Easter Garden Decor Ideas for a Charming Spring Landscape
Easter is such a perfect time to bring fresh life and meaning into your home, and an Easter garden is one of the most beautiful ways to celebrate the season. It’s simple, hands-on, and creates a lasting memory for your whole family!
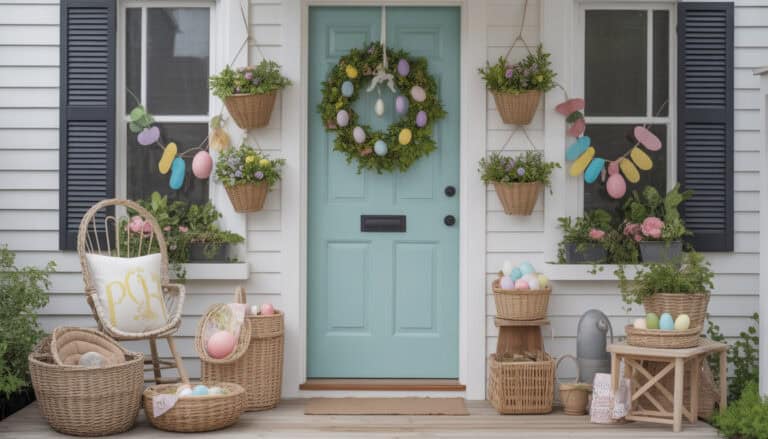
For a cohesive look from garden to porch, these spring entryway decor ideas are a great next step.
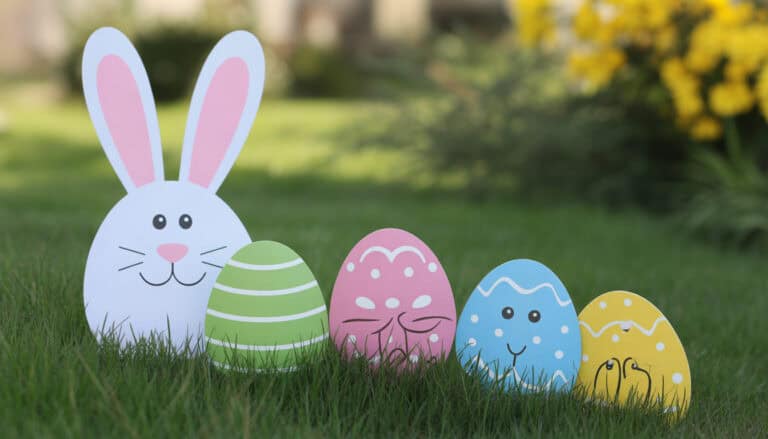
For a charming garden setup, I love adding a set of decorative garden stakes with Easter motifs to bring personality to the landscape!
Whether you’re looking for Easter garden DIY ideas or resurrection garden inspiration, you’ll find everything you need right here.
What Is a Resurrection Garden and Why Your Family Needs One
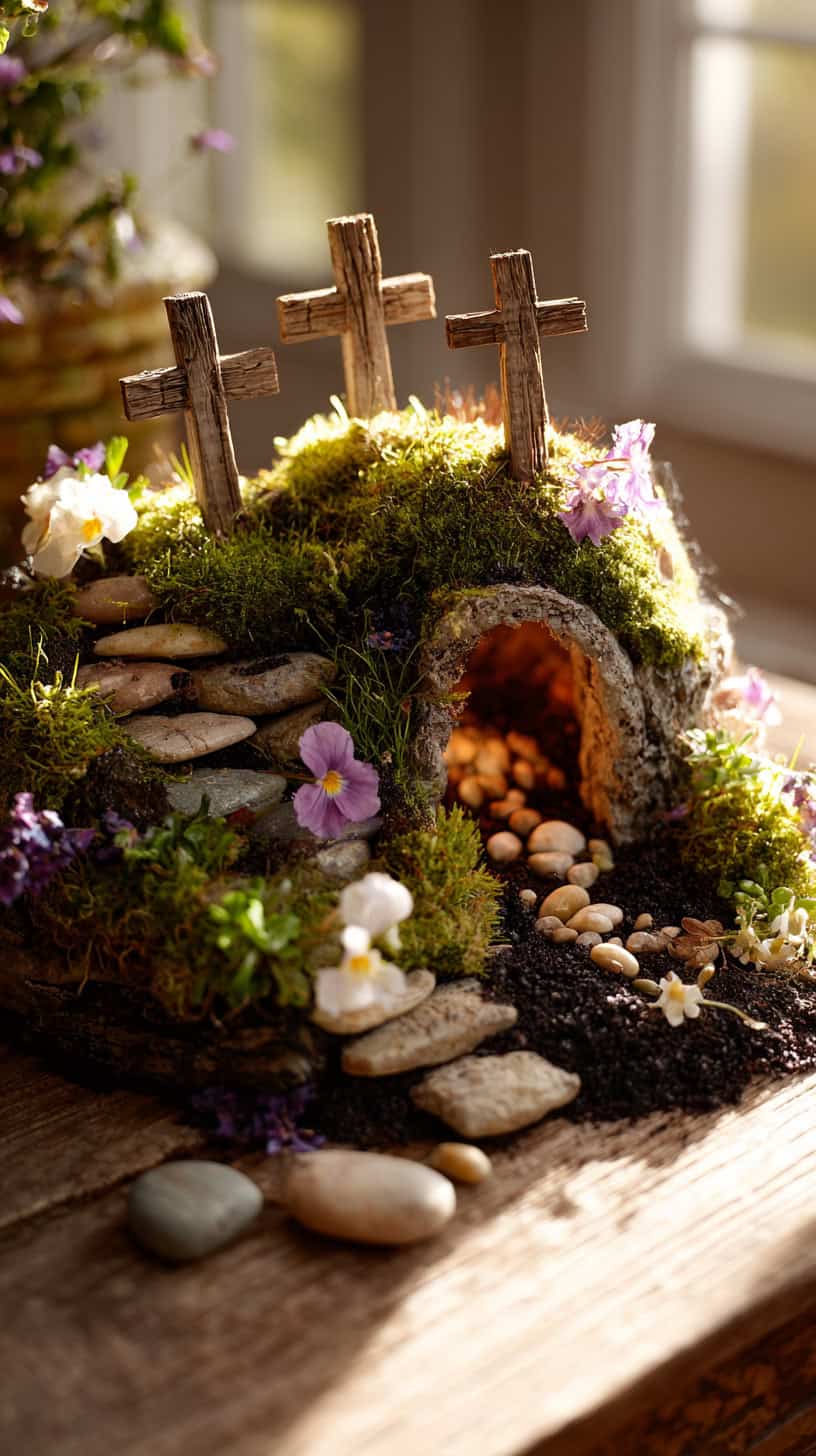
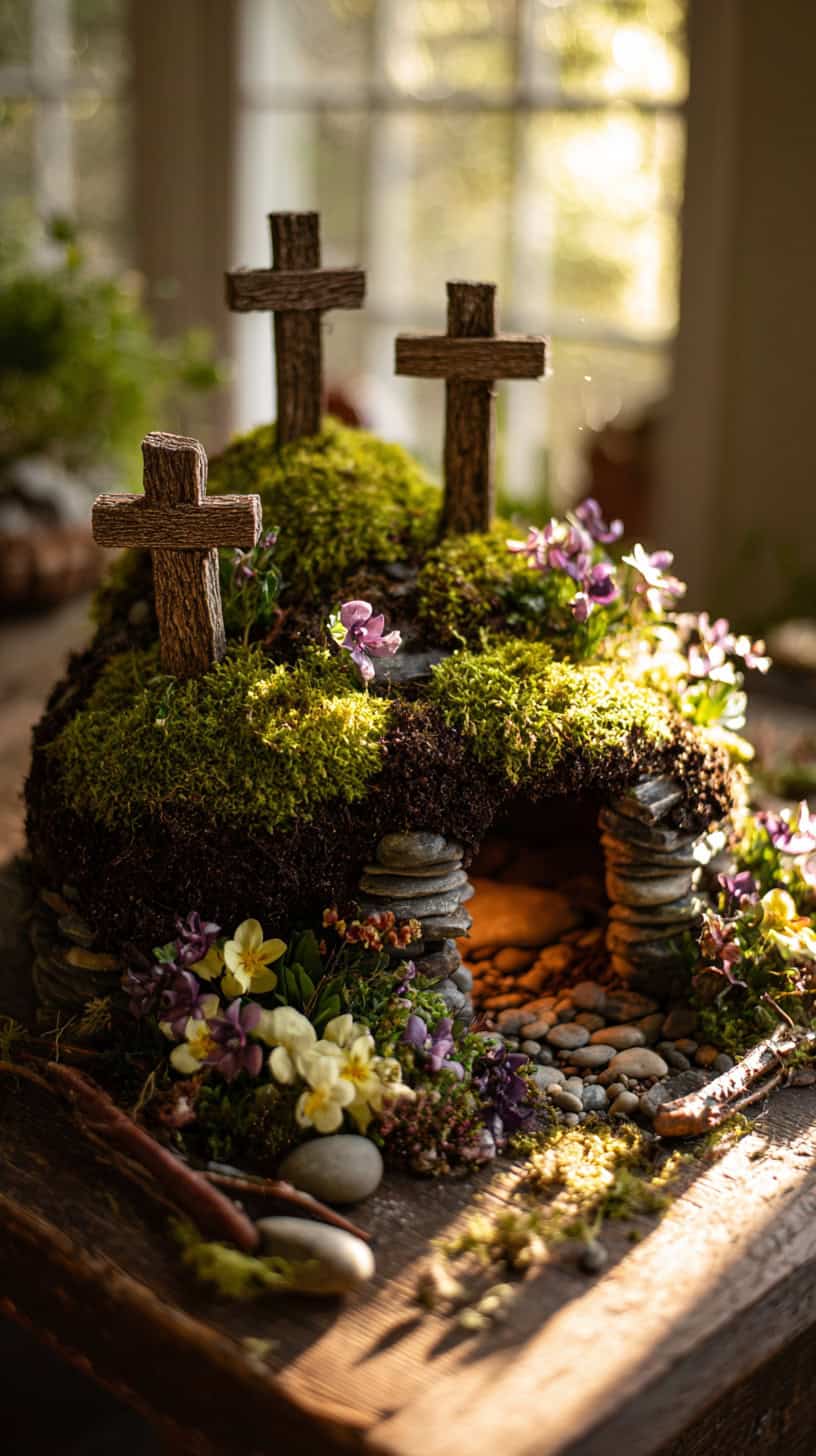

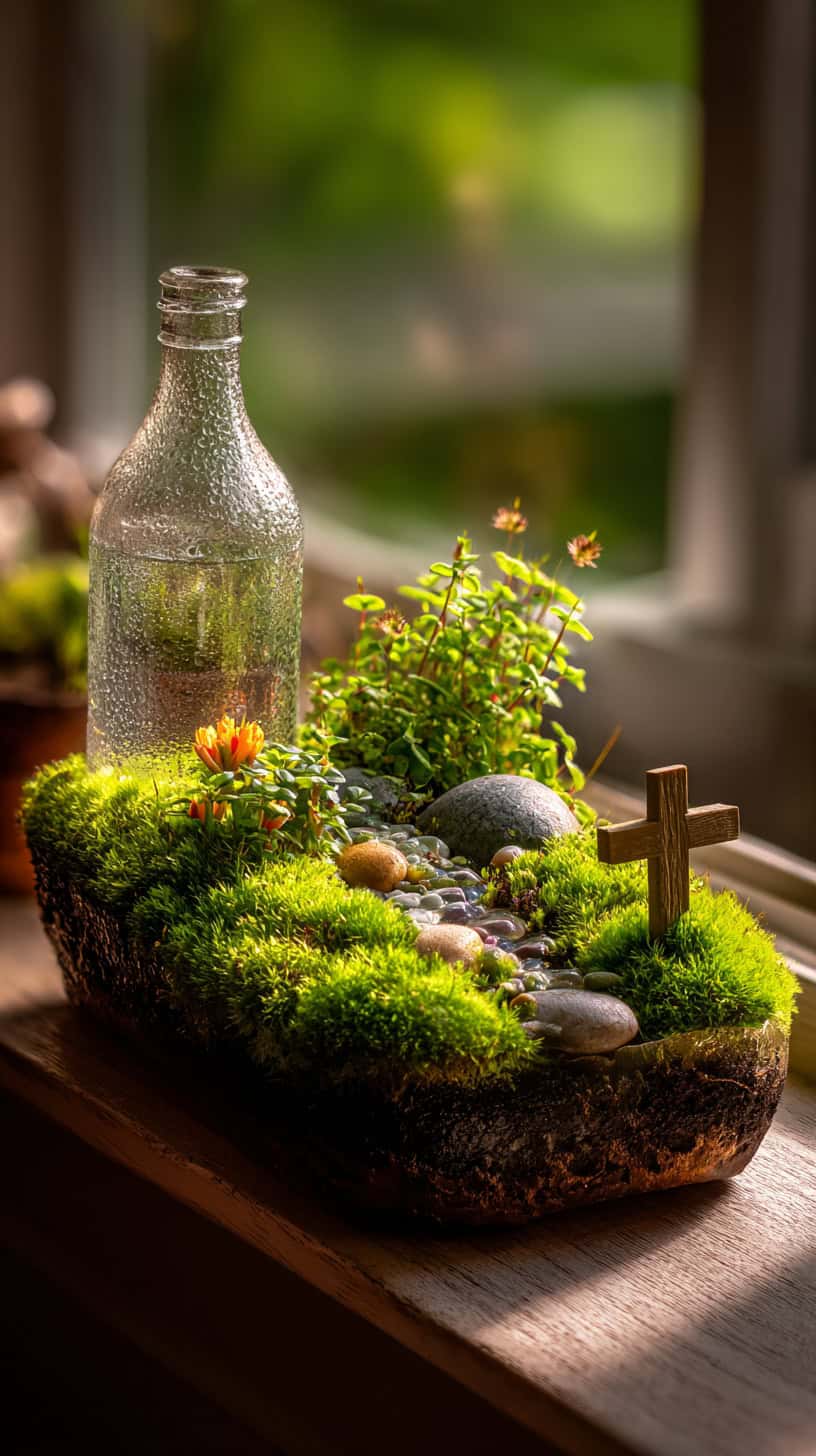
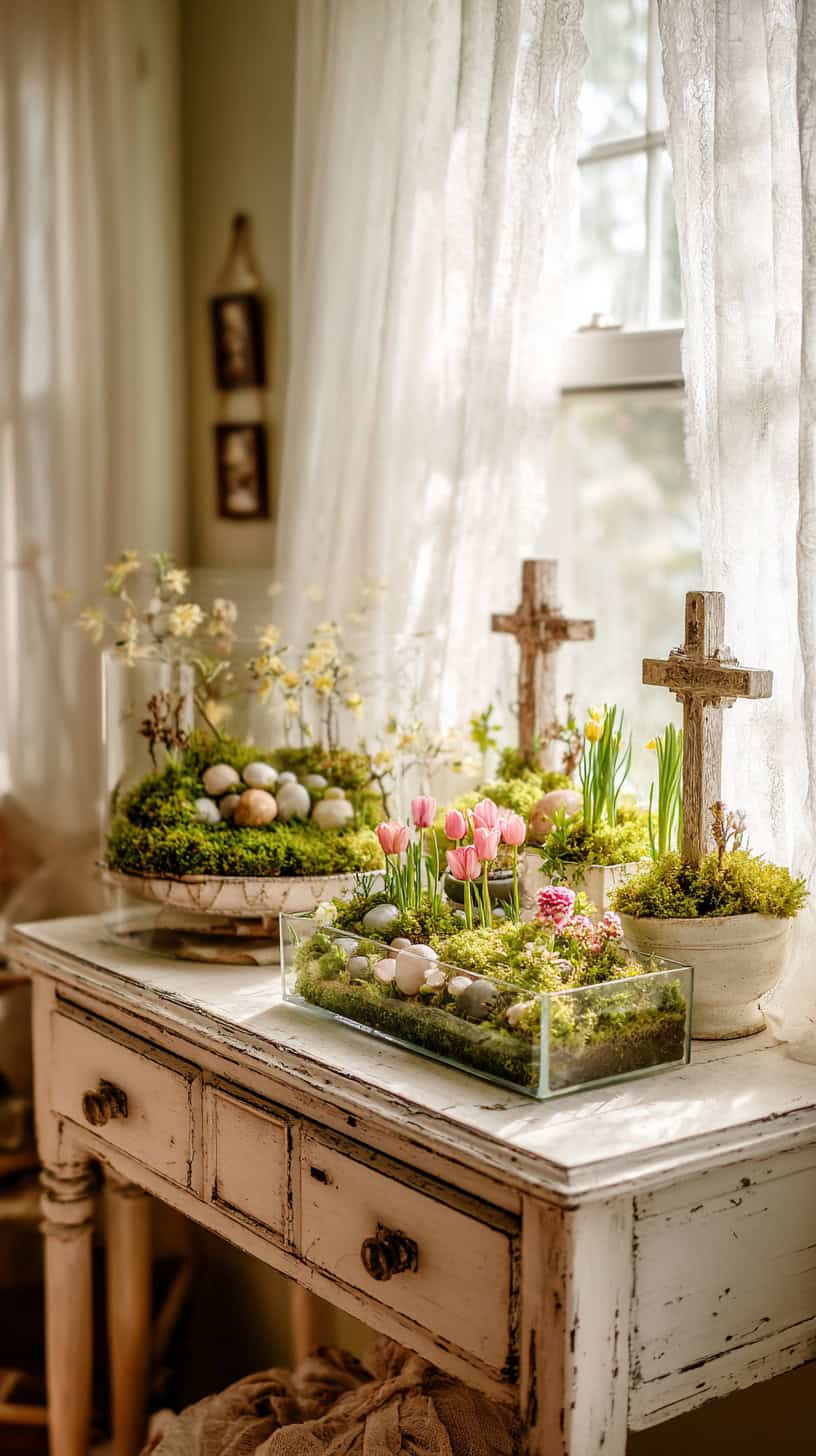
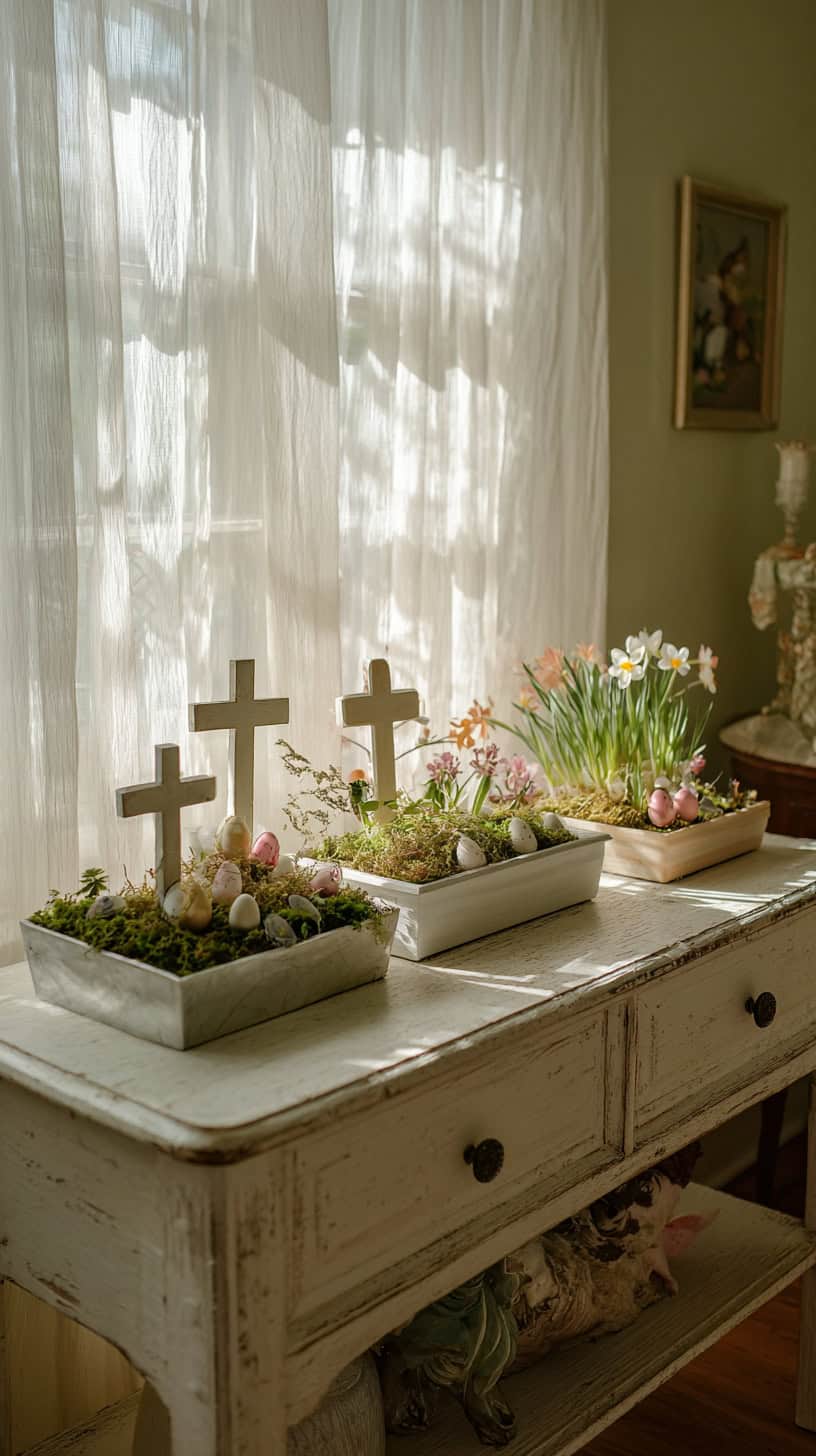
A resurrection garden is a miniature landscape that tells the story of Easter morning. It typically features three crosses, an empty tomb, and natural elements like rocks, moss, and flowers. This isn’t just Easter home decor; it’s a tangible way to share the Easter story with your children in a way they can see and touch.
I love how a resurrection garden for kids makes the biblical story come alive. Instead of just hearing about the empty tomb, children can actually look inside a small cave and see for themselves. It creates those quiet teaching moments that stick with them far longer than any lesson from a book.
The beauty of creating a resurrection garden DIY is that it becomes a family project. Everyone gets involved, from gathering rocks and sticks to arranging the flowers. My boys always remember where we found certain stones or which flowers they picked, and those memories become part of our Easter tradition year after year.
Beyond the spiritual significance, these gardens are absolutely charming. They bring Easter spring decorations right into your home in the most natural, lovely way. You can place your garden on a porch, in your entryway, or even as a centerpiece on your dining table. It becomes a focal point that draws people in and starts meaningful conversations.
Simple Resurrection Garden Ideas for Every Skill Level

The wonderful thing about Easter garden ideas is that they work for everyone, no matter your crafting experience. You don’t need to be a master gardener or a craft expert. Some of the most beautiful resurrection gardens are also the simplest ones.
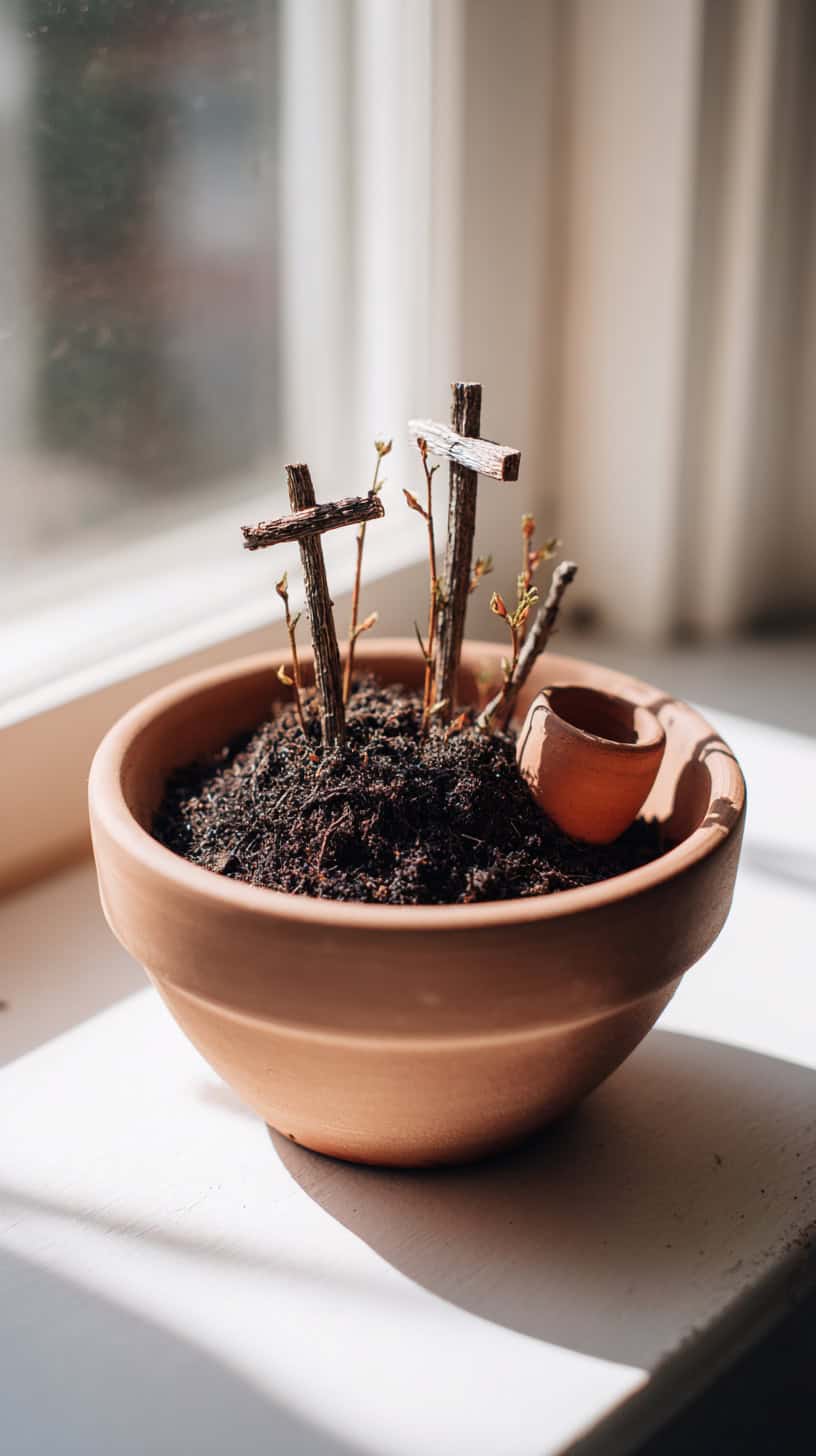
For beginners, start with a basic shallow container like a terra cotta saucer or even a pie pan. Fill it with potting soil, add three small cross sticks, and place a small overturned clay pot with the opening facing forward to create the tomb. Tuck in some moss around the edges and maybe a few small flowers, and you’re done. Seriously, it’s that simple.
If you want something a bit more elaborate, try a layered garden in a larger planter. Create a small hill using soil and rocks, carve out a cave-like opening for the tomb, and add a pathway of small pebbles leading to it. Plant wheat grass or rye grass a week before Easter so it grows into a lush green carpet. Add miniature flowers like violas or alyssum for pops of color.
For those who love a natural look, gather everything from your own backyard. Collect interesting stones, find fallen branches for crosses, dig up a bit of moss from a shady spot, and cut fresh spring flowers. This approach costs nothing and feels incredibly authentic. Plus, the outdoor scavenger hunt becomes part of the fun for kids.
Another simple idea is a tabletop version in a wooden box or basket. Line it with plastic, add soil, and keep everything miniature and contained. This works beautifully for smaller spaces and makes a stunning Easter porch decor piece that won’t take up too much room.
Easter Garden DIY: Materials You Probably Already Have at Home

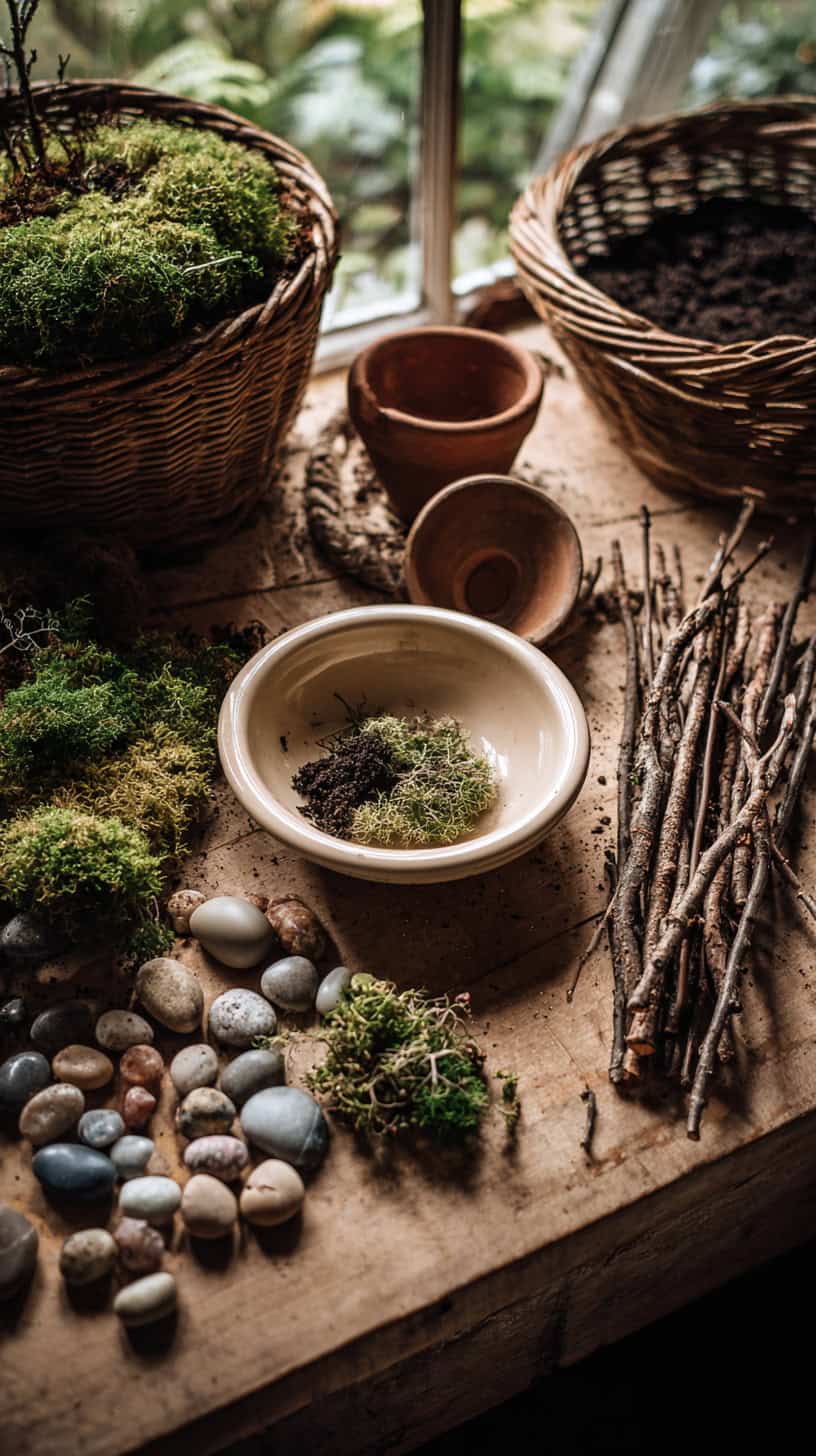
One of my favorite things about Easter DIY crafts is how little you actually need to buy. Most resurrection garden materials are things you already have lying around or can find for free in your yard.
Here’s what you’ll need for a basic Easter garden DIY project:
- A shallow container (pie pan, plant saucer, wooden box, or basket)
- Potting soil or dirt from your yard
- Three small sticks or twigs for crosses
- A small clay pot, rock, or piece of bark for the tomb
- Moss, grass, or small plants
- Pebbles or small stones for pathways
- Fresh or artificial flowers
- Optional: twine, small figurines, or a piece of fabric
That’s honestly it. You might already have every single thing on this list. The sticks can come from your yard after trimming bushes. The container could be an old planter you’re not using. The stones might be sitting in your driveway or garden bed.
If you want to add a few special touches, consider picking up a small bag of decorative moss from the craft store or some miniature spring flowers from the garden center. But even these aren’t necessary. I’ve seen absolutely beautiful resurrection gardens made entirely from foraged materials that cost nothing at all.
For the crosses, you can use small twigs tied together with twine or even hot glue if you want them extra secure. Popsicle sticks work too, though natural sticks look more authentic. The tomb can be as simple as a rock with a hollow space underneath or a small terra cotta pot turned on its side with the drainage hole as the entrance.
Don’t overthink the materials. The meaning behind the garden matters far more than having everything picture-perfect. Simple, natural, and heartfelt always wins.
Step-by-Step Instructions to Build Your Easter Garden
Let’s walk through creating your resurrection garden together. This process is straightforward and really enjoyable, especially when you involve your kids in every step.
Step 1: Choose and prepare your container. Select a shallow dish or planter that’s at least a few inches deep. If it doesn’t have drainage holes and you’re using real plants, line the bottom with small pebbles before adding soil. This prevents root rot and keeps everything healthy.
Step 2: Add your soil. Fill your container about two-thirds full with potting soil. If you’re creating a hill or elevated area for the tomb, mound the soil higher in one section. Pat it down gently but don’t pack it too tight, especially if you’ll be planting anything.
Step 3: Create the tomb. This is the centerpiece of your resurrection garden for kids. Position a small clay pot on its side with the opening facing forward, or arrange rocks to form a cave-like structure. You can partially bury it in the soil to make it look more natural. Some people use a piece of curved bark or even a hollowed-out potato for the tomb.
Step 4: Add the crosses. Position three crosses on a small hill opposite the tomb or to the side. Push them firmly into the soil so they stand upright. You can tie the cross pieces together with twine or secure them with a tiny dab of hot glue first. Make one cross slightly larger or taller than the other two if you want to distinguish it.
Step 5: Create pathways and landscape features. Use small pebbles to make a walking path from the tomb to the crosses. Add larger rocks around the tomb entrance or scattered throughout for a natural rocky landscape. This is where kids love to get creative with placement.
Step 6: Add greenery. Tuck moss around the base of crosses, near the tomb, and in any bare spots. If you’re using live plants like small succulents or grass, plant them now. Wheat grass or rye grass seeds can be planted about a week before Easter and will sprout into a beautiful green carpet. Fresh cut flowers in small water tubes can be pushed into the soil for instant color.
Step 7: Final touches. Add any special details you want, like a small stone rolled away from the tomb entrance, a tiny piece of white fabric draped near the tomb to represent burial cloths, or even small figurines if you have them. Step back and see if anything needs adjusting.
The whole process takes maybe thirty minutes, and that’s if you’re really taking your time. It’s one of those Easter decorations ideas that looks impressive but doesn’t require hours of work.
Easter Porch and Home Decor Ideas to Complement Your Garden
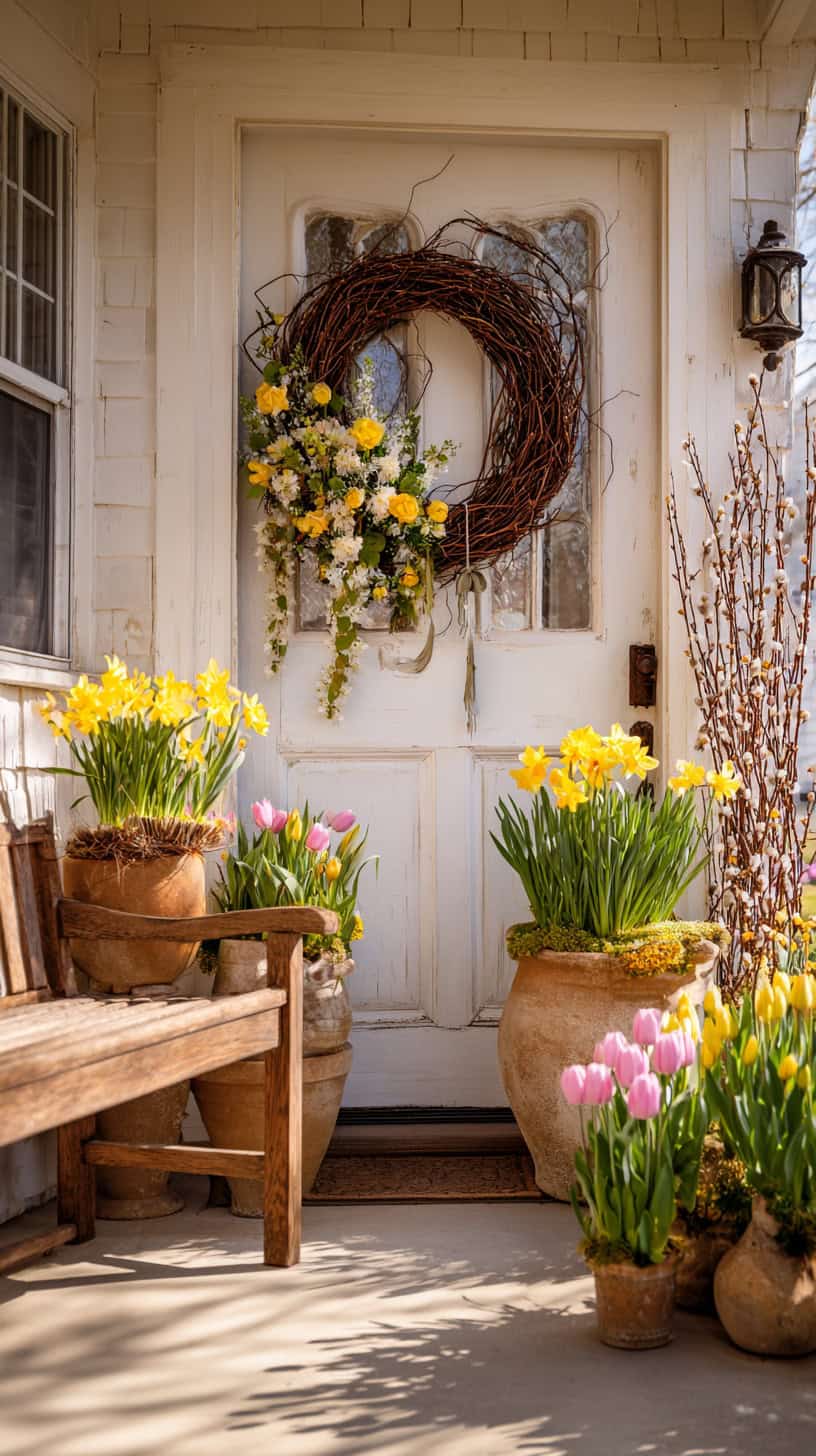
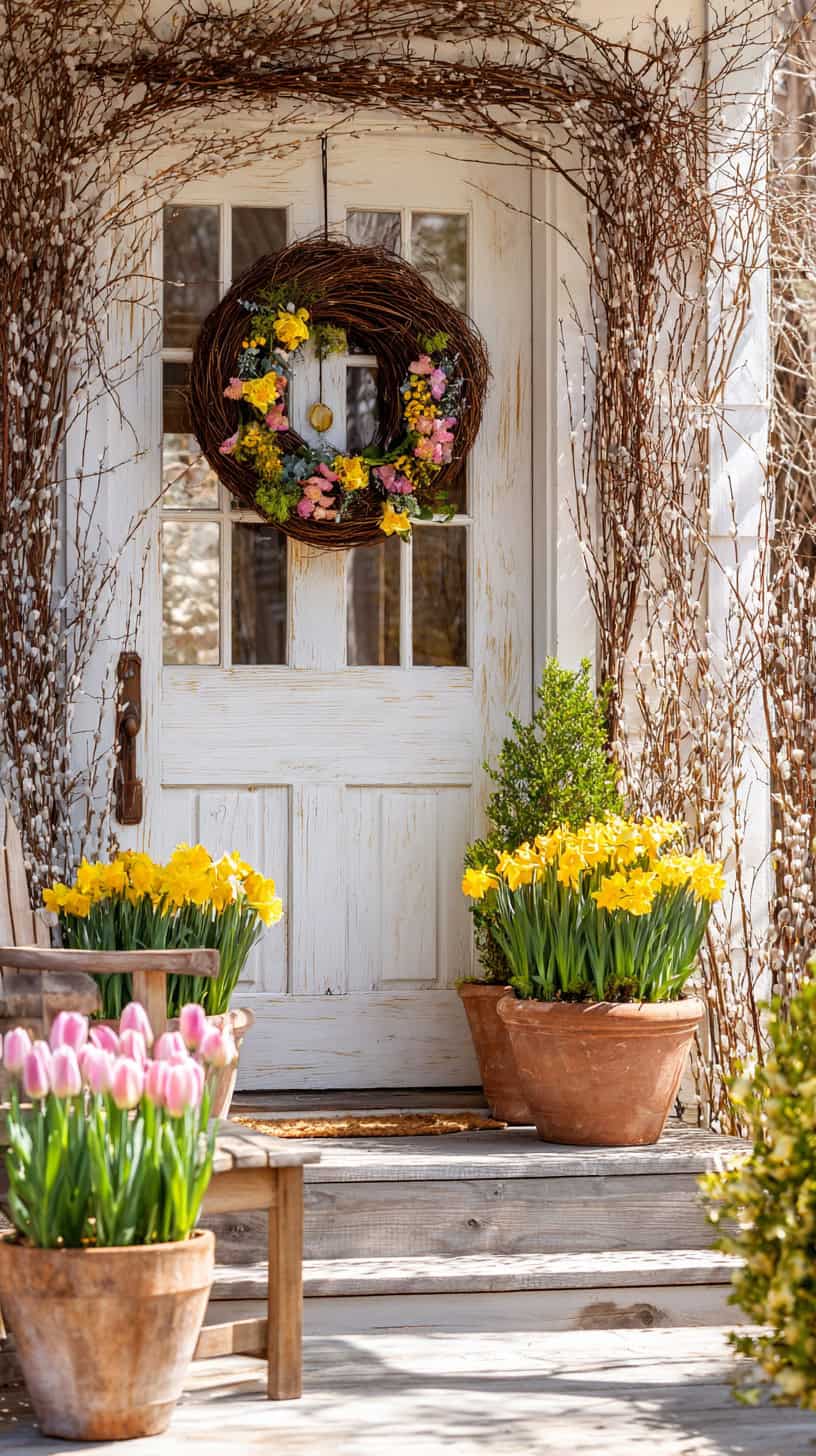
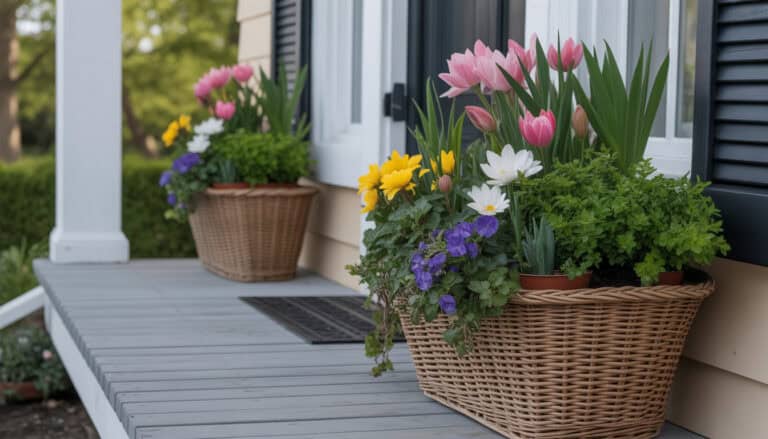
Once you’ve created your beautiful resurrection garden, you’ll probably want to extend that spring charm throughout your home. Easter porch decor and coordinating indoor touches make everything feel cohesive and welcoming.
For your porch, think natural and fresh. A simple wreath made from grapevine with tucked-in spring flowers, pussy willows, or even decorated eggs creates an immediate Easter welcome. Flank your door with potted spring bulbs like tulips, daffodils, or hyacinths. The combination of your resurrection garden on a side table with these natural elements creates a stunning entrance.
Inside, carry the garden theme through with more natural materials. Fill glass vases with branches of forsythia or pussy willows. Create small vignettes on shelves or mantels using moss, eggs, nests, and candles. The key is keeping things simple and letting the natural beauty shine through.
I love using wooden elements as part of Easter home decor. A wooden tray or cutting board makes a perfect base for displaying your Easter garden. Add a few pillar candles in natural tones, some scattered moss, and maybe a sweet bunny figurine, and you’ve got an instant centerpiece.
Don’t forget about Easter spring decorations in unexpected places. A small jar of fresh flowers on the bathroom counter, a nest with decorated eggs on a bookshelf, or even just a pretty pastel table runner brings the Easter feeling into every room. These little touches make the whole house feel special without requiring a complete decorating overhaul.
Outdoor spaces beyond the porch benefit from Easter charm too. Hang a decorative flag or banner, add some color with potted flowers along your walkway, or create a small Easter garden in your actual garden bed. The transition from indoor to outdoor decor should feel natural and connected.
Easter Craft Ideas Beyond the Garden: Quick Additions Your Boys Will Love


While your resurrection garden is the star, adding a few more Easter craft ideas keeps the creative momentum going and gives kids more hands-on activities they’ll actually enjoy.
One of the easiest Easter DIY crafts is decorating wooden crosses. Pick up some small wooden crosses from the craft store and let kids paint them, wrap them with colorful yarn, or decorate them with markers and stickers. These can be displayed around the house or even added to the resurrection garden as an extra element.
Rock painting is always a huge hit. Gather smooth stones and paint them with Easter messages, flowers, crosses, or bright spring designs. These painted rocks can line the pathway in your garden, be hidden around the yard for an Easter rock hunt, or given as small gifts to friends and neighbors.
Creating resurrection rolls is both a craft and a treat. Wrap a marshmallow in crescent roll dough, bake it, and when you open the roll, the marshmallow has disappeared, leaving an empty tomb. Kids love the surprise, and it reinforces the Easter story in a delicious way.
For boys who love building, try making crosses from Lego bricks or wooden blocks. This combines their natural play interests with the Easter theme. They can create different sizes, colors, and designs, then display them on a shelf or incorporate them into imaginative play.
Simple paper crafts work wonderfully too. Fold and cut paper flowers to add to your garden, create a paper chain countdown to Easter, or make bookmarks decorated with crosses and spring themes. These quiet activities are perfect for rainy afternoons when outdoor play isn’t an option.
Don’t overlook nature crafts. Press flowers between heavy books, then use them to create Easter cards or bookmarks. Collect interesting leaves and create leaf rubbings with crayons. Build fairy houses or small nature scenes in the backyard using only natural materials. These activities connect kids to creation and the beauty of spring.
Keep It Growing: Care Tips to Make Your Easter Garden Last

You’ve put love and effort into creating your Easter garden, so naturally you want it to last beyond just Easter Sunday. With a few simple care steps, your garden can remain beautiful for weeks or even become a permanent fixture you enjoy all spring.
If you’ve used live plants or moss, watering is essential but requires a light touch. Mist the moss and soil surface gently with a spray bottle every couple of days. You want everything damp but never soggy. Overwatering is the fastest way to turn your beautiful creation into a muddy mess. Feel the soil with your finger; if the top half-inch is dry, it’s time for a light watering.
Placement matters for longevity. Keep your Easter garden in a spot with indirect sunlight if it contains living plants. Direct sun can dry everything out too quickly and may cause delicate flowers to wilt. A covered porch, an east-facing windowsill, or a spot near a bright window works perfectly.
For fresh cut flowers, replace them as they fade. Trim stems at an angle and place them in small water tubes or floral picks pushed into the soil. This keeps water directly at the stems and extends their life. Swap out wilted blooms with fresh ones from your yard or a grocery store bouquet.
If you’ve planted grass seed, keep the soil consistently moist until it germinates and grows. Once established, trim it with scissors to keep it neat and tidy. That fresh green grass makes such a difference in how vibrant the whole garden looks.
Watch for any mold or decay, especially if you’re keeping the garden indoors. Good air circulation helps prevent problems. If you notice anything getting too damp or starting to smell musty, move the garden to a better-ventilated spot and let it dry out slightly between waterings.
For gardens you want to keep long-term, consider replacing perishable elements with more permanent ones as needed. Swap fresh flowers for high-quality silk flowers, replace real moss with preserved moss, or transition to succulent plants that require minimal care. This way, your garden evolves but doesn’t completely disappear.
Make It a Tradition: Reasons to Create an Easter Garden Every Year
Creating an Easter garden once is lovely, but making it an annual tradition transforms it into something truly special for your family. There’s something powerful about repeating meaningful activities year after year.
First, it creates anticipation and excitement. When kids know that making the Easter garden is part of what your family does, they look forward to it. They remember it from last year and can’t wait to do it again. That eager anticipation is what childhood memories are made of.
Each year brings new understanding. A three-year-old experiences the resurrection garden very differently than a six-year-old or a ten-year-old. As children grow, they grasp more of the significance, ask deeper questions, and contribute more meaningfully to the creation process. The same activity becomes richer and more layered over time.
Annual traditions also provide touchstones in our busy lives. Life changes constantly, but some things remain the same. That familiar rhythm of gathering materials, building together, and displaying your creation grounds families in something stable and comforting. It’s a reminder that some things don’t change, and that’s beautiful.
You’ll also notice how your gardens evolve. One year might be simple and rustic. Another year someone might want to add special details or try a different container. Looking back at photos of past gardens becomes a sweet way to see how your family has grown and changed while maintaining this consistent thread.
Making it a tradition teaches children about stewardship of celebrations. They learn that holidays aren’t just about what you receive but about what you create and the meaning you invest in traditions. They see that simple, handmade things often matter more than expensive decorations.
Finally, this tradition naturally opens conversations about faith and the Easter story. It’s not forced or preachy; it’s organic. As you place the empty tomb or position the crosses, you talk about what they represent. Questions arise naturally, and teaching moments happen while your hands are busy creating together.
Your Easter garden tradition doesn’t have to be complicated or time-consuming. Even fifteen minutes together creating something meaningful can become the highlight of your Easter celebration. Start this year, keep it simple, and see where the tradition takes you. I promise you won’t regret it, and years from now, your children will remember making Easter gardens with you as one of their favorite parts of spring.
This post may contain affiliate links. Read the full disclosure here.