New Years Nail Designs That Shine Into Midnight
I’m a mom of three busy boys, so my nails need to survive bath time, bedtime stories, and the ball drop. I want cute, fast, and budget-smart, without spending all night on them. Tonight is about shine and staying power, not fuss. I’m sharing new years nail designs that look great in real life and in photos.
Here’s what you’ll get from me. Quick at-home looks you can finish before teeth brushing. Smart salon ideas to request, so you get exactly what you want. Simple prep for chip-resistant wear that lasts past midnight. Easy ways to match nails with outfits and family photos, without overthinking it. I’ll keep it short, clear, and totally doable. If you need sparkle, I’ve got you. If you need calm neutral, I’ve got that too. Let’s make New Year’s nails fun and stress free!

2026 New Year’s Eve nail trends that sparkle under party lights
I want sparkle that survives snacks, midnight hugs, and sleepy toddlers on the couch. These 2026 picks look bright in low light, and they photograph beautifully. If you want new years nail designs you can trust, these are my go-tos for shine without the hassle.
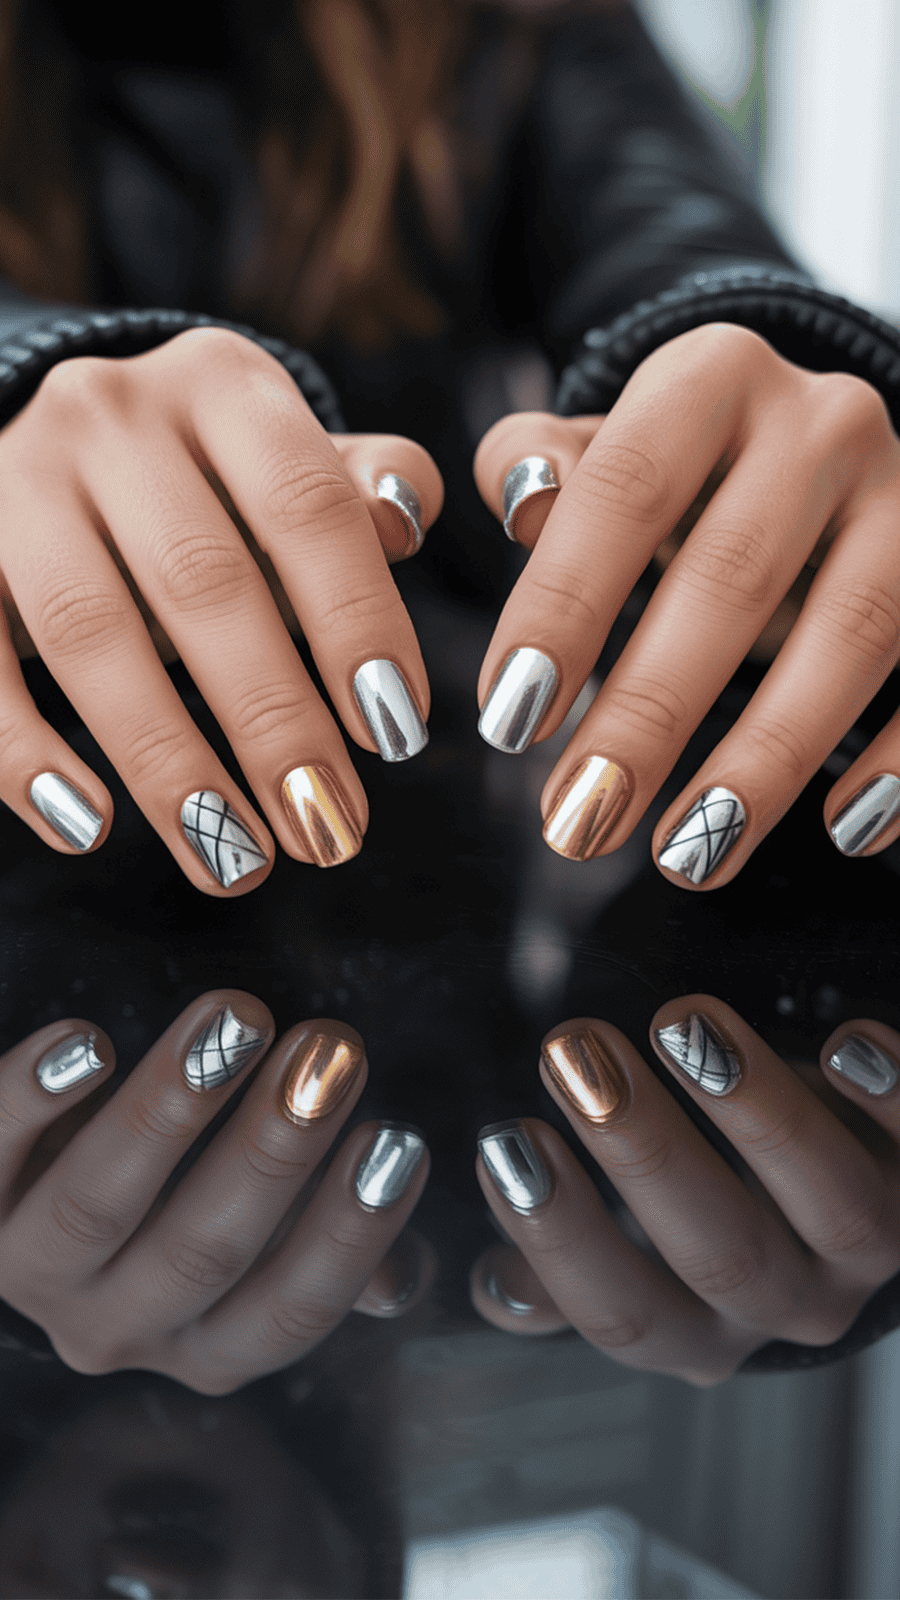
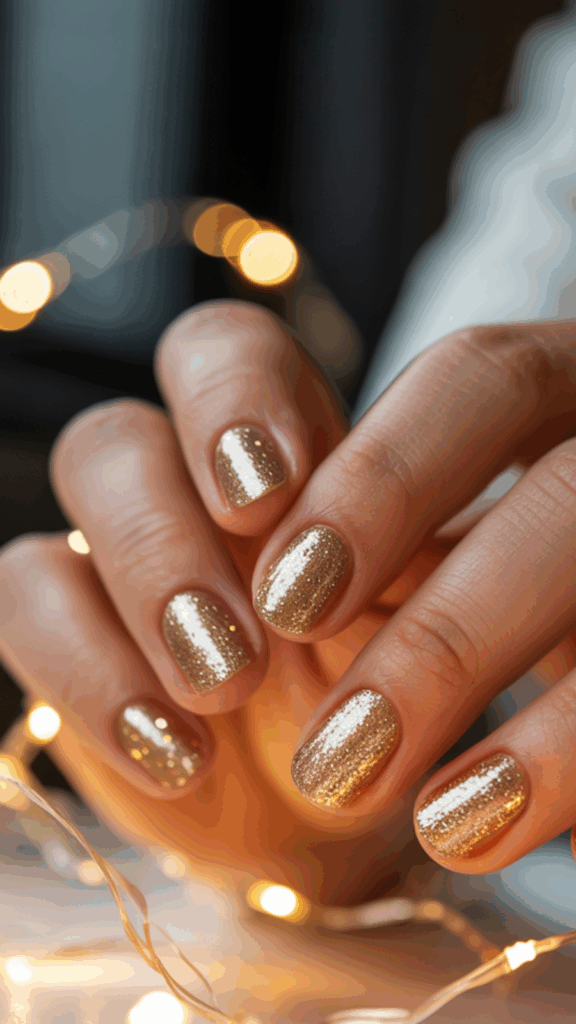
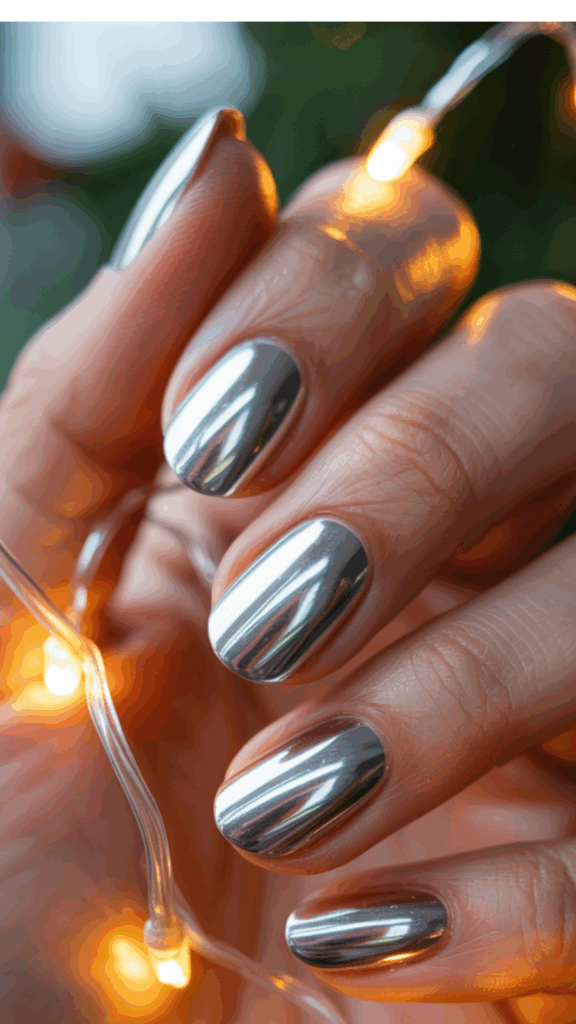
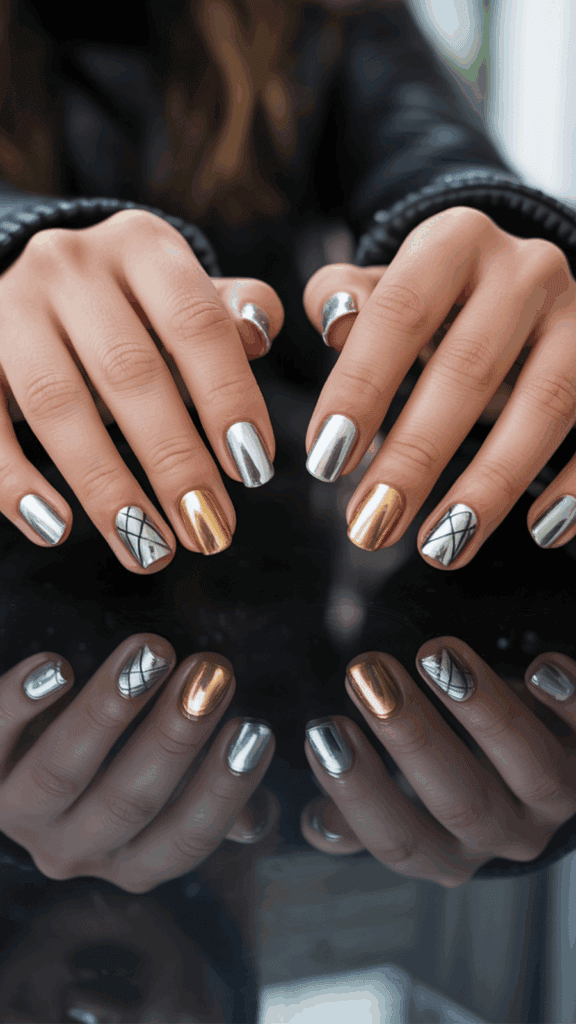
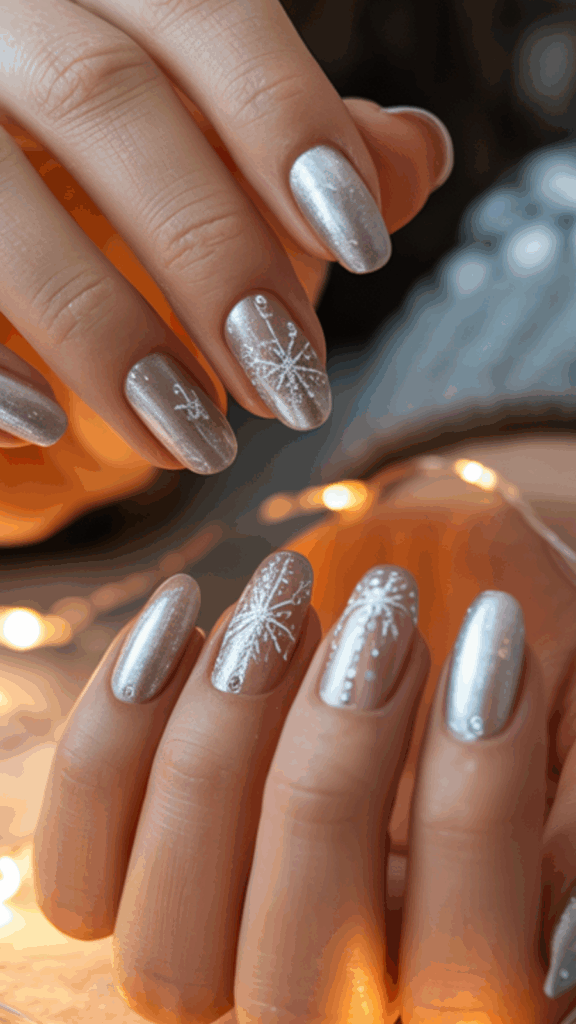
Chrome, cat-eye, and velvet finishes that glow at midnight

Chrome shines because ultra-fine metallic pigments create a mirror effect. Party lights bounce right off the surface, so your nails flash with every move. Magnetic cat-eye polishes have tiny iron particles that line up when you use a magnet, which creates that glowing stripe that shifts as you wave. It looks like a little comet on each nail, and my kids think it is magic.
Velvet or suede nails give a plush look without bulk. The effect comes from shimmer particles that catch light in a soft way, or from a matte top coat over a pearly base. You get that cozy, touchable vibe, but your nails stay smooth, snag-free, and easy to wash.
Short nails can shine too. I wear mine short most weeks, and these finishes still pop. If you want easy matching with jewelry and outfits, try:
- Silver for cool sparkle that plays nice with black and denim.
- Champagne for a soft glow that suits creams and whites.
- Rose gold for a warm blush that flatters every skin tone.
- Gunmetal for a moody, modern twist that still feels dressy.
Pro tip, keep shapes simple. A soft square or rounded tip lets the finish do the talking.
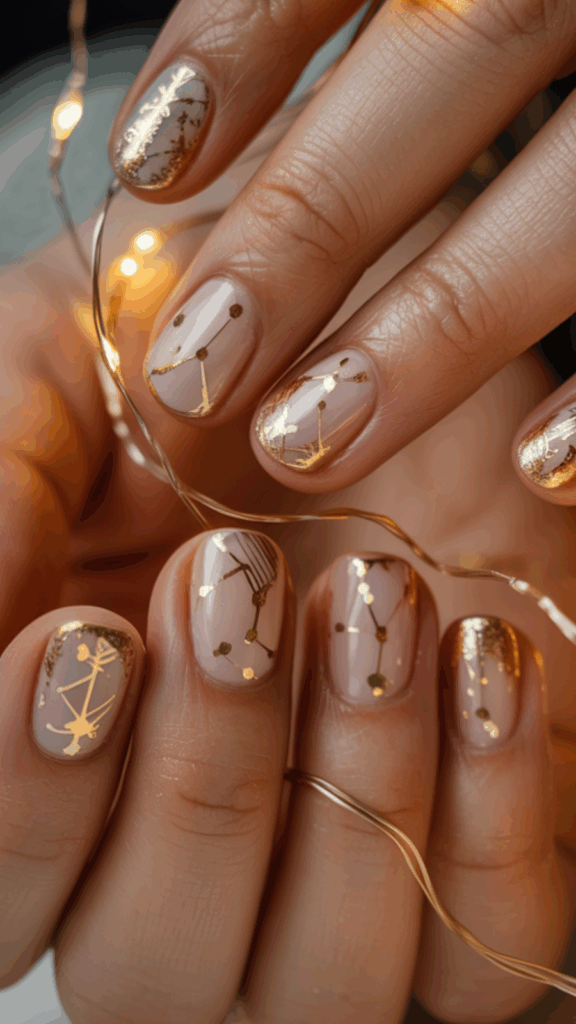
Celestial stars and moon accents for the countdown
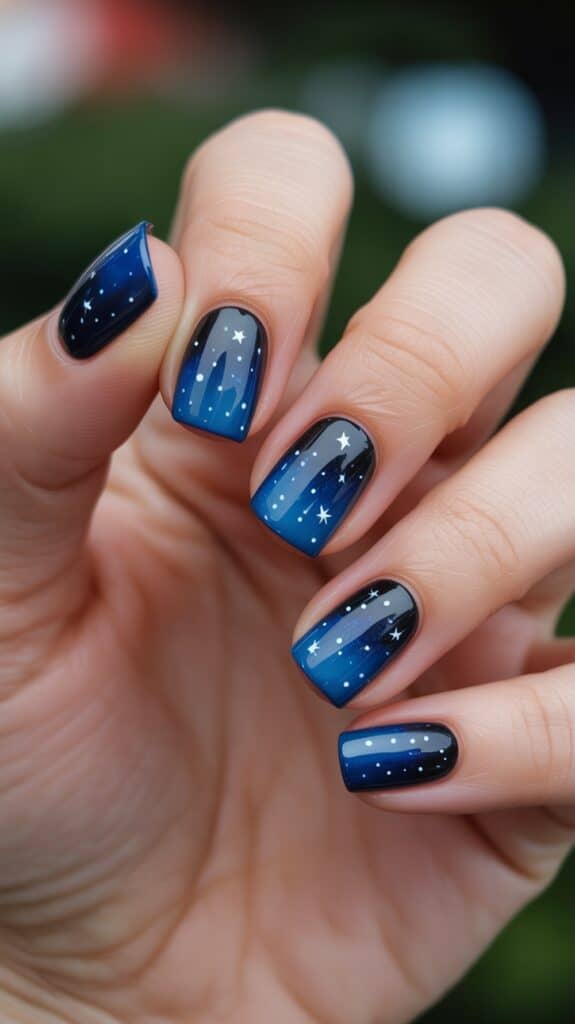
Stars and moons feel perfect for midnight. I like stickers or stamping because they are fast, flat, and kid-safe. No sharp charms, no snagging on sweaters, no drama when you are buckling car seats.
Here is how I do it at home:
- Paint your base and let it dry.
- Add star or moon stickers, or stamp a tiny constellation.
- Seal with a glossy top coat, two thin layers for a smooth finish.
I keep it clean with one or two accent nails. For example, add a silver star cluster on the ring finger, then a tiny moon near the cuticle on the thumb. Done. Pretty, simple, and looks intentional. If you want extra polish, choose accents that match your jewelry, like a gold moon with gold hoops, or silver stars with a silver clutch.
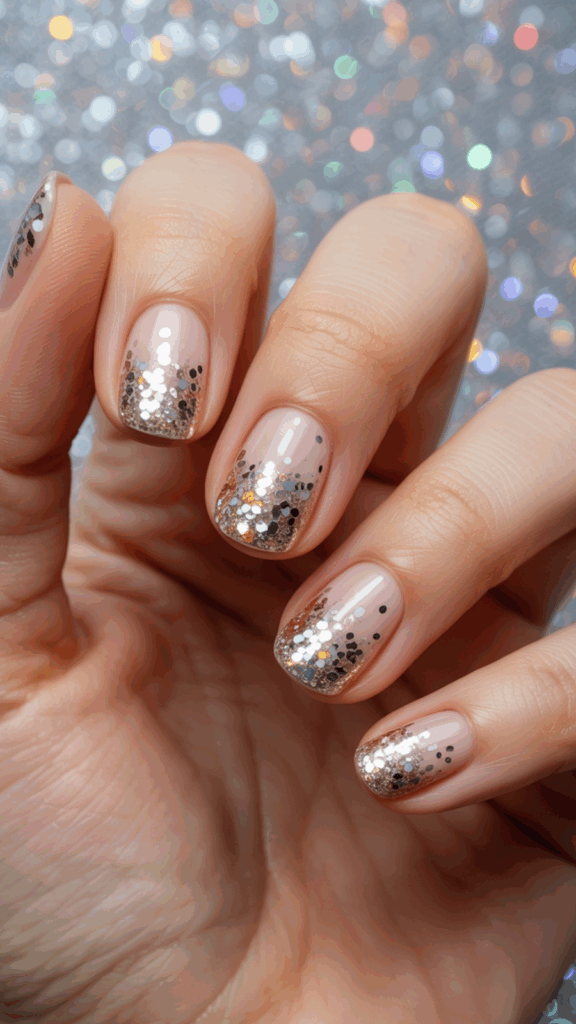
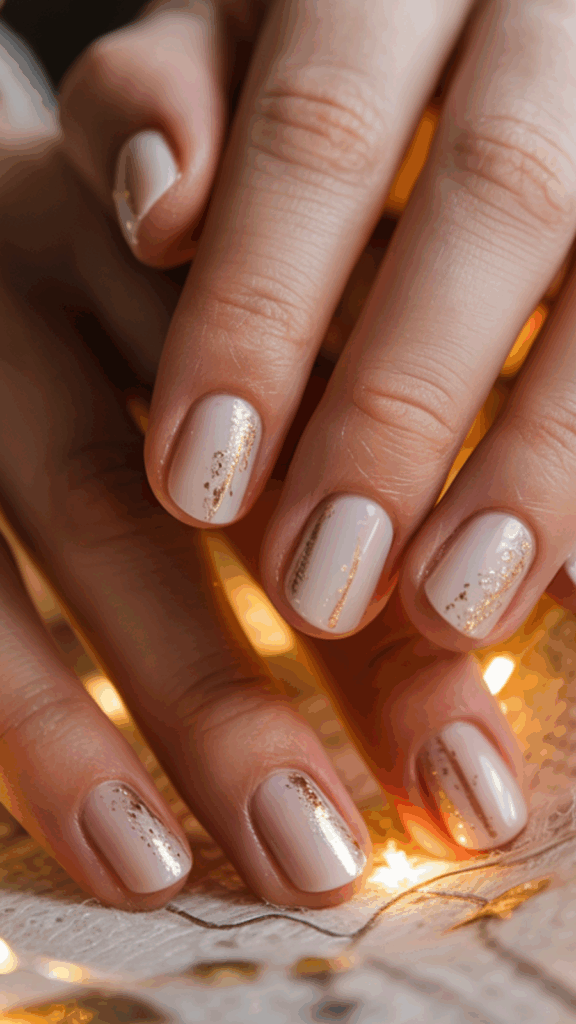
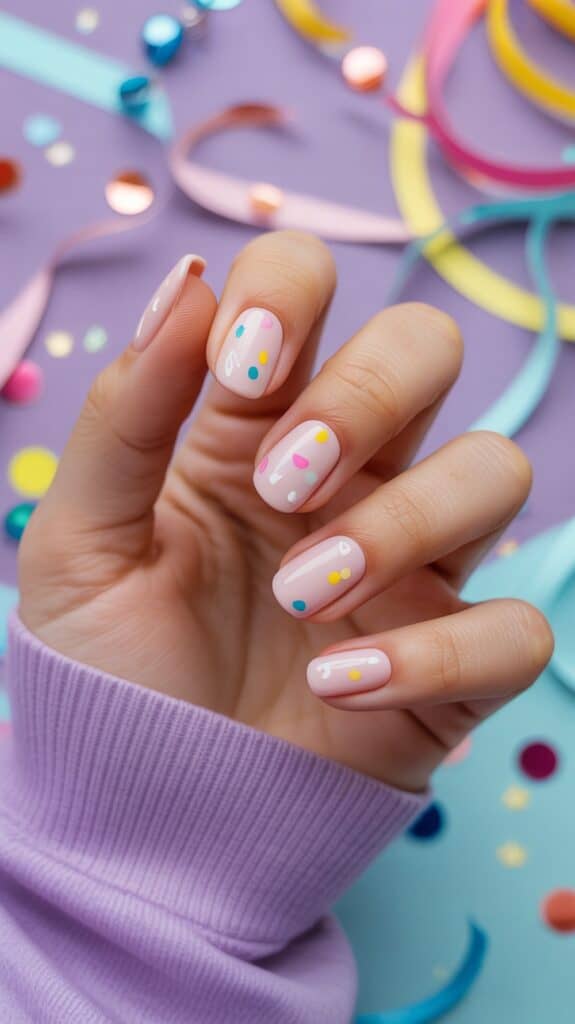
Confetti French and micro sparkle for minimalists
When I am pressed for time, I go minimalist with a party twist. A micro glitter French gives that confetti feel without full glitter nails. Paint a thin, sparkly tip, then cap the free edge with top coat for wear. It reads tidy in person and pops in photos.
Another favorite is a thin sparkle line near the cuticle. It is like a necklace for your nails. Use a striping brush and a fine glitter polish, then top coat. Both looks are perfect for short nails and busy nights.
For the base, I keep it neutral:
- Sheer pink for a clean, healthy look.
- Milky beige for a soft, chic finish.
- Translucent nude for a barely-there glow.
If you want a tiny upgrade, place one micro star at the corner of a French tip. It feels festive, not fussy.
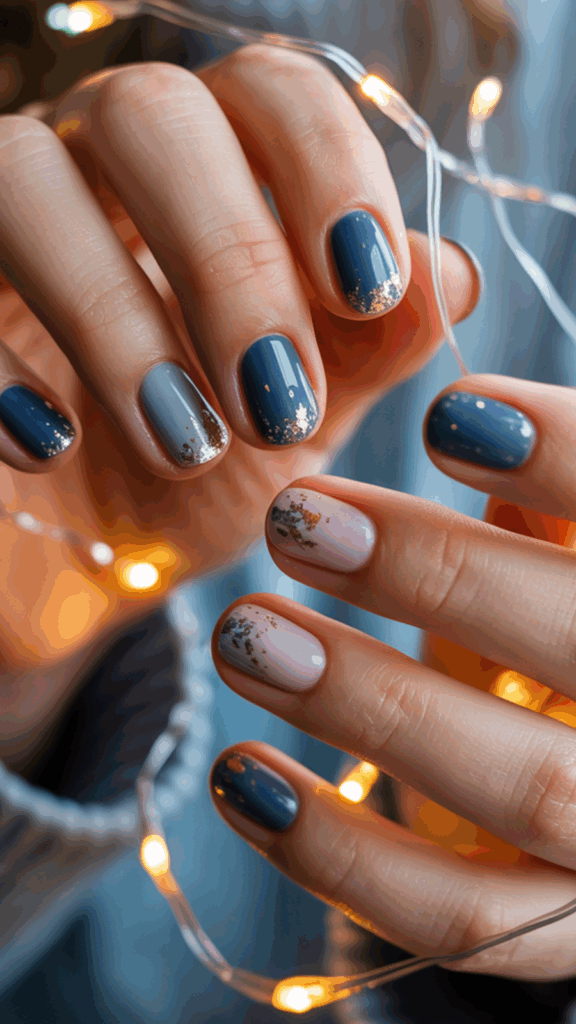
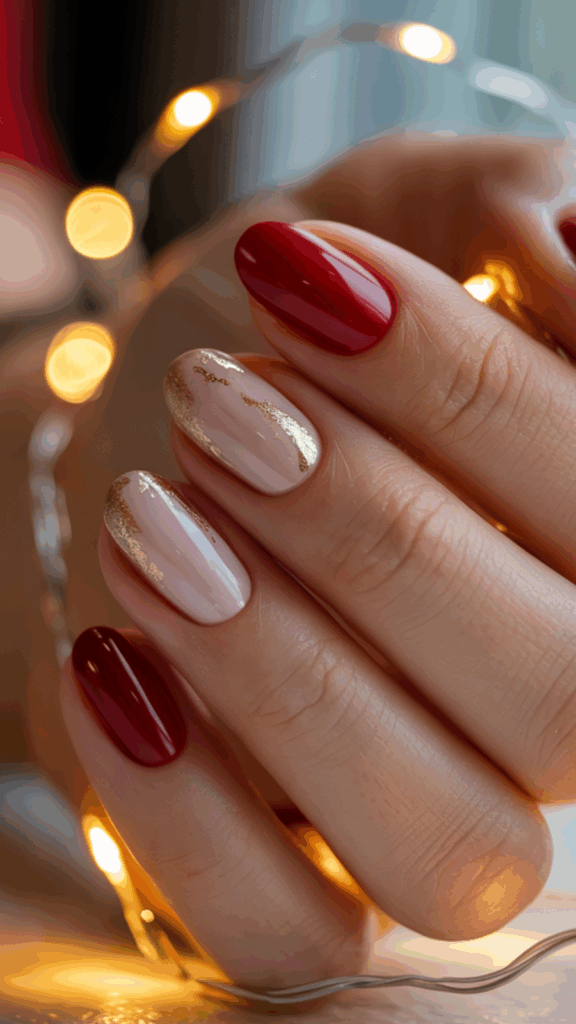
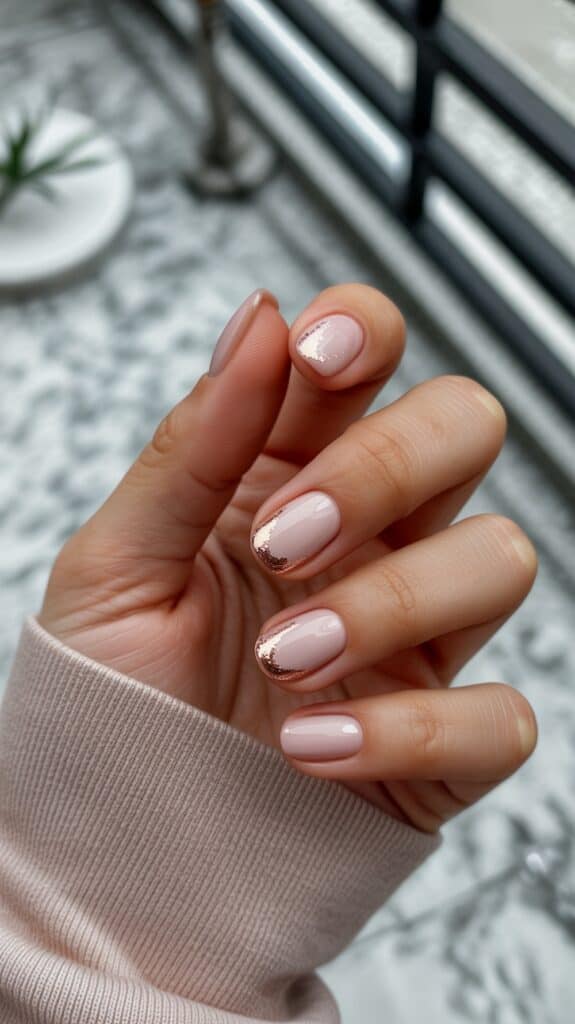
Bold party colors that still feel classy
I love color that reads bold but still pairs with everyday outfits. These combos never fail at my house, even when party plans shift mid-day.
- Black with silver: Glossy black nails with a silver accent finger. Add a silver cat-eye on the ring finger to tie in jewelry.
- Champagne with white: Champagne shimmer on all nails, white micro French tip on two nails. Fresh and calm, perfect for family photos.
- Icy blue with denim: Pale blue base, silver glitter cuticle line on one nail per hand. Cute with jeans and a cozy sweater.
- Emerald with cream: Deep green nails, one soft gold accent. Looks luxe with cream knits.
- Ruby with black: Rich red on most nails, one chrome or foil accent in gold or rose gold. Instant party energy.
To pull it all together, mix one metallic accent. A chrome tip, a gold foil stripe, or a silver cat-eye ring finger. Keep the rest solid so it looks polished, not busy. If you are juggling snacks and bedtime, paint the solid color first, then add the metallic accent if time allows. If the baby cries, you still look finished!
10-minute at‑home designs I can do before bedtime stories
When the boys are hunting for pajamas and we are racing through teeth brushing, I still want quick sparkle that lasts. These are my go-to, fast fixes that dry fast, look polished, and survive cuddles on the couch. I keep tools simple, costs low, and clean up easy. If you need simple new years nail designs you can pull off before lights out, try these with me!
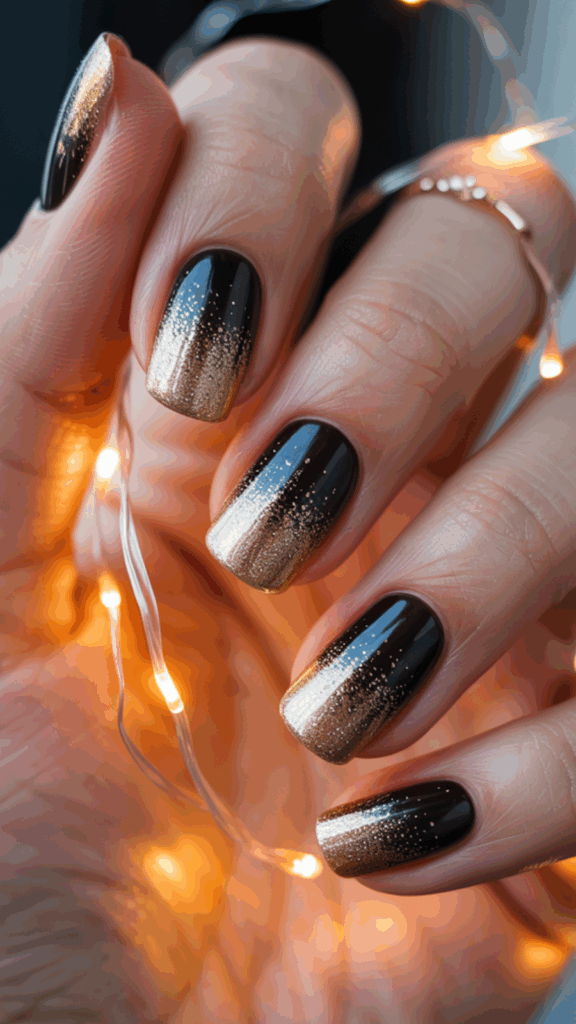
5-minute glitter gradient with a makeup sponge
This one looks fancy, but it is so fast. A soft fade hides tiny chips and grows out nicely, which I love on busy weeks.
- Prep nails with a quick file and swipe of alcohol, then a thin base coat.
- Lay a sheer base color. I like milky pink or beige.
- Dab fine glitter polish on a makeup sponge. Press from the tip down halfway, tapping lightly for a fade.
- Add a second dab near the tip for extra sparkle.
- Seal with a glossy top coat and cap the free edge.
Tips that make it last:
- Use fine glitter for a smooth surface and easy removal.
- Keep layers thin so dry time stays short.
- This looks great on short nails, and the gradient makes them look longer.
Color ideas I reach for:
- Silver glitter over sheer pink for a snow-globe vibe.
- Champagne glitter over milky beige for a soft glow.
- Rose gold glitter over a blush base for warmth.
Confetti French tips with a bobby pin
When I want a playful twist, I do confetti tips. A bobby pin is my secret dotting tool, and it works like a charm!
- Paint a sheer nude or pink base. Let it dry for a minute.
- Dip a bobby pin tip into glitter polish.
- Dot a curved smile line across the tip, keeping dots small and even.
- Add a second color, like silver over gold, for depth.
- Finish with a glossy top coat. Keep the tip line thin for better wear.
Smart tweaks:
- Keep tips thin so they resist lifting and chipping.
- Use two similar tones, like champagne and silver, to keep it chic.
- Cap the edge with top coat for extra strength, especially on short nails.
Favorite combos:
- Gold and silver for a party confetti look.
- Rose gold and blush glitter for something soft.
- Icy blue and silver for a cool winter finish.
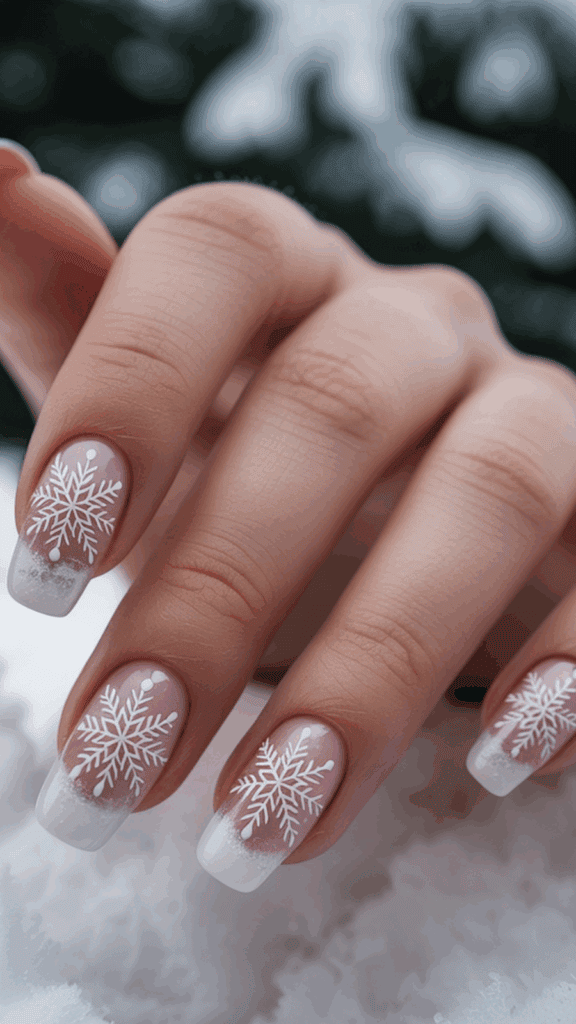
Starry accent nail using stickers
Stickers save me when bedtime runs late. One bold accent nail gives instant style without fuss or dry-time drama.
- Paint one nail in a dark shade. I like black, navy, or deep plum.
- Let it set for a minute, then place star stickers. Press them flat with a clean fingertip.
- Avoid sticker edges near the nail’s sides, so they do not lift.
- Top coat twice for a smooth, sealed finish.
- Keep the other nails sheer or milky for a chic mix.
Fast styling notes:
- Two top coats make stickers feel flush and glossy.
- If a point lifts, press it down with a dab of top coat, then seal again.
- Repeat the accent on both ring fingers to balance photos.
Color and sticker pairings I love:
- Navy base with silver stars, sheer pink on the rest.
- Black base with gold stars, milky beige on the rest.
- Deep green base with champagne stars, soft white on the rest.
Glazed chrome topper without a lamp
No lamp, no powders, no stress. A pearly topper gives that glazed donut shine in minutes, and it works over almost any base.
- Paint your base shade. Soft white, blush, or taupe are easy winners.
- Apply two thin coats of a pearly or iridescent topper.
- Finish with a quick-dry top coat, and cap the edges.
Why it works for busy nights:
- Thin layers dry faster and look smoother.
- The pearl veil hides tiny streaks, so application feels forgiving.
- It pairs with everything, from pjs to party dresses.
Base ideas that never fail:
- Soft white base for a bright, clean glaze.
- Blush base for a warm, glassy glow.
- Taupe base for a chic, barely-there shine.
Mini checklist before story time:
- Keep remover and cotton swabs nearby for quick cleanups.
- Stick to thin coats to speed dry time.
- Finish with cuticle oil so nails look fresh in photos.
These fast finishes are my secret to pretty nails on a busy night. I can tuck in the boys, then still feel party ready. Simple, shiny, and bedtime approved!
Make it last: prep and top coat tricks so nails survive the countdown

I want shine that holds up to snacks, bedtime snuggles, and clinking glasses. Good wear starts before color ever hits the nail, and the right top coat seals the deal. If you love new years nail designs that look fresh past midnight, this is the plan I use every time!
Fast prep that fights chips
Prep is quick, but it matters. I keep it simple and fast so I can get back to the living room chaos.
- Shape: File in one direction for a clean edge. A soft square or rounded tip holds up best.
- Cuticles: Gently push back with a pusher after a warm wash. Do not cut unless there are obvious hangnails.
- De-grease: Swipe nails with alcohol or acetone to remove oils. This helps the base grab and stay.
- Optional dehydrator: If you have one, add a dehydrator before base. Great for oily nails or busy moms who wash dishes a lot.
- Thin layers: Thin beats thick for dry time and strength. I do two thin coats instead of one heavy coat every time.
Little habits that help:
- Wipe the free edge with alcohol before base. It reduces early tip wear.
- Do a tiny clean-up with a small brush and remover. Less polish on skin means less lifting later.
Base that grips: rubber base or builder layer

Short, bendy nails need support. A sticky base or a thin builder overlay gives strength without bulk, which is perfect when kids are asking for snacks.
- Rubber base: It has a flexible feel that grips the nail plate. It moves with your nail, so chips are less likely.
- Thin builder gel overlay: One thin, even layer adds a shield. This helps prevent splits and corner breakage.
How I apply for extra hold:
- Brush on a thin slip layer of base.
- Add a small bead and float it over the center for an easy apex, especially on thumbs.
- Cap the free edge. Run the brush across the tip so polish wraps under a bit.
- Cure or let dry as directed, keeping layers thin.
Why it works:
- Sticky base anchors color.
- Builder fights bending, which is when chips start.
- Thin layers keep everything smooth and quick to dry.
Top coat choices that shine all night
Your top coat sets the vibe and the staying power. I switch based on the look I want and the night ahead.
- High-gloss: Perfect for glitter and chrome. It amplifies sparkle and looks glassy in photos.
- Matte: Gives a soft velvet look. Great over shimmer or pearl if you want that cozy finish.
- Flash-reflective: Wild in photos, especially with phone flash. Fun for party pics!
Wear-boosting tricks:
- Re-topcoat on party day for a fresh seal. One thin coat can revive shine and lock edges.
- Cap the edges every time.
- Run a tiny bead along the sidewalls. I lightly touch the brush at each side to seal those high-friction spots.
- For stickers or foil, do two thin top coats. Smooth and protected.
Quick pairing ideas:
- Glossy top over chrome or cat-eye for high shine.
- Matte top over micro shimmer for a velvet look.
- Flash top over silver glitter for pop in low light.
Dry-time hacks for busy hands

I need nails to set while I pack snacks and hunt for lost socks. These tricks keep smudges away and sanity intact.
- Quick-dry drops: One or two drops per nail after top coat. They help the surface set fast.
- Cool fan air: A small fan helps solvents evaporate. Cool air, not hot.
- Ice water dip: After the surface is touch-dry, dip tips in cold water for 30 to 60 seconds. It helps harden the outer layer.
Time-saving habits I use:
- Paint one hand at a time between kid tasks. Less risk of bumps.
- Keep coats thin so layers cure evenly.
- Avoid hot water for 2 hours after polishing. Heat softens fresh polish.
Mini checklist before the countdown:
- Alcohol swipe, then base.
- Thin color, capped tips.
- Top coat that matches the look.
- Re-topcoat before you leave if it has been a day or two.
- Cuticle oil at the end for a photo-ready glow.
That is how I get shiny, strong nails that last all night. Fast prep, thin layers, the right top coat, and a few mom hacks. Party proof and bedtime proof, which is my favorite combo!
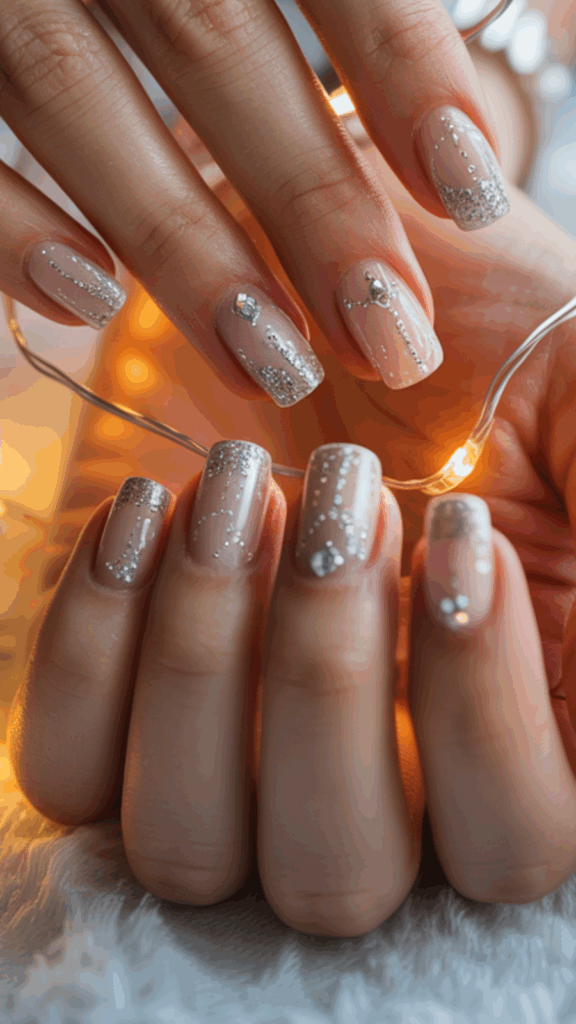
Press-ons and salon picks: what to buy or ask for, with time and budget in mind
I pick my plan based on the clock, the kids, and the wallet. Some nights need quick press-ons, other nights call for a salon treat. If you want new years nail designs that look polished without stress, here is how I decide fast and feel good about it!
Press-on upgrade that looks salon fresh
Press-ons can look perfect, even on short nails. The trick is prep and pressure. I keep it simple and follow the same steps every time.
- Size the nails: Match each tip to your natural nail. If you are between sizes, choose the smaller one for a snug fit.
- Lightly buff: Use a gentle buffer to remove shine. Do not file hard. You just want a soft, matte surface.
- Dehydrate: Wipe nails with alcohol or a nail dehydrator. This removes oils and boosts hold.
- Glue placement: Add a small dot of glue near the cuticle and a line in the center of your natural nail. You can add a tiny dot inside the press-on too.
- Apply and press: Slide the press-on in from the cuticle, then press firmly for 30 seconds. Keep steady pressure.
- Seal the edges: Brush a thin layer of top coat along the seams and sidewalls. Cap the free edge to lock it in.
- Avoid water for 1 hour: No hot water, no dishwashing. Let the glue set fully.
Quick upgrades that help:
- File the press-on sides so they match your cuticle line.
- Blend the tip with a few gentle strokes under the free edge.
- Top coat twice for gloss and a tight seal.
- Keep cuticle oil off the first day. Add it tomorrow for shine.
If a nail pops off later, clean both sides, reapply glue at the cuticle and center, press again, and reseal. Easy save!
What to ask for at the salon
I walk in with a plan and a photo. Clear words, clear results. Here is the exact ask I use for a pretty, comfy set.
- “I would love short almond soft gel tips, chrome finish, and one starry accent nail per hand. Please keep thin layers so they feel light.”
- Show a photo with the color name. List your shade picks, like silver chrome, champagne, or icy blue.
- Ask for thin builder support on thumbs if you are tough on your hands.
Key questions that keep things smooth:
- “How do you remove soft gel tips here, and what does it cost?”
- “What is the price for chrome or a cat-eye accent?”
- “Can we do a rounded almond to avoid snags?”
- “Can we keep the apex soft so the nails feel natural?”
Comfort and wear notes:
- Short almond looks elegant and handles mom life.
- Star decals or tiny stamps sit flat and will not snag on sweaters.
- Top coat refresh in a week keeps shine and prevents lifting.
Bring snacks for the kids if they are with you, and save your favorite photo to your phone. Fast, friendly, and clear gets the best set!
Shape and length that work for mom life
I need nails that hug tiny socks, open snack packs, and still sparkle in photos. Shape makes a big difference, and comfort matters.
- Short almond: Soft, slim, and safe. The tapered tip feels fancy, without sharp corners.
- Squoval: Square with rounded edges. Strong and tidy, perfect for quick cleanup and daily chores.
- Rounded edges: Ask your tech to round the corners. This helps prevent snags on clothes and hair.
What I skip:
- Stiletto points. They look cool, but they are not kid-friendly at my house.
- Extra-long lengths. Pretty, but harder for chores and bedtime.
Simple shape tips:
- Keep thumbs a touch shorter. They take the most impact.
- Ask for a gentle apex for strength without bulk.
- Cap edges with top coat. It cuts down on tip wear.
If you want a little drama, go bold with color, not length. Short and shiny still reads dressy in every photo.
Budget and timing checklist
I plan my nails like I plan school pickups. Time, cost, and comfort guide the call. Here is a quick snapshot to help you choose fast.
| Option | Prep time at home | Appointment time | Best for | Notes |
|---|---|---|---|---|
| Press-ons | 20 to 40 minutes | None | Tight budget, late-night glam | Prep well, use glue at cuticle and center, press 30 seconds, seal edges. |
| Salon basics | 60 to 75 minutes | 60 to 75 minutes | Clean, glossy, long wear | Ask about removal. Keep layers thin for comfort. |
| Salon with art | 75 to 90 minutes | 75 to 90 minutes | Chrome, cat-eye, decals, accent | Ask add-on prices for chrome, cat-eye, or decals before you sit. |
Smart booking tips I use:
- Ask for add-on prices before you choose finishes.
- Bring a photo and color names to speed decisions.
- If time is tight, request one accent nail instead of full art.
- Plan for no water exposure right after. I do baths before my appointment or use gloves.
Choose what fits your night. Press-ons when the kids are bouncing off the couch. Salon when you want a little pamper. Both can shine past midnight!
Style your night: match nails to outfits, photos, and family fun
I want my nails to shine in real life, in photos, and while I chase three boys around the house. These picks help me match color, finish, and cozy moments without stress. If you are planning new years nail designs and family pictures, this is how I style everything so it looks cute and feels easy.
What photographs best under flash and fairy lights
Party lighting can be tricky, but some finishes love it. I plan for sparkle that reads bright, not messy.
- Reflective glitters: Tiny reflective particles pop when a phone flash hits. They look subtle in person, then glow in pics.
- Chrome: Smooth metallic color gives a mirror shine. It captures fairy lights and looks polished in every angle.
- Cat-eye: The magnetic stripe catches light like a ribbon. One accent nail per hand adds that pretty glow.
Smart swaps and poses:
- Skip bulky gems. They cast shadows and snag on sweaters. I use flat decals or thin foil instead.
- Hold a mug or clutch. It gives your hands a relaxed pose and turns your nails to the camera. A sparkly cuff or cozy knit sleeve frames the shot.
- Angle toward the light. Tilt your nails slightly toward the flash for a clean reflection.
Photo-friendly color tips:
- Silver or champagne reads crisp under cool lights.
- Deep navy or black with a chrome accent gives sharp contrast.
- Icy blue shimmer looks frosty and bright near fairy lights.
Outfit matchups I love
I keep outfits simple, then match nails for balance. If my nails are bold, I tone down jewelry. If my clothes shine, I go softer on nails.
- Sequins with silver nails: Sequins already sparkle, so I pick sleek silver chrome or reflective glitter on short nails. I pair with tiny studs, no statement rings.
- Black jumpsuit with champagne chrome: Soft champagne chrome warms up black and looks chic in photos. One star sticker on the ring finger keeps it playful.
- Cozy sweater with a milky base and star accent: A milky pink or sheer beige base with one tiny star near the cuticle feels sweet and calm. Perfect for couch cuddles and bedtime stories.
- Jeans with icy blue shimmer: A pale blue shimmer, then a thin silver line at the cuticle on one nail. It is casual and still party ready.
Simple styling rules I follow:
- One statement per look: Bold nails or bold jewelry, not both.
- Metal match: Silver nails with silver hoops; champagne nails with gold hoops.
- Short and glossy always reads tidy, even with sparkle.
Example pairing:
- Black sweater, jeans, silver hoops, and icy blue shimmer nails with one cat-eye accent. Easy, pretty, and mom-proof.
Quick hand care before photos
Tiny tweaks make a big difference in pictures. I do a 10-minute refresh right before we snap.
- Moisturize 15 minutes before: Rub in a light hand cream, then wait. It sinks in without leaving shine.
- Blot with a tissue: Tap away extra lotion, especially on fingertips and sidewalls.
- Add cuticle oil last: A pinhead drop per nail, then press it in. You get glow without greasy streaks.
- Hide chips fast: Swipe a sparkle topper on one accent nail if a chip shows. It looks planned and buys you more wear.
Photo-day checklist I love:
- Clean under nails with a cotton swab.
- Wipe nails with a dry tissue for smudges.
- Re-topcoat one thin layer for fresh shine.
Bonus tip:
- Keep a mini lotion and a tiny cuticle oil in your bag. Do a quick touch-up in the car before you go in.
Kid-friendly mini manis
The boys love to help, and little nails are the sweetest detail in family photos. I keep it fast and safe.
- Water-based polishes: Low odor, easy to wash off later. Perfect for short attention spans.
- Removable stickers: Stars, moons, or tiny hearts. They stick flat and come off without tears.
- Let them choose one: I set out two or three sticker options. They pick a star or moon to match mine. Instant smiles.
How I make it fun and quick:
- Wipe hands clean, then dry.
- One thin coat of water-based polish, and let it air for a minute.
- Add one star or moon sticker near the cuticle.
- If they will sit, a light top coat; if not, skip and move on.
Easy matching ideas:
- Mom wears champagne chrome, kids wear clear with one gold star.
- Mom wears navy with silver accents, kids wear clear with one silver moon.
- Mom wears milky pink with a star, kids wear a tiny star too. So sweet for photos!
Keep it stress free:
- Paint at the table with a snack. Short nails, thin layers, big cheers.
- Remove stickers in the bath tomorrow if needed. No battles, just bubbles.
Family nails can be simple and still feel special. A little shine, a cute pose, and everyone looks photo ready. Happy styling, and have the best night!

Conclusion
I am closing out the night with simple joy and shiny hands. The plan stays the same for new years nail designs, even when bedtime runs late. Pick your shine style, prep thin, seal with a strong top coat, and match your nails to your outfit. Keep shapes short and comfy, choose one metallic accent, and refresh top coat before you head out. Small steps, big payoff, and yes, they survive hugs, snacks, and the countdown.
Thanks for reading with me, mama to mama. I would love to see your looks, so share photos or your favorite shades in the comments. If you try chrome, cat-eye, or a tiny star accent, tell me how it wore. I will keep testing quick mom-proof ideas, then report back with fresh color combos for winter weekends. Here is to sparkle that lasts past midnight, happy memories, and nails that make you smile!
This post may contain affiliate links. Read the full disclosure here.