Hello Kitty Pumpkin Carving That’s Cute and Simple
Pumpkin season is here again and I couldn’t be more excited! With three adventurous boys in my house, pumpkin carving is always a wild, silly mess, but adding a cute twist like hello kitty pumpkin carving turns the whole thing into pure FUN!
I love how it lets us blend sweet, playful designs with simple steps (that even little hands can help with)!
This Hello Kitty stencil set makes pumpkin carving fun and easy for kids (and moms!).
If you’ve ever wished Halloween decorations looked a bit more cheerful, you’re in the right place! This your the year to bring smiles and a touch of whimsy right to your doorstep!

Why Choose Hello Kitty for Pumpkin Carving?
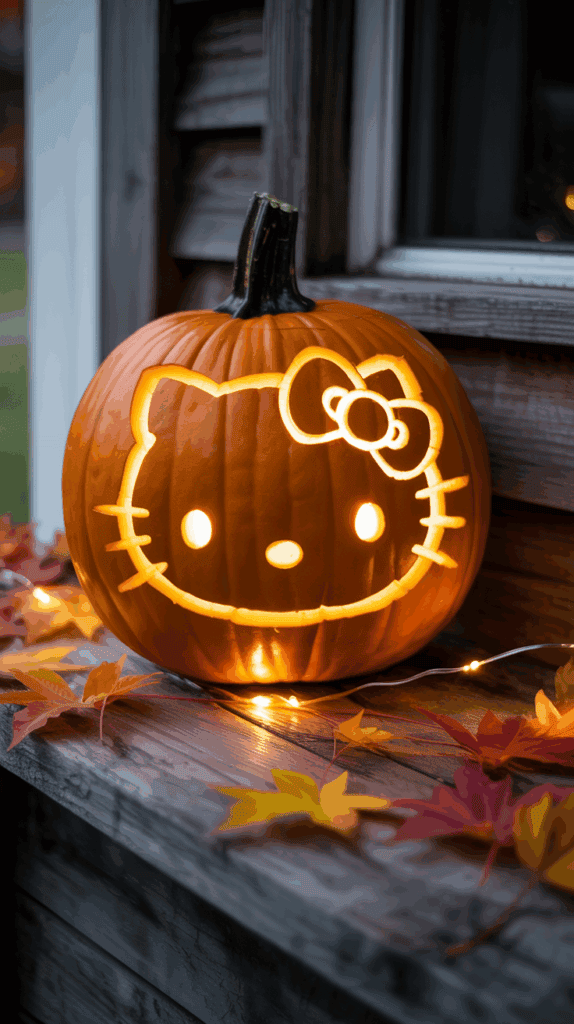
When I think about what makes a pumpkin stand out on the porch, cute and simple ideas always win in our house. hello kitty pumpkin carving checks every box for moms who want something playful without all the spooky stuff. It’s cheerful, easy to do, and instantly puts a big smile on every face that walks up to our door.
Below, I’ll share what makes Hello Kitty such a perfect pick for families, and why it’s always a big hit with my own kids.
Universal Appeal for All Ages
Hello Kitty is a classic—she’s been around for decades, yet kids still love her just as much as we did growing up. She’s sweet and friendly, and her signature bow just adds that extra touch of charm. For moms with little ones (like me), this means no scary faces or creepy designs that give the kids the heebie-jeebies. Everyone in the family can get involved, from toddlers to tweens.
- Non-scary and inviting: Makes your porch feel fun, not frightening.
- Recognizable character: Even the youngest kids know Hello Kitty.
- Timeless look: Works every year, not just with current trends.
Simple Shapes Make It Easy
Carving pumpkins is messy enough without complicated patterns. What I love about Hello Kitty is that her face uses very simple shapes—a circle, two ovals for eyes, and a sweet little bow. This keeps the project stress-free and perfect for small hands to help out.
If you want an easy win, grab a marker and map out her features, then carve basic outlines. No need for fancy pumpkin tools or hours of tracing and poking.
- Few carve lines: Less risk of breaking or cracking the pumpkin.
- Beginner friendly: Great even if you’ve never carved a pumpkin before.
- Room for creativity: Kids can help color the bow or add whiskers with a safe tool.
Adds Whimsy and Charm to Your Decor
Let’s be honest—after a long day, it’s nice to come home to something cheerful. A Hello Kitty pumpkin on your porch brings a dose of sweetness to Halloween without looking out of place. I’ve even caught neighbors snapping photos!
You can dress up the pumpkin with bows, glitter, or paint for even more fun. This playful, cute style works for school parties, church events, or any family-friendly gathering.
- Unique look: Stands apart from traditional jack-o’-lanterns.
- Great for photos: Makes adorable backdrops for costume pictures.
- Fits any color scheme: Hello Kitty pumpkins don’t have to be orange—try white or pink!
Encourages Family Involvement
Pumpkin carving always ends up being a group project in our house. With a Hello Kitty theme, my boys feel excited to join in, and even little hands can help stick on eyes or draw whiskers. It’s a team effort—and lots of fun chats and giggles come with it.
- Everyone gets a job: From drawing to carving to decorating.
- Boosts confidence: Kids see their finished pumpkin and feel proud.
- Memory-making: These are the moments that lead to favorite family traditions.
In our family, picking hello kitty pumpkin carving is about choosing fun, simplicity, and memories we’ll talk about for years to come. You can see why it’s a mom-approved favorite every pumpkin season!
Gathering the Right Supplies: Stress-Free and Simple

Getting ready for hello kitty pumpkin carving starts with one of my favorite parts—shopping for all the supplies! I want this to be simple and stress-free, especially with my three boys helping every step of the way. No one wants a project that feels like more work than fun. With the right pumpkins and safe tools, you can make this memory without any meltdowns or mess you didn’t expect.
Let’s break it down and make sure you feel confident setting up your family for a smooth, happy carving day.
Best Pumpkin Picks for Hello Kitty Designs
Picking the right pumpkin is the first step to a cute hello kitty pumpkin carving. The shape and size matter, and trust me, not every pumpkin in the bin works for these sweet, simple designs. I always look for a pumpkin that fits the project and the kids’ ages.
What to look for:
- Size: Go for a medium pumpkin for most designs. It’s big enough for the details, but not too heavy for little helpers to move.
- Shape: Round, wide pumpkins work best since Hello Kitty’s face is nice and circular. Flat bottoms help pumpkins stay steady.
- Smoothness: The smoother the pumpkin, the easier it is to draw her face and cut clean lines.
- Sturdy stem: A short, strong stem is less likely to snap off—plus, it’s easier for little hands to grip.
If your kiddos are younger (like my smallest), mini pumpkins or pie pumpkins can be perfect. These are easier to hold and safer to manage, but still have enough room for Hello Kitty’s eyes, nose, and that cute bow.
Here’s how we usually match sizes:
- Toddlers and preschoolers: Mini pumpkins for simple decorating.
- Elementary-aged kids: Medium pumpkins for classic Hello Kitty faces.
- Teens or adults: Larger pumpkins if you want to try added details or group scenes.
If you’re shopping at the patch, let the kids help! Picking their own pumpkin always makes the day more special and gets everyone excited to start.
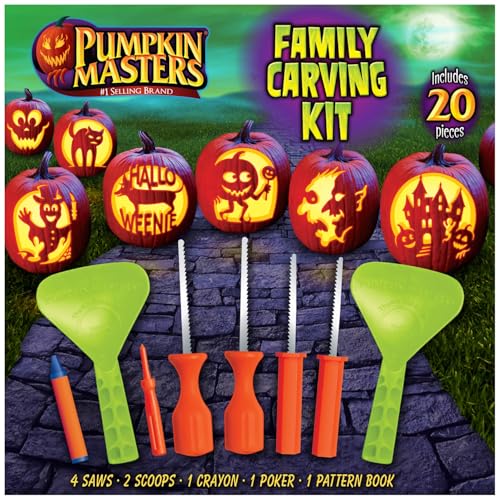
Must-Have Tools & Kid-Friendly Options
Let’s talk tools. I’m always on the lookout for easy, safe ways to let everyone join in, including my littlest boys. With the right carving set, the fun stays safe and stress-free—even if your little ones are just learning how to help.
Kid-safe carving kits:
Most stores have pumpkin carving kits made just for kids. These usually have:
- Plastic saws that only cut pumpkin flesh, not little fingers.
- Blunt scoops for cleaning out seeds (also great for older kids who want that gooey job).
- Stencils which can help outline Hello Kitty’s face.
For younger kids (or kids who’d rather skip carving):
Sometimes, the best choice is skipping sharp tools and going with easy decorating supplies. I love these because everyone gets to join in and the mess stays small.
- Washable markers or paint pens: Perfect for drawing Hello Kitty’s eyes, nose, whiskers, and that signature bow.
- Self-adhesive foam shapes: These stick right to the pumpkin and are simple for even toddlers.
- Googly eyes and stick-on jewels: Let the kids go wild! Adding sparkly bows or oversized eyes is always a highlight.
- Pre-made Hello Kitty sticker sheets: These make it super easy to decorate, especially if drawing isn’t your thing.
Simple add-ons I keep around for a fuss-free setup:
- Newspaper or an old tablecloth to catch the mess.
- Wet wipes or paper towels for sticky fingers.
- Small bowls for scooped seeds (perfect for roasting later!)
All of these options help make your hello kitty pumpkin carving session feel like fun, not a frenzy. You know your kids best, so go with the tools and tricks that work for your crew. Sometimes the best memories come when everyone pitches in—even if you end up with more marker than pumpkin!
Step-by-Step: Creating a Cute and Simple Hello Kitty Pumpkin

Let’s be honest, the best part of hello kitty pumpkin carving is watching your kids’ faces light up at the end. I love how a project like this brings everyone together, even if you’re not an art pro and you have more pumpkin guts on the table than in the trash. I’m sharing my top secrets—straight from years of test runs with my boys—so you can get that perfect mix of cute, simple, and totally fun without any stress. From stencils to sprinkles and bows, you’ll have everything you need for an adorable Hello Kitty pumpkin that’s mom-approved and kiddo-complete!
Easy Hello Kitty Stencil Techniques
Stencils save the day when hand-drawing feels risky. I promise, you don’t need to be a supermom with a fine arts degree to get Hello Kitty’s sweet face on your pumpkin! There are so many ways to make this step simple but still keep space for a little creativity (and maybe a giggle or two at your oldest’s “abstract” bow).
How to find or make the perfect Hello Kitty stencil:
- Download & print: Search for “Hello Kitty pumpkin stencil” online and you’ll find lots of free printable options. Look for bigger, simple outlines—tiny details can get lost on pumpkin skin.
- DIY trace: Place a sheet of tracing paper over a Hello Kitty coloring book page or sticker. Trace with a pencil, then cut it out to make your own custom stencil.
- Bold marker magic: Draw basic shapes directly onto your pumpkin using a washable marker. Hello Kitty’s face comes down to a circle (head), two ovals (eyes), an ellipse (nose), and the cutest bow ever. If you mess up, just wipe it off and try again!
Simple stencil tips that work even if you’re not artistic:
- Tape it down: Secure your stencil to the pumpkin with painter’s tape so it doesn’t move while you trace.
- Transfer with a toothpick: Use a toothpick to poke tiny holes along the lines of the stencil. Once you remove the paper, you’ll see a dotted outline to follow for carving or painting.
- Work in sections: If your little ones are helping, let them trace one element—maybe the bow or the nose—while you do the rest. This gives everyone a proud moment.
- Relax the rules: Remember, if the shapes come out a little wobbly, your Hello Kitty pumpkin will have extra personality! Kids notice effort and joy, not tiny mistakes.
When our family carves pumpkins, I usually have a few stencils on hand for each kid, so no one feels lost and everyone can try their own version. Don’t forget, tracing is just the beginning—decorating is where the magic really happens!
Carving and Decorating Tips for Maximum Cuteness
Decorating is where your Hello Kitty pumpkin gets her full dose of charm! Some families go all in with carving tools, others love a no-carve paint job. In our house, we usually end up with a happy mix of both styles (plus a few wild extras, thanks to my boys).
Here’s how to keep your hello kitty pumpkin carving easy, safe, and seriously cute:
Carving steps for a picture-perfect Hello Kitty:
- Cut a hole in the base: Skip the top lid—cutting the bottom helps the pumpkin stay upright and hides any carving oopsies.
- Scoop it clean: Take out all the seeds and stringy bits. The smoother the inside, the safer your carving lines will be.
- Follow the dotted stencil: Use a small pumpkin saw to trace your dotted outline from the stencil. Slow and steady keeps your lines smooth.
- Minimal cuts: Only carve out the eyes, nose, and outline of the bow if you want a classic look. Leave the cheeks and whiskers for paint or markers.
No-carve and paint ideas (great for toddlers and tiny helpers):
- Acrylic paint or paint pens make Hello Kitty’s white face really pop—even on an orange pumpkin. Let the kids fill in big shapes, then add features once it dries.
- Foam or felt shapes are perfect for a pop-on pink bow, whiskers, or even giant eyes. Just use school glue or double-sided tape.
- Googly eyes can add a silly, playful twist and keep little ones entertained.
Cuteness boosters (these tiny extras make a big difference!):
- Bows: Attach a real pink ribbon bow above one ear with a dot of glue or a push pin. You can get creative—sparkly bows, polka dots, and even clip-on hair bows all work.
- Whiskers: Pipe cleaners cut in half, painted black, or even drinking straws sliced thin make perfect whiskers. Just poke them into the sides of the pumpkin.
- Nose and eyes: Yellow buttons or stick-on gemstones make a fun nose. Big black foam stickers or construction paper work for the eyes, especially if you want no-mess decorating.
- Blush: Dab on a little non-toxic pink paint for rosy cheeks.
Quick checklist for maximum mom sanity and minimal mess:
- Cover your table with an old tablecloth or newspaper.
- Have wipes and a trash bag handy for sticky hands and pumpkin bits.
- Give each child their own “work zone”—that way, everyone feels involved and proud of their part.
Your Hello Kitty pumpkin doesn’t have to look store-bought perfect. The whole point is to enjoy the project and laugh together while making memories. In our house, it’s usually a bit of everything—paint, googly eyes, wobbly bows, and all the family stories behind each pumpkin. That’s the real secret for a truly cute, simple finish!
Getting the Kids Involved and Making Sweet Memories

Hello Kitty pumpkin carving is always a family event in our house. Decorating pumpkins isn’t just about the final look. It’s all those goofy, sticky, happy moments that stick with our kids long after the holiday. I love how these little projects help my boys work together, show off their creative flair, and actually want to help—not just watch! Below I’ll share the best ways to keep everyone involved, plus some smart tricks for keeping things tidy so cleanup is a breeze.
Pumpkin Carving Planning and Cleanup Hacks
I’ve learned (the hard way) that prepping up front makes the whole hello kitty pumpkin carving process feel so much calmer. Messes can still happen—after all, three boys are involved!—but quick planning keeps stress down and the fun going strong.
Here’s how I run our pumpkin afternoons without losing my mind:
1. Prep Your Work Station First
Set up a “carving zone” before you let the kids touch a single pumpkin. Use the kitchen table, a picnic table, or even the porch.
- Lay down thick newspaper, a plastic tablecloth, or an old shower curtain. Let it cover everything—the floor too, if your little ones are wild.
- Set out supplies in easy reach: stencils, tools, wipes, paper towels, and extra markers. I stack ours in a bin for each kid.
- Add a few aprons or old shirts for the kids. No one needs orange stains on last year’s school photos!
2. Keep Clean-Up Buckets and Bags Nearby
The mess sneaks up fast. I always set out:
- Large mixing bowls for scooping seeds and stringy bits straight from the pumpkin. We dump these into the compost or roast them for a snack.
- Small trash bags taped to the edge of the table. No one has to leave their spot to toss pumpkin guts, and it saves my sanity.
- Wet wipes and paper towels stacked right in the middle. Littles always seem to wipe their hands on their shirts if these aren’t right in front of them.
3. Delegate “Kid Jobs” to Make Cleanup Fun
One of my sneakiest mom tricks? Give each boy a cleanup job they actually want to do.
- Have one child in charge of collecting tools and wiping them down.
- Let another gather up all the dirty paper and dump it in the trash bag.
- I put my youngest in charge of hunting down stray pumpkin seeds under the chairs (he actually thinks this is fun!).
4. Carving Slow and Simple
Patience really does pay off when you’re carving with little ones. Avoid rushing so everyone stays safe and the fun lasts.
- Use a timer if your crew gets antsy. Fifteen minutes of carving, then take a break to decorate or snack.
- Only let one child carve at a time with the sharp tools. The rest can color, paint, or help with the stick-on decorations.
- Keep a small stash of bandages on hand in case of slips. We’ve only needed them for scraped knees, but it’s good to be ready.
5. Make After-Party Sorting a Game
When it’s time to wrap up, I turn cleanup into a simple “sort and stack” game.
- Have the kids sort markers, foam pieces, and tools back into their bins.
- Play “who can collect the most pumpkin seeds” for a prize (usually an extra marshmallow or two).
- Let each kid admire their own pumpkin while you handle the final wipe-down.
Keeping hello kitty pumpkin carving easy and manageable isn’t about being perfect. It’s about building sweet memories and laughter that spill over for weeks. Smart planning clears the way for all those silly moments and giant grins—and isn’t that what every mom really wants from pumpkin season?
Showcasing Your Hello Kitty Pumpkin & Beyond

Hello Kitty pumpkin carving is all about spreading that adorable, playful spirit past your front steps. After spending the afternoon with my three wild boys making our pumpkins look sweeter than a Halloween cupcake, you can bet I want to share their creations! This is where the fun continues—showing off those cute Hello Kitty pumpkins, keeping them fresh, and getting even more creative once Halloween winds down. Here’s how I make our pumpkins the star of the season, at home and beyond.
Display Ideas That Make Your Porch Pop
Once your Hello Kitty pumpkin is finished, it deserves a spot in the spotlight. I’m always looking for ways to make our porch feel extra inviting, especially since my boys want every neighbor (and every trick-or-treater) to see their hard work.
Try these fun ways to show off your pumpkin:
- Front steps centerpiece: Line up a few Hello Kitty pumpkins in different sizes right by your door. Layer with mums, hay bales, or bundles of dried corn for that cozy fall look.
- Fairy lights: Add battery-powered string lights around your pumpkin for a magical glow at night. They make the bow and face details shine!
- Personalized pumpkin parade: Let each child place their own Hello Kitty pumpkin on a sturdy crate or small table. Add a name card made from a painted rock or a small chalkboard sign.
- Window display: If you want to keep things safe from nighttime mischief, pop the pumpkin right inside a front window facing the street.
I love mixing in pink or white pumpkins for a little extra charm. Sometimes just one or two special details—like a big pink bow tied around the stem—turns a simple Hello Kitty pumpkin into porch perfection.
Keeping Your Pumpkin Fresh (and Kid-Approved)
No mom wants a pumpkin disaster a few days before Halloween! There’s nothing sadder than putting love into a cozy Hello Kitty pumpkin carving, only to find it wilted and moldy the next morning. I’ve learned a few tricks to keep our pumpkins cute and happy as long as possible.
Here’s my tried-and-true pumpkin care routine:
- Pick a firm pumpkin with no soft spots when you’re shopping.
- After carving or decorating, rinse the pumpkin inside and out with a solution of one tablespoon of bleach per quart of water. This helps kill mold spores.
- Pat dry, then rub a thin layer of petroleum jelly along the cut edges. This keeps them from drying out too fast.
- Display outside in the cool air but out of direct sun, which can make pumpkins shrivel.
- On unusually warm days, I bring our pumpkins inside overnight. It sounds fussy, but it makes a difference!
- Skip the candle and use a battery tea light to keep things cool and safe, especially around busy feet.
- If your Hello Kitty pumpkin does start to droop, let the kids give it a “pumpkin spa” by soaking it in cold water for an hour. Dry well before returning to the porch.
I set daily reminders on my phone to check the pumpkins, so each face stays bright all week long. Plus, teaching my kids a little care routine gives them even more pride in keeping their creations beautiful!
Share the Fun: Photos, Social, and Community Ideas
Nothing gets my boys excited like seeing friends and family react to their Hello Kitty pumpkins! It’s about more than just showing off—sharing the joy spreads inspiration and starts new family traditions.
Here are my favorite ways to share those cute pumpkins with the world:
- Photo shoots: Set up a mini shoot on the porch. Dress your kids in Halloween costumes, add a few autumn props, and snap away! These make adorable thank-you notes or holiday cards.
- Social media slideshows: Post your pumpkin creations to Instagram or Facebook with a fun caption like, “Hello Kitty made our Halloween extra sweet!” Don’t forget to use hashtags like #HelloKittyPumpkin and tag other family members or friends.
- Neighborhood pumpkin walk: Challenge neighbors to join in the Hello Kitty theme. Take a walk to see everyone’s pumpkins and vote for the cutest.
- School or daycare submissions: Many schools run pumpkin contests or craft boards. I let my boys pick their favorite photo to send to their teacher. Sometimes we print a picture and tape it to their cubby for extra smiles.
- Virtual family share: Set up a family group chat or photo album where cousins and grandparents can post their pumpkin pictures together.
Coming up with creative ways to display and share our pumpkins adds a fun twist and helps us stay connected with loved ones near and far. It’s a sweet way to wrap up all that hard work and creativity!
Beyond Halloween: Don’t Toss That Cute Pumpkin Yet!

After Halloween wraps up, it feels a bit sad to think about getting rid of all those cheerful Hello Kitty pumpkins. I like to make the most of their cuteness before any tossing happens.
Here are some simple ways to keep your pumpkin celebration going:
- Switch to fall décor: If your pumpkin is still looking good, tuck it among your regular fall decorations until Thanksgiving. Remove bows or paper pieces that might wilt.
- Compost or bird feeder: Let the kids help break up the pumpkin to add to your compost bin. Or fill cleaned-out shells with birdseed for a backyard treat.
- Pumpkin seed roasting party: If you scooped seeds during carving, rinse and roast them for a snack. My boys sprinkle on cinnamon sugar or parmesan for a sweet or savory treat.
- Pumpkin painting sequel: If the carving side has seen better days but the back is still fresh, give the kids free reign with leftover paints and stickers for a “goodbye fall” craft.
Keeping the fun alive past Halloween turns every part of hello kitty pumpkin carving into a lasting family memory. It’s a wonderful feeling seeing your kids’ hard work celebrated from start to finish and beyond!
Conclusion
Simple hello kitty pumpkin carving brings so much more than just cute porch decor. It’s a chance to bond, laugh, and make memories with my kids that last long after the pumpkins come down. Every wobbly whisker, colorful bow, and sticky table proves you don’t need to be perfect to create something magical with your family.
I hope you feel inspired and ready to try your own Hello Kitty pumpkin this season! Whether you go all out or keep it simple, your effort creates pure fall joy for your kids. If you have your own Hello Kitty pumpkin carving stories or photos, I would love to see them! Share your creations and tips in the comments below so we can all keep the fun going.
Thanks for reading and joining me on this sweet, silly tradition. Here’s to making new memories, one cheerful pumpkin at a time!
This post may contain affiliate links. Read the full disclosure here.