Homemade DIY Spooky Outdoor Halloween Decorations
Hi there, I’m a mom of three energetic boys who can’t get enough of Halloween! If you’re like me and want your house to stand out without breaking the bank, you’re in the right place. Homemade DIY spooky outdoor Halloween decorations are my go-to every year, and they’re a blast to make with the kids. We laugh, make a mess, and fill our yard with things that give the neighbors a good jump (in a fun way, of course)!
These DIY outdoor Halloween prop kits make decorating fun and easy, even if you’re not super crafty.
I know every dollar counts. That’s why I’m excited to share my favorite ideas that turn old boxes, scraps, and a few dollar-store finds into decorations your kids can help with and be proud of. We’ve tested these as a family, and they’re silly, a bit scary, and totally budget-friendly. I hope these tips help your family create your own fun memories and the spookiest yard on the block!

Planning Your Outdoor Haunted Yard on a Budget


Having three boys with wild imaginations means our yard has to be extra spooky every Halloween! I’ve learned that planning makes the biggest difference, especially when every penny counts. Homemade DIY spooky outdoor Halloween decorations bring the whole family together, and you don’t need to spend a fortune. The best haunts start with a good plan, a little bit of scavenging, and a lot of excitement!
Starting With a Vision (But Keeping It Real)

Before my boys and I hunt for cardboard or paint, I love to dream up what we want our yard to look like. We sketch silly monsters, talk about what gave us a spooky shiver last year, and pick out some must-have decorations. We don’t get too grand (yet), but we set a theme or pick a “main” scare. Planning helps us focus, keeps our spending in check, and makes everything run smoother.
Here’s how I do it:
- Choose a theme first. Ghostly graveyard, haunted woods, or wild monster mash? Picking one helps the ideas fit together.
- List your “must-haves.” My boys always want ghosts, but some yards need more spiders or skeletons.
- Pick a main spot. Is it the front porch, walkway, or big old tree? One main feature gives the most impact for the least money.
Taking Inventory and Gathering Materials


It’s easy to forget what you have shoved in bins or cluttering the garage. I round up last year’s decorations, broken toys, extra sheets, and even packing boxes before I buy anything.
A quick scavenger hunt with the kids always turns up hidden treasures. Some of our best homemade DIY spooky outdoor Halloween decorations came from:
- Cardboard boxes (giant tombstones or spooky houses)
- Old white sheets (ghosts or shrouds)
- Black trash bags (spiders, bats, or creepy curtains)
- Empty milk jugs and bottles (glowing features)
- Paint, tape, and leftover markers
We love hitting up dollar stores, but starting with what’s at home keeps the budget low. Sometimes we trade with neighbors or family, too.
Setting a Realistic Budget and Sticking to It

Let’s be honest, it’s easy to get carried away at the craft store. I’ve learned to set a strict budget. We all talk together and agree on what to spend—this helps the kids get involved with smart choices.
Some quick tips to keep cash in check:
- Use a simple notebook or phone app to jot down prices and keep track.
- Set a strict “dollar store limit”—we pick a set number and stick to it.
- Make a “wish list” for each of us, so we pick the best ideas first.
Here’s a simple budget planner I use with my kids:
| Item Needed | Found at Home? | Need to Buy? | Cost Estimate |
|---|---|---|---|
| Cardboard boxes | Yes | No | $0 |
| Black paint | No | Yes | $3 |
| Fake spider web | No | Yes | $2 |
| String lights | Yes | No | $0 |
| Old clothes/rags | Yes | No | $0 |
| Plastic spiders | No | Yes | $2 |
This table helps us stay prepared, avoid doubling up, and make shopping trips much quicker (and less stressful).
Planning for Safety (Kid and Guest Friendly Fun!)

Spooky is fun, but I make sure every decoration is safe. Before we build anything too high or too sharp, I check it’s family and guest friendly.
- Keep pathways clear and decorations sturdy so no one trips.
- Battery lights are safer than candles, especially with kids running around.
- Secure everything tightly (my boys are famous for wild chases!).
A little planning ahead means fewer surprises on Halloween night (except the fun ones).
Creepy Yard Decor: Easy DIY Ideas Using Everyday Supplies

Transforming our front yard with homemade DIY spooky outdoor Halloween decorations feels like pure magic for my boys and me! There’s something extra fun about spooky surprises that pop up near the porch or wave from the bushes. Even with only a little money, I can turn everyday supplies and forgotten odds and ends into decorations that make the whole neighborhood stare. The best part? My kids get to help with every step, so we end up laughing way more than we scream!
Let’s break down some of our favorite kid-friendly spooky yard decor ideas. They’re simple, cheap, and sure to get your family in the Halloween spirit.
DIY Spooky Ghosts and Ghouls

Nothing says Halloween quite like floating ghosts! My boys beg for these every year. You can make them from items you already have around the house. Here’s how we do it:
Supplies:
- Old white bed sheets, pillowcases, or cheesecloth
- Newspaper, plastic bags, or any soft stuffing
- Metal hangers or sturdy sticks
- String or fishing line
- Permanent markers or black craft paint
Steps:
- Ball up newspaper or plastic bags to form the ghost’s head. Secure with a rubber band if needed.
- Drape your sheet or cheesecloth over the ball. For a flowing look, use longer fabrics.
- Shape a hanger or stick into a “T” and tie the fabric so it hangs like a body.
- Use string to tie the fabric just under the head, giving the ghost a neck.
- Draw on faces with markers or paint. We love silly, scared, or goofy ghost faces that little ones find funny.
- Attach fishing line or string to the top of the head for hanging.
Where to Place:
- Hang ghosts from trees, porch eaves, or the mailbox for a floating effect.
- Drape smaller versions in bushes or shrubs for surprise scares.
Tips for Extra Spook (While Keeping It Fun):
- Add glow-in-the-dark paint for nighttime fun.
- Use battery tea lights inside the head for a gentle, spooky glow.
- Make a whole ghost family with different face expressions so nothing feels too mean or scary.
These ghosts are always a big hit with my boys and their friends. No worries about nightmares, just big laughs as they swing in the breeze!
Glowing Eye Creatures Lurking in the Bushes

Nothing makes a walk up the driveway creepier than mysterious glowing eyes. This is one of the easiest homemade DIY spooky outdoor Halloween decorations I’ve ever done, and it uses stuff you’d toss in the recycling anyway.
Supplies:
- Empty toilet paper or paper towel rolls
- Scissors or a craft knife (grownup job)
- Glow sticks (from the dollar store)
- Tape
Steps:
- Cut eye shapes in the side of each roll. Get creative—big round eyes, sharp cat slits, goofy cross-eyes. My youngest loves making monster faces!
- Crack a glow stick and tape it inside the roll, keeping it away from the cut-outs.
- Tuck the rolls deep into bushes, shrubs, or low tree branches so only the glowing eyes peek out.
Eye Shape Ideas:
- Cat’s eyes
- Angry monster eyes
- Surprised wide eyes
- Goofy crooked eyes (great for laughing kids!)
Kid-Friendly Spookiness:
- Stick to bright colors like green, blue, or orange for a playful vibe.
- Not too many angry eyes together; mix in silly or surprised faces so little kids don’t get too creeped out.
Extra Fun: If you have leftover black paint, color the outside of the rolls so they disappear even better at night. You can also use empty plastic bottles for giant monster eyes!
These are simple to set up and my kids love sneaking around, “hiding” more eyes while giggling the whole time.
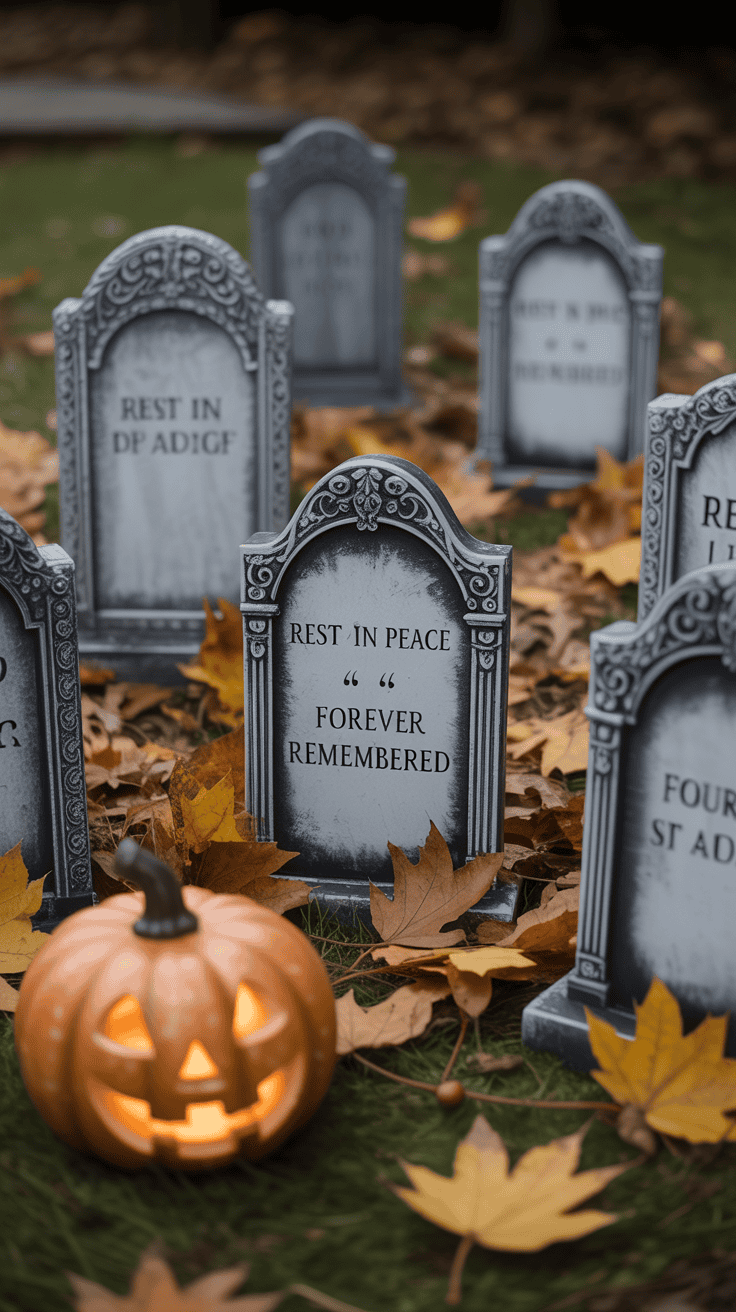
Homemade Spooky Yard Signs and Tombstones

A yard full of spooky signs sets the mood right away and gives your trick-or-treaters something to giggle at. The best part? You can make these with leftover boxes, a bit of paint, and a touch of imagination.
Yard Signs
Supplies:
- Large pieces of cardboard or thick poster board
- Paint (black, white, neon, or any fun color)
- Wooden paint stirrers, yard sale sign stakes, or old sticks
- Paintbrushes
- Tape or glue
How-To:
- Cut cardboard into fun sign shapes: arrows, rectangles, or shaky ovals.
- Paint your signs with a solid base color and let them dry fully.
- Write spooky messages in bold, block letters. Here are some of my favorite family-friendly ideas:
- “Beware the Boogeyman”
- “Haunted Yard Ahead”
- “Turn Back Now!”
- “Candy Graveyard”
- “Witch Parking Only”
- “Zombies Welcome (Humans Beware!)”
- “Rest in Reese’s”
- Decorate with handprints, fake blood drips (red paint), or wiggly spider shapes for extra fun.
- Tape or glue your stick to the back and push into the yard or garden.
Tombstones
If you have leftover foam board, thin plywood, or more cardboard, you can whip up a few creepy tombstones.
Steps:
- Cut tombstone shapes: rounded top rectangles or old, jagged edges look great.
- Paint grey, speckle with a sponge, and let dry.
- Add silly names or spooky puns like:
- “Ben Better”
- “Izzy Dead”
- “Ghost Malone”
- “Al B. Bach”
- Add cracks or mossy details with black or green paint.
- Mount on sturdy sticks or set against stones for support.
Tips for Signs and Tombstones:
- Spray with clear sealant if you’re expecting rain.
- Let kids “design” the tombstones—no two ever look the same!
I love how these signs and tombstones fill the yard with humor, not just scares. They’re low-cost, a bit messy, and completely homemade—which, honestly, makes them even better for family fun!
Budget-Friendly Lighting Tricks for a Haunted Glow

Lighting truly sets the mood for any outdoor Halloween setup, and I can say from experience that you don’t need a big budget to make your yard glow like a haunted movie set! Homemade DIY spooky outdoor Halloween decorations feel so much more magical at night, especially when a clever light trick catches the corner of your eye. After years of experimenting (and a few funny flops), I’ve gathered my favorite ways to create a spooky, memorable glow outdoors, all while keeping costs down. Here’s how I make our yard come alive with light, even on the tightest budget!
Repurposed Jar Lanterns and Glowing Jugs
One of my favorite tricks is saving up empty jars or milk jugs and turning them into little beacons of Halloween magic. Not only is this great for the wallet, but it’s also a wonderful way to get the kids involved!
- Clean, empty jars work as lanterns when you pop in battery tealights or glow sticks.
- Milk jugs become friendly ghosts or grinning pumpkins with a quick marker face and a glow stick dropped inside.
- I let the boys go wild with faces or even scary words like “BOO!” or “HELP!” on the side for extra effect.
Line these glowing jars and jugs along your driveway or steps, or hide them in garden beds for a gentle, ghostly surprise!
Dollar Store String Lights with a Spooky Twist

String lights don’t have to be fancy to make a difference! I pick up packs of battery-powered string lights from the dollar store, then give them a homemade twist:
- Color them with permanent markers or slip small bits of colored tissue paper over each bulb for a different hue (just be careful and use battery lights only—no heat).
- Web effect: We weave the lights through DIY spider webs made from cotton batting or white yarn. This makes bushes look like they’re crawling with glowing, spooky webs!
- Bottled lights: Fill clear bottles or jars with mini string lights for instant lanterns the kids can carry around (so cute during trick-or-treat walks).
Simple Spotlight Shadows
Homemade shadows are one of my “secret weapons” for a haunted yard. With the right setup, you can make any plain decoration look way scarier!
Here’s how we make our own spooky spotlights:
- Grab basic flashlights or old work lights (borrow from your garage).
- Aim lights from the ground up at any big shape—think ghosts, tombstones, or old branches. This stretches the shadows and makes everything look way bigger and creepier.
- Cut shapes out of black cardboard (bats, spiders, witches) and tape them near the light’s edge to cast wild shapes on the wall or fence.
You don’t need special effects or fancy equipment—just bendy flashlights and imagination!
DIY Flickering Candlelight (Safe for Kids)

Real candles make me nervous outside, especially with little ones running around. Instead, we use a few easy swaps that give that same flicker:
- Battery-operated tea lights—they look like the real deal but won’t start any fires!
- Wrap orange or yellow tissue paper around a clear jar with a tea light inside for a mini “fire bowl.”
- Scatter these on windowsills, porches, and under bushes for cozy, shivering light that feels just like an old haunted house.
The boys love “planting” these all over the yard and calling them “witch fires.” There’s no clean-up, no real flames, and I can relax knowing it’s totally safe.
Black Lights and Glow Paint Surprises
Black light bulbs are my go-to for a splashy effect, and they aren’t just for scary parties! You can often find one at a discount or use a black light flashlight for even less.
- Paint signs, tombstones, or even rocks with glow-in-the-dark paint (I’ve picked these up cheap at the craft store).
- Hang white sheets or spider webs near the black light. They’ll suddenly pop to life with a neon blue glow.
If you have a black light aimed at your porch, you can even let the kids wear white clothes or glow sticks for a mini “ghost parade” when the sun sets.
Quick List: My Favorite $5-and-Under Haunted Lighting Tricks
For those nights when you need a fast wow-factor (and maybe forgot to plan ahead!), here are my quick wins:
- Fill a balloon with a glow stick, draw on monster faces, and hang from trees.
- Use empty tin cans, poke holes for eyes and mouths, and add a tea light to create “creature lanterns.”
- Wrap fake spider webs over your porch light—the whole entry will glow!
- Line the walkway with glow sticks stuck into the ground for a safe, glowing path.
These lighting ideas work together with your homemade DIY spooky outdoor Halloween decorations to give your yard that professional haunted house feeling, all without spending much at all. The best part is watching the kids’ faces light up when their creations start to glow after dark!
Getting the Kids Involved: Turning Decorating into Family Fun

There is something special about watching my boys dart around with paint-streaked noses and sticky fingers while we make homemade DIY spooky outdoor Halloween decorations together. I truly believe the best memories happen when everyone joins in, and Halloween is the perfect time for a family project that lets everyone shine. Who needs a picture-perfect display when you can fill the yard with decorations full of personality and giggles? Besides, nothing tops those proud faces when the porch gets admiring glances or knocks for “best house on the block!”
Making your outdoor Halloween decorating a family event isn’t just about saving money. It’s about building excitement, giving kids real jobs, and getting creative together. With a little planning, you can turn even the messiest moments into memories your kids will talk about for years.
Letting Kids Have a Say (and a Job!)
I want my boys to feel like our Halloween yard is their own. That starts by letting them weigh in right from the start. When kids help pick out what decorations to make, they get so much more excited to help. I keep it simple:
- Suggest 2-3 decorating themes and let them pick
- Ask each child to choose one “must-make” decoration
- Assign every family member an area or a small task (even toddlers love handing over tape or stickers)
- Give them roles based on their ages, like drawing faces for ghosts, stuffing scarecrow arms, or arranging glowing eyes in the bushes
When everyone has a job, there are fewer arguments and way more teamwork. It’s like running our own little “Halloween crew,” and the boys come up with the wildest ideas.
Making Decorating Day an Event

When we decorate, we go all out! Instead of treating it like a chore, I like to turn it into a mini holiday. Here’s how we make the day extra special:
- Play a fun Halloween playlist—everyone picks at least one song!
- Make a “spooky snack” together, like popcorn with orange chocolate drizzle or monster-shaped cookies. Sugar helps with painting energy, trust me.
- Wear old clothes so nobody worries about messes. Sometimes I let the boys put on costumes while we work, so, yes, there are Spidermen painting tombstones and ninjas taping ghosts.
- Split up jobs, set a timer, and see how many tasks we can finish before snack breaks. Racing the clock makes everything silly!
By the end, the mess is half the fun, and cleaning up becomes a game, too.
Little Hands, Big Results: Kid-Friendly Tasks
I divide decorating jobs so every child gets something they’re good at and something new to try. Here are a few favorites that work for a range of ages and skill levels:
Great Tasks for Younger Kids:
- Drawing faces on ghosts or pumpkin cutouts
- Stuffing newspaper for ghosts or scarecrows
- Handing over clothespins, string, or tape
- Sorting supplies (glow sticks, lights, spiders) into bins or baskets
Awesome for Older Kids:
- Painting tombstones or spooky signs
- Cutting simple shapes (with safety scissors or supervision)
- Arranging lights and tape (older kids love aligning things “just right”)
- Hammering stakes for signs (with help)
- Setting up pranks, like sound effects or motion-activated eyes
I remind myself that every “imperfection” just makes the decorations more unique and memorable. Giggling over lopsided eyes or silly names brings us all together.
Encouraging Creativity (and Letting Go of Perfection)
There are years my yard could win a “messiest monsters” award. That’s okay! My kids love to put their own spin on everything. Sometimes our ghosts have patchwork faces, and sometimes our tombstones are a rainbow instead of gray. When you let the kids experiment a little, the whole yard turns into a storybook of their ideas.
Want to help the creativity flow? Try these:
- Set out bowls of buttons, markers, or scraps and let them mix and match
- Give them stickers or stencils to help with faces or patterns
- Encourage “themed” decorations, like superhero monsters or googly-eyed pumpkins
- Let them come up with silly names for tombstones or punny messages for signs
Mistakes become memories. The more laughs, the better it looks.
Getting the Most Fun (and Least Mess) from Supplies
To keep things from getting too wild, I plan ahead (just a little). Here’s what helps me:
- Work outside, or lay down a big old sheet or shower curtain for easy clean-up afterward
- Pour paint into small cups or trays, and hold back extra supplies until they’re needed
- Use washable markers or quick-dry paints, especially with little kids nearby
- Keep a roll of paper towels and a bucket of water close at hand
Cleanup goes fast when everyone has a job, even if it’s just dunking brushes or grabbing tape. We “race” to see who can finish their part first.
Celebrating the Finished Display
The best part of this whole process is showing off the final results. My boys love inviting friends over or taking a “spooky walk” through the yard to see their handiwork come alive at night. We take photos, share them with family, or let the kids give a mini tour to their grandparents over a video call.
Here are some simple ways to celebrate:
- Snap a family photo with your favorite decoration
- Share a walk-through video or photo album with relatives
- Let each child “introduce” their own spooky creation to friends or neighbors
At the end of the day, it’s not about having magazine-perfect decorations. It’s about shared laughter, sticky fingers, and a yard that feels like your family—brave, silly, and full of spirit. That’s what really makes homemade DIY spooky outdoor Halloween decorations so much fun for everyone!
Reusing, Recycling, and Storing DIY Decorations for Next Year
After all the work (and family fun!) that goes into making homemade DIY spooky outdoor Halloween decorations, it only makes sense to reuse as much as possible. Storing decorations well means you’re all set for next October—plus, it saves money and cuts down on waste. I’ve learned a few tricks for keeping things organized, safe, and ready for my boys to enjoy again and again.
Smart Ways to Reuse Your DIY Halloween Decorations
Some decorations are easy to reuse. Others just need a tiny fix or a quick makeover. Before you toss anything, take a good look at what might work again or in a new way.
Here are some of my favorite approaches:
- Cardboard tombstones and signs: If they’re not too soggy, stack them flat and store with a piece of cardboard on top to keep them straight.
- Ghosts made from sheets or cheesecloth: Fold and tuck away—you can always freshen them up next year with new faces or wrinkles.
- Plastic creatures (spiders, bats, glowing eyes): Wipe them off and store in a lidded bin. They’ll last for years.
- Lights and jars: Remove any batteries first, then pack everything by type. Wrap glass jars in old grocery bags to keep them from chipping.
If something breaks, save what you can. Handles, sticks, and plastic scraps might work for a whole new project later on. Old sheets or cheesecloth can be cut into strips for next year’s mummy or spider web.
Simple Recycling Tips for DIY Decor Materials
Let’s be honest, some decorations don’t survive my guys’ wild Halloween antics. Instead of adding everything to the trash, see what can go in your curbside bin or be used for another holiday.
Here are easy recycling tips that work for us:
- Cardboard boxes: Tear up any beyond saving and add to the recycling bin.
- Milk jugs and plastic bottles: As long as they’re not painted with permanent markers or covered in glue, rinse and recycle.
- Paper decorations: Any that got wet or torn can go into compost or paper recycling.
- Glow sticks: Most can’t be recycled, so I try to limit these or save them for another night if they are still glowing.
Sometimes, my boys like to “rescue” parts from last year’s decorations while I’m sorting. Empty string light wires or plastic spiders can become part of homemade Christmas or birthday party decor (their creativity never ends).
Storing Decorations for Easy, Stress-Free Setup Next Year
Here’s my not-so-secret trick: storage bins and labels! I want everything to survive the winter in the garage or basement, where it might get bumped by sports gear or snow boots. With the right setup, decorating next year feels more like a treasure hunt than a chore.
Here’s what I do each year:
- Sort by type: I group ghosts, lights, spiders, and signs together in their own bins or bags.
- Label everything: A roll of masking tape and a marker go a long way. The boys even help write what’s inside each bin.
- Keep small parts together: Little things like clothespins, fishing line, stakes, and batteries all go in a zip-top bag labeled “hardware.”
- Wrap fragile stuff: Glass jars, lights, and painted bottles get wrapped in leftover tissue paper or even old pillowcases.
- Stack bins: I keep heavier bins on the bottom and lighter, more fragile ones on top.
If you have a lot of flat cardboard decorations, slide them behind a set of shelves or behind heavier bins so they don’t get crushed.
Sample Storage Checklist
Here’s a tiny sample of how I organize my bins. It’s not fancy, but it saves me so much time and panic every October!
| Bin Name | Contents | Label Example |
|---|---|---|
| Ghosts & Ghouls | Folded sheet ghosts, string, fabric scraps | “Ghosts & Fabric” |
| Spooky Signs | Cardboard tombstones, painted signs, stakes | “Tombstones & Signs” |
| Lights & Glow | String lights, tea lights, batteries, jars | “Outdoor Lights” |
| Small Parts | Clips, stakes, tape, hardware, glow sticks | “Small Parts” |
If you want, add a quick note with each bin on what worked and what didn’t—future you will thank you!
Teaching Kids to Care for Decorations
Kids love creating decorations, but helping clean and store them can be just as important. I let my boys help sort, wipe down, and put things away. It makes next Halloween feel like a big team effort from start to finish. They also learn a little about responsibility and keeping things out of the trash, which is always a bonus.
We make it a game: who can find all the spiders, or who can fold the most ghost “sheets” into a tidy pile? Add some music and snacks, and it’s another chance for family time.
Keeping up with your homemade DIY spooky outdoor Halloween decorations this way helps your wallet, the planet, and your future decorating mood. Plus, it means next year you’ll be all set to scare up some more smiles with so much less stress!

Conclusion
It feels so rewarding to see what a few simple ideas and dollar-store treasures can become with a little imagination and a lot of heart. Homemade diy spooky outdoor halloween decorations don’t just save money, they turn a regular October into a season packed with laughter, teamwork, and the kind of memories your kids will talk about for years.
Every ghost, glowing eye, or silly tombstone has a story behind it (and probably a bit of spilled paint or some giggling in the background). Let these fun, affordable tricks inspire you to jump in, get your hands messy, and turn your yard into the spooky showstopper of your dreams!
I’d love to hear what your family dreams up this year. Share your favorite tips or decorating stories below, and let’s help each other create even more fun for our kids. Wishing you and your family a safe, silly, and delightfully spooky Halloween!
This post may contain affiliate links. Read the full disclosure here.