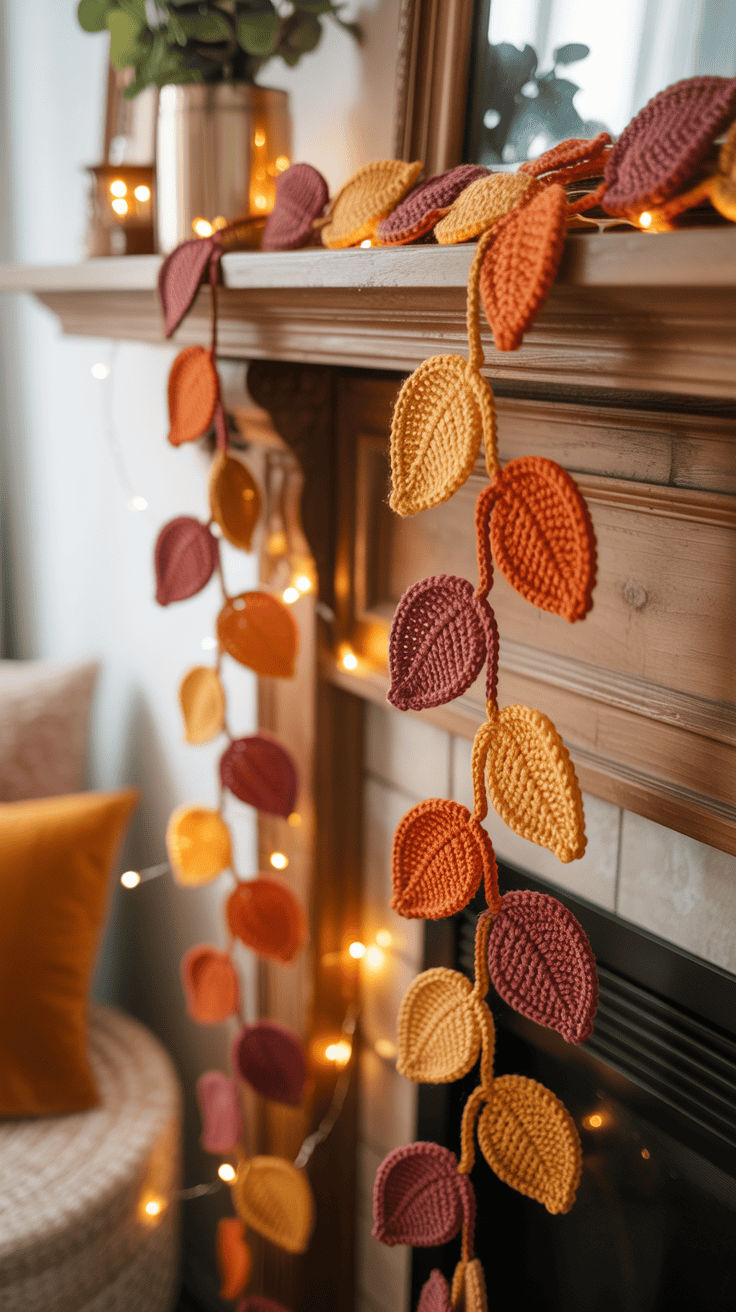
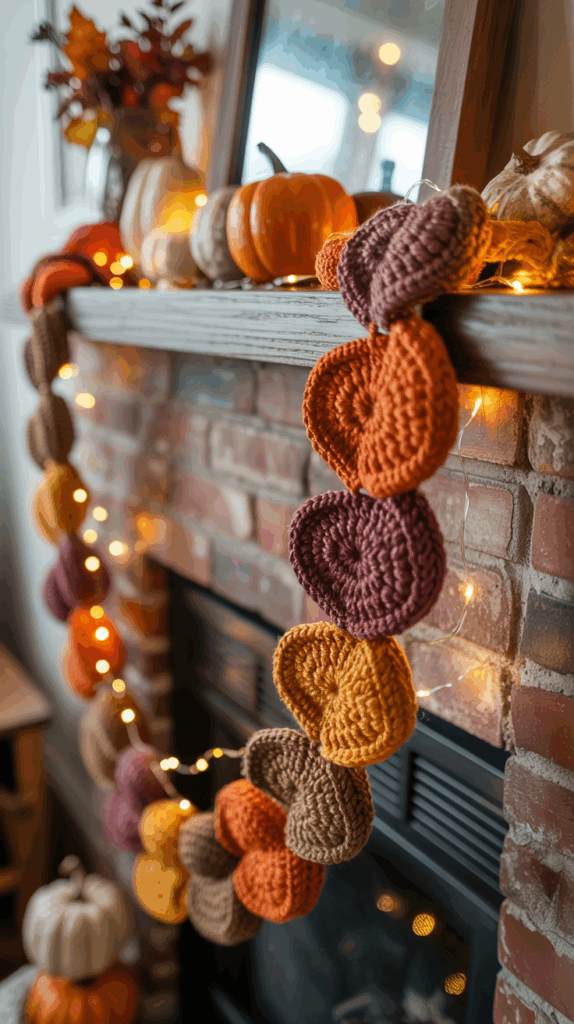
Crochet Fall Garland for a Rustic Seasonal Touch
If you want your home to feel like fall without splurging, you’re in the right place, friend. I’m a mom of three busy boys who love to “help,” and this cozy project is our favorite rainy afternoon win. A Crochet fall garland turns yarn into instant warmth, and it’s easy, cute, and budget friendly!
In this post, I’ll share the simple supplies I use, the step-by-step motifs we make (think leaves, pumpkins, and tiny acorns), and how I assemble each strand. I’ll show you easy ways to style it on a mantel, mirror, or kids’ bookshelf. I’ll also cover quick troubleshooting for common hiccups, plus real time and cost.
This is beginner friendly, even if you’re picking up a hook for the first time. Plan for 2 to 4 hours, depending on how many motifs you want. My cost stays under about $15 to $25, which includes yarn and string, and I usually have leftovers for a second strand.
I keep the steps short and clear, and my boys chime in with color picks and counting stitches, which is always a highlight. You’ll finish with a rustic, seasonal touch that looks store bought, without the store price. Pull out your soft yarn, pour something warm, and let’s make a charming garland together!
Supplies and Yarn That Make a Rustic Garland Last
I want this garland to look cute on day one and still look crisp when I pull it out next year. The right supplies make all the difference for a sturdy, pretty Crochet fall garland that holds its shape and hangs well. I keep it simple, I pick yarns that block nicely, and I grab tools that make fast work between school pick-ups and dinner.
Best yarn weights and fibers for crisp leaves
For sharp points and clear veins, I reach for DK (Light 3) or worsted (Medium 4). Both give clean stitch definition without floppy edges. DK reads delicate, worsted reads bold. I love mixing both for a layered look.
Here is how the common fibers stack up for leaves, pumpkins, and acorns:
| Fiber | Shape & Stitch Definition | Feel & Look | Care | What I Use It For |
|---|---|---|---|---|
| Acrylic | Holds shape well, light bounce | Soft, even color | Machine wash and dry, low fuss | Kids’ rooms, high traffic spots |
| Cotton | Very crisp edges, little stretch | Matte, classic farmhouse vibe | Machine wash, dry flat to avoid warps | Leaves with sharp points |
| Wool blend | Great memory, blocks beautifully | Cozy, slightly heathered texture | Hand wash or gentle cycle, dry flat | Premium garlands, heirloom feel |
- Acrylic: Budget friendly, easy care, and sturdy. Great if little hands like to “adjust” the leaves every day.
- Cotton: The queen of crisp. Points stay sharp, which is perfect for maple or oak motifs.
- Wool blends: Warm, springy, and very forgiving. A tiny bit of fuzz makes it look rustic and cozy.
For a farmhouse vibe, I lean into heathered or tweed yarns. Those tiny flecks add texture that reads like fallen leaves on a gravel path. If you love depth without bold color changes, tweed worsted yarn is a winner.
Yardage adds up fast when you switch colors. For a 5 to 6 foot garland with 12 to 18 motifs, plan on:
- 150 to 250 yards total across your colors.
- 20 to 30 yards for the hanging chain or cord, if you crochet the string.
- A single 100-yard ball per main color is usually enough for several motifs, with leftovers for a second strand.
Hooks and tools I reach for every time
I keep a small pouch ready to go, since my boys love to “help” by handing me the next color. These are my always-in-reach tools.
- Hooks: H/5.0 mm to I/5.5 mm. I switch based on yarn and how firm I want the leaves. H for crisp edges, I for a softer drape.
- Tapestry needle: For weaving in ends so they stay hidden and secure.
- Stitch markers: I clip them on the vein point or leaf tip to keep count while snacks are flying.
- Sharp scissors: Clean cuts keep ends tidy and easy to weave.
- Optional, hot glue gun: A tiny dot on a knot can lock it in place. Use with care, and stash it safely away from kids.
- Optional blocking tools: Pins and a towel. A quick steam or spray, then pin to shape, and your points stay crisp.
Pro tip I use every time: tighten the last stitch of each motif. It seals the shape before blocking and keeps points from curling.
Fall color palette ideas for farmhouse style

I love a color story that blends with wood tones and neutral walls. Pick three to four shades and repeat them in order across the garland. It feels balanced and calm.
Ready-to-use palettes:
- Mustard, rust, olive, cream: Warm, cozy, and classic. Works with natural wood and wicker baskets.
- Cranberry, pumpkin, taupe, forest: A bit richer, perfect for mantels and entryways.
- Neutrals with tweed: Oatmeal, charcoal, wheat, and a tweed fleck. Subtle and very farmhouse.
Quick testing tip: lay the yarn balls on a table in the order they will hang. Step back. If one color shouts, swap the placement or tone it down with a heather or cream between bold shades. I also snap a fast phone photo. The camera makes off notes obvious.
Example I love: rust leaf, cream leaf, olive leaf, mustard pumpkin, repeat. It looks collected and planned, not matchy.
Real-life budget and time estimate for one garland
I keep it honest here, because time is tight and budgets matter.
- Budget: Under $15 if you shop your stash or grab sale bins. $20 to $25 if you buy new yarn in three to four colors.
- Time: 2 to 4 hours for 12 to 18 motifs, plus a simple chain and assembly. I break it into nap-time sprints or after-bedtime TV time.
A few speed notes:
- Larger hooks and bulky yarn work faster, with fewer stitches per motif.
- DK takes a bit longer but gives that sweet, crisp shape.
- Weaving as you go saves a chunk at the end.
Once you dial in your yarn and tools, the rest is easy. Your garland will look rustic, hold up to curious little hands, and pack away nicely for next year.
Simple Crochet Patterns for Leaves, Pumpkins, and Acorns
Ready for the cutest little motifs? These quick patterns are my go-to when the boys want to “help” and I need something simple. They work fast, use small bits of yarn, and tie right into any Crochet fall garland. I keep the stitches basic and the shapes clean, so everything looks polished when it hangs.
Easy gauge and sizing so motifs match
Exact gauge is not critical, but consistency is. I try to keep my tension steady from start to finish so the shapes feel cohesive. If a piece looks floppy, I drop a hook size. If it feels stiff, I bump up.
Here are the sizes I aim for with DK or worsted yarn and a 4.5 to 5.5 mm hook:
| Motif | Approx. Finished Size |
|---|---|
| Small leaf | 2.5 in long |
| Large leaf | 3.5 in long |
| Mini pumpkin | 2.5 to 3 in wide |
| Acorn | 1.5 to 2 in long |
I make one of each first, then adjust my hook if needed. That quick test saves time later and keeps the garland balanced.
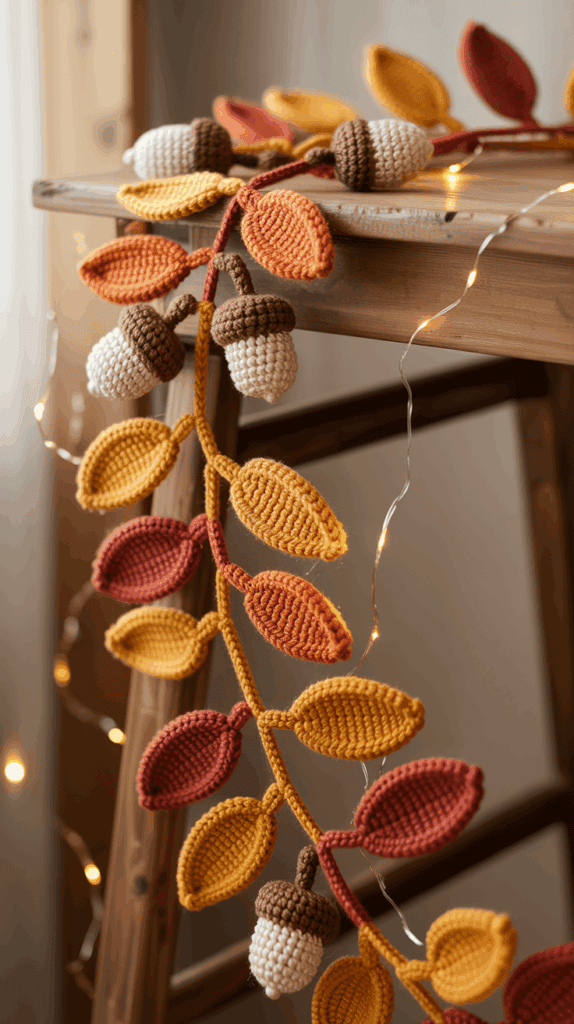
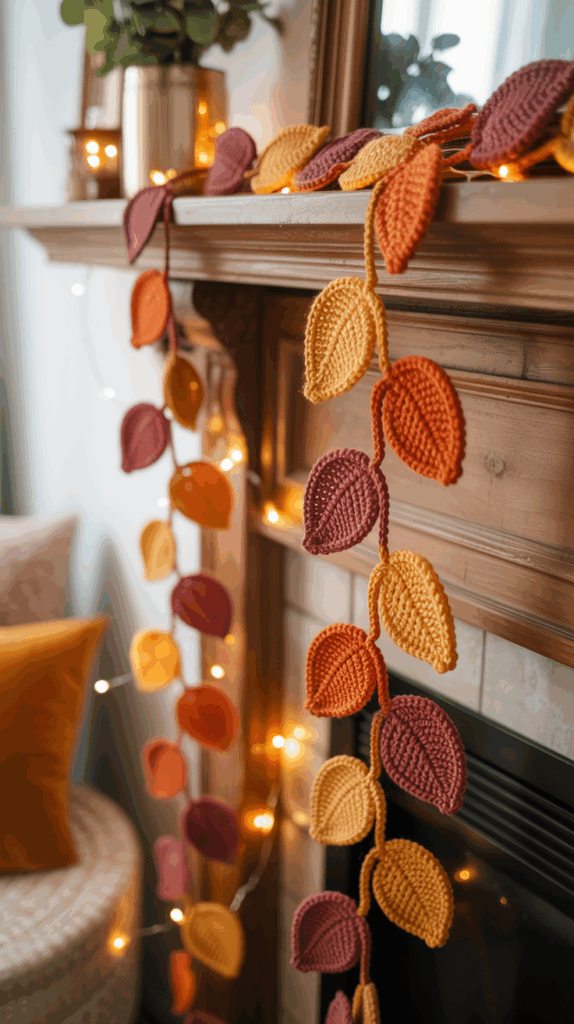
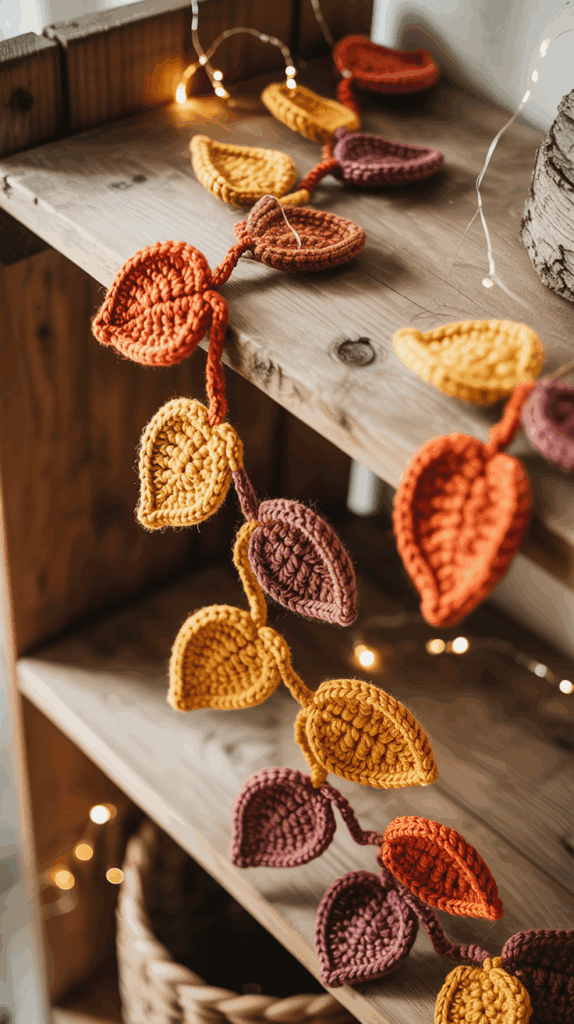
Two quick crochet leaf patterns, small and large
I work these leaves along a foundation chain, down one side and back up the other. The stitch heights grow toward the center, then taper back down, which gives that nice leaf curve. I add a tiny stem at the tip, either a mini picot or a short chain. So simple!
Small leaf pattern:
- Chain 8.
- Down first side: sc in 2nd ch from hook, hdc in next, dc in next, tr in next, dc in next, hdc in next, sc in last.
- Tip and stem: ch 2, sl st in 2nd ch from hook (tiny picot), or ch 3 for a short stem.
- Up the other side (in the free loops): sc, hdc, dc, tr, dc, hdc, sc to mirror the first side.
- Sl st to the first stitch to close. Fasten off and weave in ends.
Stitch counts for small:
- One sc at each end, two hdc, two dc, one tr on each side.
Large leaf pattern:
- Chain 12.
- Down first side: sc in 2nd ch from hook, hdc, dc, dc, tr, tr, dc, dc, hdc, sc, sc in last.
- Tip and stem: ch 3, sl st in 3rd ch from hook for a petite stem, or ch 2, sl st back for a tiny picot.
- Up the other side: sc, sc, hdc, dc, dc, tr, tr, dc, dc, hdc, sc to mirror the first side.
- Sl st to the first stitch. Fasten off and weave in ends.
Stitch counts for large:
- Two sc at each end, two hdc, four dc, two tr on each side.
Make 7 to 11 leaves for a 5 to 6 foot garland. I like a mix of small and large for a natural look. If you want more fullness, add a couple extra small leaves and cluster them near pumpkins.
Tips I use every time:
- Tighten the slip stitch at the tip so the point stays crisp.
- Steam block the leaves on a towel, pin the points, then let dry. It makes a big difference.
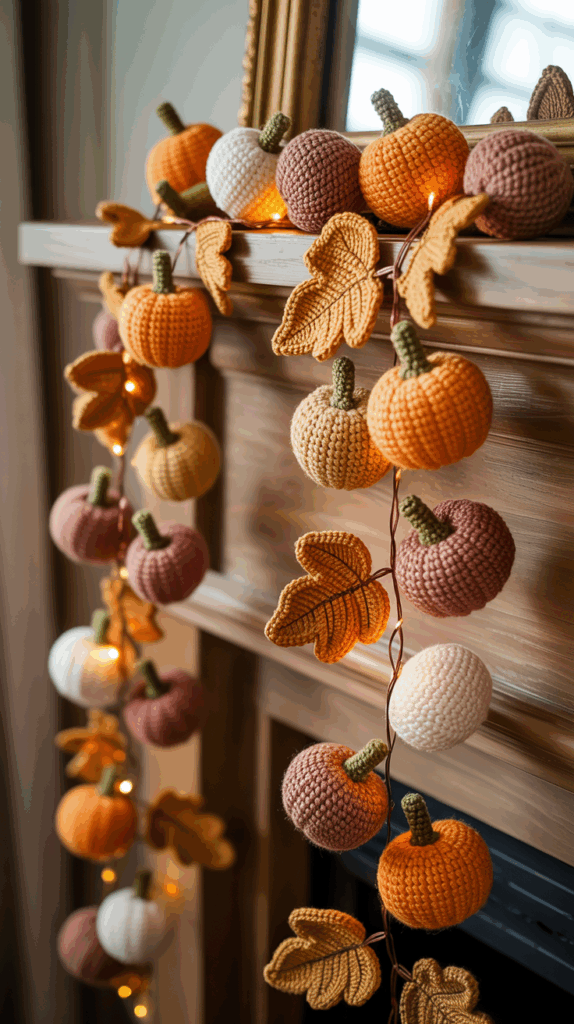
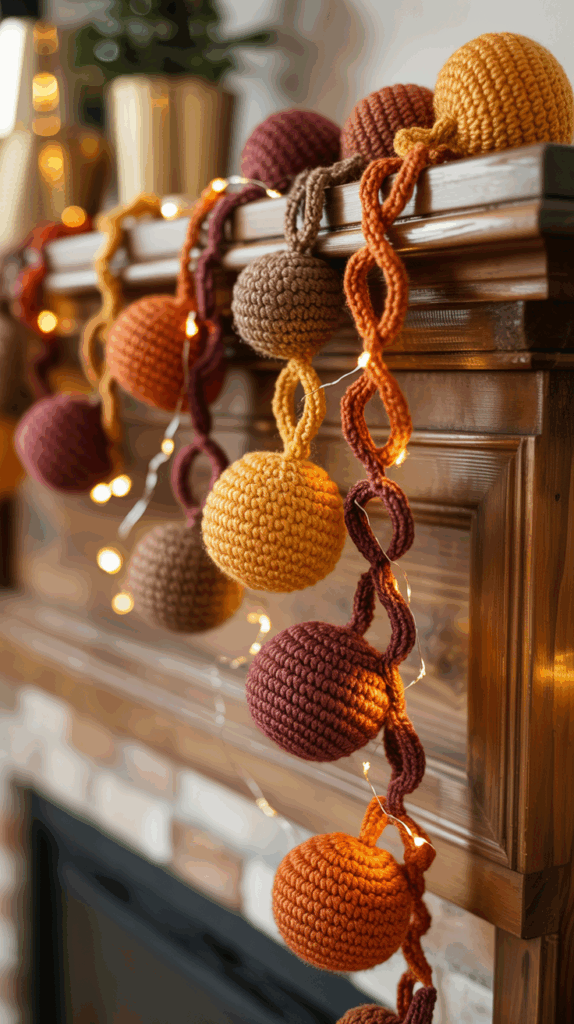
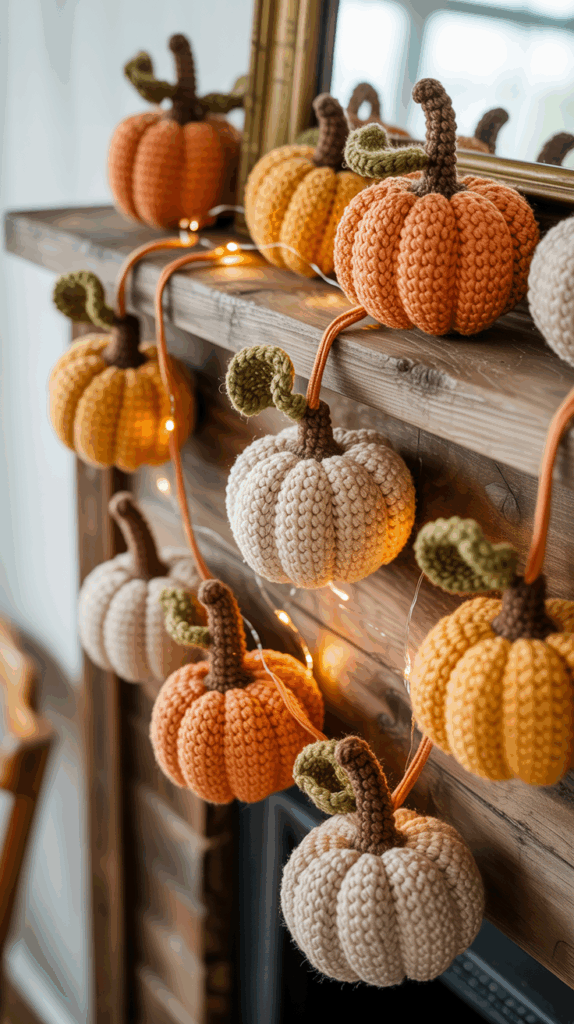
Mini pumpkin with cute ridges and stem
These little pumpkins can be flat or gently stuffed. The ridges come from working in the back loop only, or using front post stitches. I like BLO for speed, and a single front post round for that classic pumpkin look.
Flat circle pumpkin with ridges:
- Round 1: Magic ring, 8 hdc, join, ch 1.
- Round 2: 2 hdc in each stitch around, join. You now have 16 hdc.
- Round 3: BLO hdc around, working 2 hdc in every other stitch to reach 24 hdc, join.
- Optional texture: work one round of FPdc around every third stitch to add soft ribs, then slip stitch around to finish the edge.
- Size check: 2.5 to 3 inches wide.
Stem and tiny leaf:
- Stem: attach brown or green to the top center, ch 4, sl st back down the chain. Fasten off with a small tail and weave into the center for stability.
- Tiny leaf: with green, ch 4, sl st in first ch, sc in next, hdc in last, fasten off. Stitch next to the stem.
Stuff-and-squash option:
- After Round 3, leave a long tail. Lightly stuff, then use that tail and a tapestry needle to wrap from bottom center to top center 5 or 6 times, pulling gently to define segments. Knot securely inside the back. It looks plump and adorable.
- For a lighter garland, skip stuffing and leave it flat. It still hangs nicely and keeps the strand from drooping.
Color tip:
- Mix two oranges, one bright and one rusty. The boys always pick the bright one, and I sneak in the rustic shade for balance.
Tiny acorn with snug cap
These little guys bring the whole strand together. I work the nut as a small ball, then add a darker cap. You can leave the nut unstuffed for a flatter acorn that sits lighter on the string.
Nut (lighter brown):
- Round 1: Magic ring, 6 sc.
- Round 2: 2 sc in each stitch around, 12 sc.
- Round 3: sc around, 12 sc.
- Round 4: sc2tog around, 6 sc. Lightly stuff before closing if you want a rounded nut.
- Fasten off, leave a short tail for closing the gap.
Cap (darker brown):
- Round 1: Magic ring, 6 sc.
- Round 2: 2 sc in each stitch around, 12 sc.
- Round 3: sc around, 12 sc, then slip stitch in next 2 stitches to create a tiny brim look. Fasten off, leave a long tail for sewing.
- Optional stem on cap: attach yarn to the top center, ch 3, sl st back into the same spot, fasten off.
Assembly:
- Place the cap over the nut. Stitch around the edge of the cap and into the nut, snug but not tight. Secure the tail and weave in.
- No-stuff option: stop the nut after Round 2, work Round 3 as sc around, then flatten. Add the cap as written. It looks sweet and hangs flat, which is great for longer garlands.
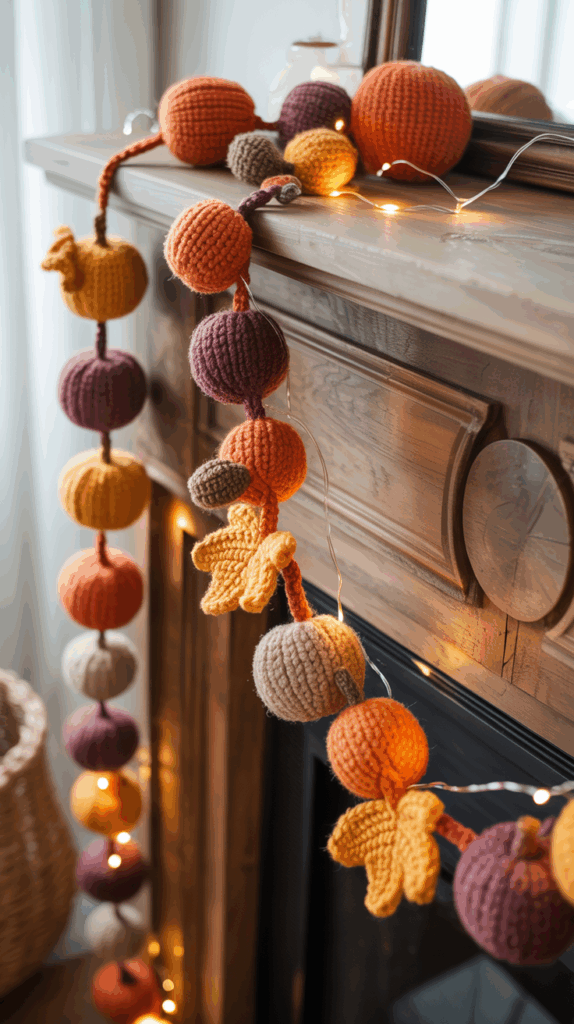
I add 3 to 5 acorns across the strand, tucked between pumpkins and leaves. The scale change gives the garland rhythm, like a little drumbeat of fall on the mantle.
Assemble and Hang: Make Your Garland Strong and Pretty
This is the fun part, where everything comes together and the house starts to glow. I like a calm, tidy process, even with my boys “helping,” so I set us up for success. A Crochet fall garland should hang straight, feel sturdy, and look balanced. With a few simple steps, it will.
Plan the layout and spacing that looks balanced

I always lay every motif on the table before joining. It saves time, and it keeps me from untying knots later. I set a neutral backdrop, then arrange leaves, pumpkins, and acorns in rows.
- Alternate shapes and colors for a natural rhythm. Leaf, pumpkin, leaf, acorn, repeat.
- Spacing that works: 3 to 4 inches between motifs. It looks full, without a heavy sag.
- Symmetry tip: pick a center motif, then mirror left and right. If I place a pumpkin two spots to the left, I place the same to the right. It reads calm to the eye.
- Step back, snap a quick photo, and adjust. A phone photo shows gaps that my busy kitchen lighting hides.
If a color looks loud, split it into two smaller repeats. That little tweak makes the whole strand feel balanced.
Join motifs with a chain base or jute twine
Two easy options, both sturdy and cute. I pick based on mood and how rustic I want the strand to feel.
- Crochet chain base
- Chain the full length first. I aim for 6.5 to 7 feet for a standard mantel.
- Work a single crochet where each motif will sit. Then slip stitch through the top of the motif to attach, and continue the chain.
- For extra hold, add a second single crochet through the motif, then keep chaining.
- Weave tails into the chain in small zigzags so nothing slides.
- Jute twine base
- Cut jute to 6.5 to 7 feet, plus 12 inches for tying loops.
- Tie motifs on with matching yarn or thin twine. I use a double overhand knot or a square knot for grip.
- Pull snug, then thread the tails back through the motif with a tapestry needle. Weave in and out three or four passes so the piece stays put.
- If a motif wiggles, add one hidden stitch through the jute and into the back of the motif.
Both methods look great. The chain gives a soft line, the jute gives a farmhouse vibe that my boys call “campfire rope.”
Block, weave ends, and kid-safe finishing
A little finishing makes everything look crisp and store bought, which is wild for such a fast project.
- Steam or damp-towel block: place motifs on a towel, hover steam or lay a damp cloth and press lightly. Shape points with your fingers. Let dry fully.
- Weave ends for strength: run each tail in three directions. Back and forth, up and down, then snip. This keeps little fingers from pulling anything loose.
- Lock knots with care: a tiny dot of hot glue can secure a knot. I do this at the sink or outside, and I keep the gun far from kid reach.
- Safety first: never hang within baby or toddler reach. Keep strands high and away from cribs, beds, and play zones.
Quick test I always do, I hold the garland by the ends and give it a gentle shake. If nothing shifts, it is ready.
Best places to hang for maximum fall vibes
Pick a spot that catches the eye, then add one small layer for depth. Here are my go-to ideas that always make the house feel cozy.
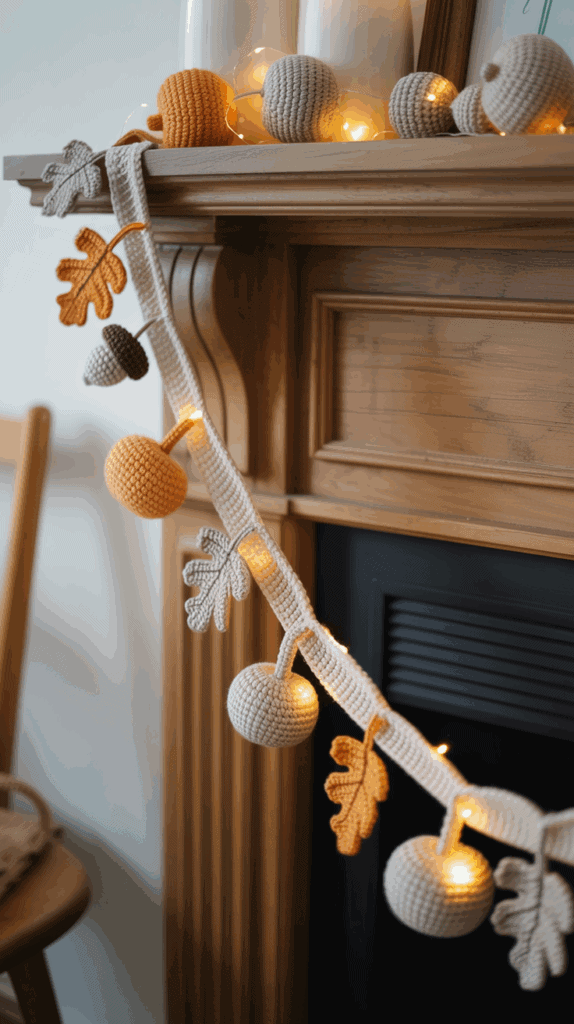
- Mantel over a mirror: drape the garland with a soft smile shape, then anchor the ends. Add a mirror behind to bounce the colors. Tuck a mini pumpkin at each end.
- Stair rail with fairy lights: wrap warm lights first, then tie the garland on top every 8 to 10 inches. It looks magical at night.
- Entry table: lay the garland across the front, then set a basket of pinecones or apples on one side for weight and texture.
- Classroom bulletin board: clip the garland along the top edge. Teachers love the color and kids spot their favorite pumpkin.
- Porch around a window: run it along the trim. Add a plaid ribbon at the corners for a pop.
Use removable hooks or clear clips to protect paint and wood. I place hooks where motifs will sit, so the strand looks clean, not stretched.
One last styling tip, create tiny tying loops at each end of the base, about 3 inches long. Loops make hanging quick, and they keep the garland from creeping when the door closes or the heater kicks on. Done and so pretty!
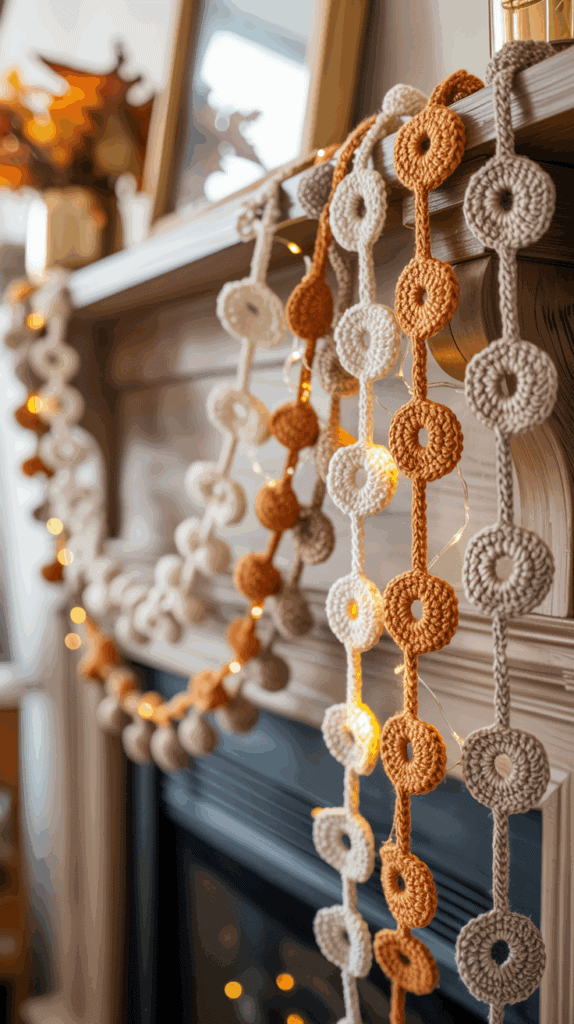
Customize Your Garland: Colors, Themes, and Fast Shortcuts
Here is where the fun starts. I like to tweak the look so it fits the room, the season, and my boys’ mood. A Crochet fall garland can swing farmhouse, boho, or modern with simple choices in yarn, add-ons, and color. I also have quick tricks for busy nights, plus eco ideas that save money and reduce waste. Pick a lane, or mix and match. You cannot mess this up!
From farmhouse to boho, style it your way
I set the tone with color first, then add small details for texture. Think cozy layers that feel collected, not fussy.
- Farmhouse: I start with a jute base for an earthy line. Colors that always work are cream, rust, olive, and wheat. I repeat them in a steady order so it looks calm. For texture, I tie on short cinnamon sticks, tuck in a couple felt leaves, and add one tweed yarn leaf for depth. It smells like fall and looks warm.
- Boho: I use soft cotton string for the base. Then I add tassels, wood beads, and a few macramé knots at the ends. I like tan, clay, mustard, and forest. The tassels fill space and add movement, which is cute near a window.
- Modern: I keep it simple with clean neutrals and one bold color. Try oatmeal, charcoal, cream, and a single pop like rust or cranberry. I keep shapes crisp and spacing even. No extra fluff, just tidy, graphic pieces.
Small add-ons make a big impact:
- Cinnamon sticks: tie with thin twine between motifs.
- Felt leaves: mix sizes and tuck near pumpkins.
- Wood beads: cluster in threes for balance.
Tip I love, build a tiny sample set of three motifs in your palette. Lay them on the mantel and check the vibe with your lighting at night. It saves time later.
Get the kids involved with simple tasks
My boys live for “jobs,” and it keeps hands busy while I stitch. I pick tasks that are safe, quick, and repeatable. We keep it light, and we switch often to match short attention spans.
Here is what works well at different ages:
- Toddlers: hand me stitch markers, pass yarn balls, put finished leaves in a basket. I keep scissors far away and give lots of high fives.
- Preschool: help pick colors, count chains out loud, place motifs on the table in order. I give a small bowl of wood beads to sort by color. They love this.
- Early elementary: measure the base with a tape, string wood beads onto a blunt needle with help, sort finished motifs by shape. They can also glue felt leaves with close supervision.
A few fun prompts:
- “Pick three colors for today’s strand.”
- “Count 30 chains with me, then snack break.”
- “Can you line up all the pumpkins from light to dark?”
Keep sessions short, 10 to 15 minutes, then switch to a new job or a music break. Everyone wins.
Short on time? Try bulky yarn and fewer motifs
When dinner is late and bedtime is near, I go for speed. Big stitches, fewer pieces, still gorgeous.
- Bulky yarn and a larger hook: Grab bulky weight with a 6.5 to 8 mm hook. Make 7 to 9 oversized motifs and space them a bit wider. Big leaves and chunky pumpkins look intentional and cozy.
- Fewer shapes, bigger impact: Stick to two shapes, like large leaves and pumpkins. Repeat the same color order throughout to keep it polished.
- Mix in store-bought pieces: Fill the length fast with felt shapes, wood beads, or tiny pinecones between crochet motifs. I do leaf, bead cluster, leaf, felt pumpkin, repeat.
- Quick base: Use jute string instead of a crocheted chain. Tie on each piece with long yarn tails. Done in minutes.
My favorite fast formula:
- Seven big pumpkins in two oranges.
- One wood bead cluster between each.
- Jute base with 3 inch tying loops on each end.
It looks full, hangs straight, and takes under an hour.
Eco-friendly and stash-busting ideas
I love using what I already have. It saves money, and it gives the garland a story.
- Scrap yarn leaves: Use leftovers to make multi-color leaves. Change colors halfway up the second side for a fun variegated look. It reads natural, like real leaves that shift shade.
- Thrifted yarn: Check thrift stores for partial skeins. Neutrals, tweeds, and heathers are easy to mix. Wash and dry according to the label before you start.
- Unravel an old sweater: Pick a sweater with smooth yarn and simple seams. Cut seams, pull out the yarn, then wind into cakes. I let the yarn relax overnight before crocheting.
- Choose natural fibers near heat: If you hang the garland near a fireplace or heater, lean into cotton or wool blends. They hold shape and handle warmth better than some synthetics.
- Test colorfastness before steaming: Wet a cotton swab, rub a small hidden spot, and check the cloth for color. If it bleeds, skip steaming and block dry.
Smart reuse ideas:
- Turn yarn tails into tiny tassels for the ends.
- Stitch small felt accents from old wool scraps.
- Use cardboard bobbins to keep tiny yarn bits tidy for kids to help.
Simple, cozy, and personal. That is the goal. Pick your theme, give the kids a job, and use what you have. Your garland will feel like home, which is the best part!
Troubleshooting, Care, and Storage for Year-After-Year Use
I want this sweet project to look fresh each fall, even with little hands touching it. My Crochet fall garland gets lots of love, so I plan for quick fixes, gentle care, and simple storage. Here is exactly how I keep every leaf and pumpkin looking tidy and ready to hang again next season.
Fix curling leaves and wobbly pumpkins
Curling leaves and wobbly pumpkins happen, especially when I switch yarns or stitch fast during snack time. These tricks fix it fast.
- Curling leaves
- Go up one hook size for the next leaf. The extra space relaxes the edge.
- Steam block. Pin the points, then hover steam and shape with fingers. Let cool and dry.
- Wobbly pumpkins
- Tighten your tension on the next round. Firm stitches keep the circle flat.
- Add one more round to reach a steady edge. Check that increases are even.
- Shape with a tail wrap. Thread the long tail, wrap from bottom center to top center 5 or 6 times, and pull gently to define segments.
- Sliding motifs on the base
- Add a tiny stitch through the base and into the back of the motif.
- Use a double-knot on jute or a snug square knot. Hide tails by weaving back through the motif.
Quick check I love, lay pieces on a flat surface. If corners curl or a pumpkin rocks, it needs a block or a round.
How to block and shape so pieces lay flat
Blocking makes everything look polished. I keep it gentle and fast.
- Steam method: place motifs on a towel, pin points and curves, then hold an iron a few inches above. Let the steam relax the stitches. Shape with fingers, then let them dry fully.
- Damp towel pinning: cover pinned pieces with a slightly damp cloth, press lightly with your palm, then air dry.
- Shape details: pinch leaf tips, smooth ridges on pumpkins, and press any twist out of stems.
- Fiber note: avoid heavy steam on acrylic. It can flatten the texture. A light hover is enough.
I set pieces near a fan for a quick dry. No rushing with direct heat.
Cleaning tips and moth-safe storage
Kids touch everything, so I plan for easy cleaning and safe storage.
- Spot clean: dab with mild soap and cold water. Pat dry with a towel. Lay flat.
- No soaking: keep it quick to prevent color bleed or warping.
- Drying: reshape, lay flat on a clean towel, and air dry fully before hanging or packing.
- Storage: place the garland in a breathable cotton bag or pillowcase. Add cedar or lavender sachets to keep moths away.
- Avoid: heat, damp spaces, and direct sunlight. Sun can fade color, and heat can warp acrylic.
I label the bag with the year and colors inside. It saves time when fall comes back around.
FAQ: length, yardage, skill level, and left-handed notes
Here are the questions I get most from friends and readers, all in one spot.
- How long for a standard mantel? I make it about 6.5 to 7 feet, including the tie tails. That gives a soft drape without sag.
- How much yarn will I need? About 150 to 250 yards total, depending on motif count and size. Leaves take less, pumpkins a bit more.
- What skill level is this? Beginner-friendly. If you can chain, single crochet, and half double crochet, you are set.
- Left-handed makers: follow the same steps. Mirror photos as needed. Most stitches read the same, so you will be just fine.
If your space is wider, add two more motifs and extend the base chain. For a narrow shelf, stop an inch early and use the extra tail for tying cute loops.

Conclusion
This sweet project turns a busy afternoon into simple joy. A Crochet fall garland adds that rustic sparkle we love, and it grows fast with small wins, one leaf at a time. I keep the steps easy, the colors warm, and the vibe relaxed, which means my three boys stay happy and I get a pretty mantel, win win.
If you want momentum, start tonight with one leaf in your favorite shade. Lay it on the shelf and let it cheer you on. Tomorrow, add a pumpkin or a tiny acorn. Before you know it, you will have a full strand and a home that feels extra cozy.
I would love to see what you make. Share your color combos or photos in the comments, and tell me where you plan to hang it. Ask any questions too, I am here and happy to help. Let’s make fall feel special with small hands, soft yarn, and memories that last.
This post may contain affiliate links. Read the full disclosure here.