My Black and Gold Christmas Tree Ideas for a Glam Holiday
This year I’m going all in on a black and gold christmas tree, and I’m so excited to make it glam and still kid friendly! I’m a mom of three boys, which is hard to believe some days, and I want sparkle that can survive flying Nerf darts and curious hands!
Here’s what you’ll get from me today. I’ll share simple color ratios, easy steps you can follow, safe materials that hold up to kids, and smart budget tips. I’ve also got four ready-to-copy theme recipes, all tested in our busy home, so you can plug and play without stress!
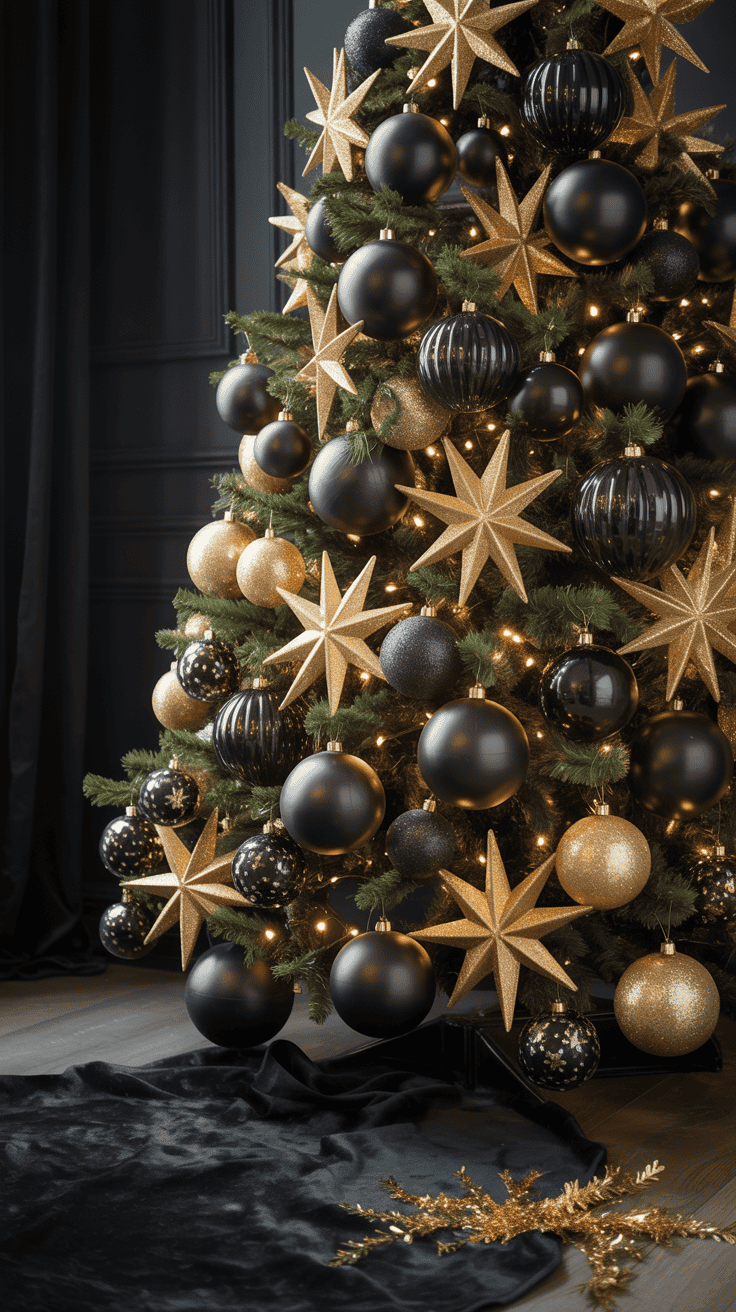
These black and gold ornaments create the most elegant, moody holiday look ever.
I keep it real and practical. Think shatterproof ornaments, soft ribbons instead of sharp hooks, and placement tricks that protect fragile pieces. We’ll use a few hero items, mix in affordable fillers, and get a luxe look on a family budget.
If you want glam that still feels cozy and fun, you’re in the right spot. I’ll help you build a tree that photographs beautifully, stands up to everyday chaos, and makes your living room feel special. Let’s make this holiday shine, with style that works for real life!

Why Black and Gold Feels Glam and Still Works With Kids


I love the balance of shine and depth. Black grounds the tree, gold brings the glow, and the mix looks luxe without feeling cold. On a busy weeknight, this combo hides bent branches and kid-made treasures and still photographs like a dream. A black and gold christmas tree gives me grown-up glam that my boys can touch without stress.
When I decorate with the kids, I think about finishes and texture. Matte black, satin gold, and a little sparkle keep it rich, not loud. Shatterproof pieces make it family proof. The result feels fancy, but the plan stays simple and stress free.
Pick Your Color Ratio for a Balanced Glow

A quick ratio helps your tree look intentional. It also keeps the look kid friendly because you know what to add and when to stop. Here are easy mixes that work every time.
- 60 percent base tree color, 30 percent gold, 10 percent black, for a bright look.
- Example: Layer two strands of 2.5 inch white or champagne ribbon in soft S-curves, add mostly gold shatterproof ornaments, then tuck in a few matte black ball ornaments and two black berry picks.
- 50 percent base tree color, 30 percent black, 20 percent gold, for a moodier style.
- Example: Weave a 2.5 inch black velvet ribbon and a thin gold mesh ribbon, hang more black ornaments in mixed finishes, then pop in gold fern picks and a handful of gold mercury-look balls.
- 70 percent base tree color, 20 percent gold, 10 percent black, for a light, airy feel.
- Example: Keep ribbon pale and soft, add slim gold icicles and a few black bows, then finish with gold leaf picks toward the center for depth.
- Small space tip: Lean brighter. Use more gold and white so the tree reflects light. Keep black to bows, a stripe of ribbon, or a few matte ornaments near the center so it reads chic, not heavy.
If you want it foolproof, place your black pieces deeper in the branches. Let gold and the base sparkle on the outside. You get dimension, and little hands are less tempted.
Must-Have Supplies I Prep Before Decorating

I set everything out first. It keeps the kids busy sorting, and I move faster with fewer messes.
- Shatterproof ornaments, mixed sizes, with a few 4 to 6 inch statement pieces.
- Two types of wired ribbon, 2.5 inch works best, plus one slimmer 1 to 1.5 inch for layering.
- Warm white lights or soft gold lights, enough for 100 lights per foot of tree height.
- Ornament hooks, or ribbon ties for little helpers who skip sharp metal.
- Floral wire, 22 to 24 gauge, for securing ribbon and picks.
- Zip ties for fast fixes and top-heavy stems.
- Command hooks for walls and mantels, size small or medium.
- Tree collar or skirt, wide enough to hide cords and kid clutter.
- Picks and sprays, think gold ferns, glitter berries, black velvet leaves.
- Storage bins with lids, one for fragile items, one for kid-safe pieces.
- Step stool, sturdy, so I can reach the top without wobble.
A quick flow that saves sanity:
- Test lights first. Replace any dull strands now.
- Prep ribbon into 18 to 24 inch pieces so it tucks in clean.
- Sort ornaments by finish and size, then let kids handle the shatterproof pile.
Kid and Pet Safety Tips That Still Look Fancy

I want sparkle that survives soccer cleats and wagging tails. Safety steps can blend right in with the design.
- Keep shatterproof ornaments on the lower half. Use matte and satin finishes so smudges hide better.
- Use secure hooks or ribbon ties. I tie bows right onto branches for a soft, polished look.
- Skip heavy glass at kid height. Place breakables above three feet, deeper in the tree.
- Hide cords along the trunk and under the tree collar. Tape cords along baseboards if needed.
- Anchor the tree to the wall with clear fishing line and a small command hook.
- Check battery packs on garlands and fairy lights. Close covers tight, and place them out of reach.
- Space lights away from fabric picks. Look for flame safe labels on ribbon and sprays.
- Cap sharp pick ends with a bit of floral tape. It prevents pokes and scratches.
- Keep a small bin for stray hooks. I stash it under the tree so pieces do not wander.
One last habit that helps, do a quick morning scan. Straighten a ribbon, secure a loose ornament, and tuck cords back under the collar. The tree stays pretty, the kids stay safe, and I can enjoy the glow all night.
Build the Base: Tree, Lights, and Ribbon Layers That Wow

This is where the magic starts. The right base makes every ornament look intentional, and the whole tree feel lush. I want that glow you can see from the driveway, but I also want kid proof. My boys help every year, so I build a strong foundation first. If you want a polished black and gold christmas tree, the base sets the mood and saves time later.
Choose the Right Tree Size and Shape for Your Room

Size and shape matter more than people think. A tree that fits your room will look chic, not cramped.
- Ceiling height quick guide:
- 8 to 9 foot ceilings, pick a 6.5 to 7.5 foot tree.
- Two story rooms, try a 9 foot tree, or taller if you have space.
- Leave at least 6 inches below the ceiling if you use a tall topper.
- Shape tips:
- Slim tree: Great for apartments, tight corners, or busy playrooms. It keeps floor space clear for kids and pets.
- Full tree: Best for larger rooms or open floor plans. It fills the space and looks rich in photos.
- Color and style:
- Classic green tree: Warm and timeless. Gold pops, black reads soft and elegant.
- Black tree: Bold and modern. Gold shines like jewelry. It hides wires and gaps very well.
- Flocked tree: Soft and snowy. Gold looks airy, black gives contrast. Watch for shedding if little hands love to touch.
- Fast measuring tip: Measure ceiling height, subtract 12 inches for the tree and topper, then pick the closest size. Example, 8 foot ceiling, choose a 6.5 to 7.5 foot tree so the topper has breathing room.
If you are torn, go slimmer and taller. It makes small rooms feel grand, and it keeps pathways clear for little feet.
Layer Lights for Warm, Even Sparkle
I start with lights before anything else. It sets the glow and hides the cords.
- Use this simple formula: 100 lights per foot of tree height as a starting point. Add 25 to 50 percent more for glam. A 7.5 foot tree looks great with 750 lights, and stunning with 900 to 1,100.
- Inside out method:
- Plug in the strand so you can see the bulbs while you work.
- Wrap the trunk first, this makes the tree glow from the center.
- Weave out to the branch tips, then back in toward the trunk.
- Move in sections, top to bottom, so coverage stays even.
- Bulb color: Choose warm white or soft gold for a cozy glow. Cool white can feel icy with black, so I save that for outdoor trim.
- Twinkle settings: Keep it gentle. A slow sparkle adds life without looking busy. I set one timer for the whole room, so lights turn on at dusk and off at bedtime.
- Plug and cord sanity:
- Place the plug at the back, near the stand, so cords drop straight into the tree collar.
- Use one surge protector with a switch you can reach.
- Tape or clip cords along the baseboard if kids or pets zoom by.
- Tuck any extra wire into the trunk, not around the outer branches.
If strands blink or die, replace now. Nothing ruins the mood like hunting for a dead bulb after the ribbon goes on.
Ribbon Tricks That Look Designer in Minutes

Ribbon is my secret sauce. It fills space, adds color, and hides gaps fast. I keep it simple and repeat a few easy moves.
- Choose two ribbons:
- One black velvet or satin for depth.
- One metallic gold for light and sparkle.
- Wired edges help shape and hold.
- Waterfall cascades:
- Cut 2 to 3 foot pieces. For a 7.5 foot tree, plan 18 to 24 pieces total, split between the two ribbons.
- Start near the top. Tuck the first pinch deep into the branch with a small piece of floral wire.
- Let the ribbon flow down 10 to 12 inches, pinch again, then tuck. Repeat to create soft steps.
- Loose S weave:
- Work in sections, using 18 to 24 inch pieces, not one long run.
- Pinch the center of the ribbon, tuck into the tree, then create an S curve that moves across the front.
- Layer gold over black in staggered curves for a designer look.
- Big layered bows:
- Make 3 to 4 loop bows with both ribbons together.
- Place them near the top third, and one or two on the midline. They fill space and highlight favorite areas.
- Secure hold tip: Always pinch and wire ribbon into the inner branches. Hide the wire under the greens. The ribbon grips better, and kids cannot pull it free as easily.
I repeat the same pattern all around the tree. It looks intricate, but it takes minutes once you get a rhythm.
Add Picks and Garlands for Fullness and Texture

This is where the tree turns lush. Picks and garlands fill gaps, add texture, and make the whole design feel custom.
- Group picks in threes:
- Gold leaves for shine.
- Glitter berries for sparkle.
- Soft black feathers for mood and movement.
- Tuck three stems together like a small bouquet, then place them evenly around the tree. Work in the upper third, middle, and lower third.
- Garland ideas:
- Beaded garland: Spiral it from top to bottom, lightly draped, so it catches light without sagging.
- Tuck between ribbon layers: Slide beads into the dips of your S weave. It looks intentional and hides wire.
- Simple placement pattern:
- Start at the top, move down in a gentle S path across the front.
- Mirror that flow on the sides and back so the tree feels balanced.
- Step back often, adjust where the eye feels empty.
- Why picks help:
- They cover open spots fast.
- They anchor ribbon ends.
- They create depth without heavy ornaments at kid height.
If the tree still looks thin, add more picks inside the branches, not just on the outside. That inner layer creates a soft shadow that makes gold pop and lets black read rich, not flat.
Ornaments That Shine Without Stress

I want sparkle that photographs well and still survives little hands. If you are building a black and gold christmas tree, a smart mix of finishes and sizes keeps the shine balanced and kid friendly. I focus on easy rules, sturdy materials, and quick swaps that save time when the boys help me decorate. Simple, pretty, and low stress, that is the goal!
Mix Matte, Glossy, and Glitter for Depth

Here is my foolproof finish mix: 40 percent matte, 40 percent glossy, 20 percent glitter. It reads luxe without looking busy. Matte gives depth, glossy reflects light, and glitter adds a touch of magic.
- Shapes to include: spheres for the base, finials for height, and drop shapes for movement.
- Quick rule: do not cluster all the glitter in one area. Mix finishes inside each zone so the tree looks layered from every angle.
- Placement tip: tuck matte black spheres deeper in the branches. Let glossy gold sit mid to outer layer so they catch the lights.
- Size mix: use lots of 2.5 to 3 inch balls, then sprinkle in a few 4 to 5 inch pieces for scale.
- Luxe touch: add a few black velvet ornaments. They look rich, they hide fingerprints, and they calm all that sparkle in the best way.
I keep glitter up higher, away from curious fingers, and let the boys hang the matte and glossy along the bottom half. It still looks glam, and clean up stays easy.
Statement Ornaments and Tree Topper Ideas

I like a few bold stars that guide the eye. Choose 5 to 7 inch statement ornaments and place three of them in a loose triangle around the tree. One up high, one on the middle left, and one on the lower right. It pulls the look together fast.
- Topper ideas:
- A gold starburst for instant shine.
- A big black and gold bow for soft drama.
- A cluster of gold picks like ferns or fireworks for texture.
- Scale and balance:
- If the topper is tall, keep nearby ornaments simple and matte for 12 to 18 inches around it.
- If the topper is wide, use slimmer drops underneath so the top does not feel heavy.
- Mirror one statement piece on the back side if your tree is seen from multiple angles.
I anchor each large ornament with two hooks or a loop of ribbon. No sagging, no slipping, and fewer heart attacks when a soccer ball rolls by.
Easy DIY Ornaments Kids Can Help Make

These quick projects are sturdy and cute. We set up a plastic tablecloth and play holiday music. The boys love it!
- Black and gold splatter balls
- Use plastic clear balls. Paint the inside or outside black, let dry 30 to 45 minutes.
- Dip an old toothbrush in gold acrylic, flick light splatters.
- Dry 1 hour. Seal with clear spray outside for less mess.
- Salt dough stars with gold edges
- Mix 2 cups flour, 1 cup salt, 1 cup water. Roll, cut stars, poke a hole.
- Bake at 200°F for 2 to 3 hours until hard. Cool fully.
- Paint edges gold. Dry 30 minutes. Seal with clear spray outside.
- Black paper snowflakes with sparkle
- Fold black cardstock squares, cut simple snowflakes.
- Brush a thin line of glue on tips, sprinkle a dusting of fine gold glitter.
- Dry 20 minutes. Seal with a light clear spray outside.
- Mess saver: cover the table, keep baby wipes nearby, and set a drying tray out of reach. Label with names so kids feel proud when they spot theirs on the tree.
Where I Shop to Save Money and Time
I mix big box deals with thrift treasure hunts. Fast, budget friendly, and fun with kids.
- Target: great shatterproof sets, ribbon, and tree skirts.
- Walmart: budget lights and bulk ornament packs.
- Michaels: coupons for picks, floral wire, and craft paints.
- Hobby Lobby: velvet ribbon, seasonal sales, statement ornaments.
- Amazon: quick backups, extra lights, storage bins with lids.
- IKEA: simple balls, neutral ribbon, and affordable tree collars.
- Local thrift shops: unique finials, vintage drops, and sturdy storage finds.
- Smart shopping habits:
- Shop off season in January for 50 to 70 percent off.
- Check after Christmas sales in store the week after.
- Browse Facebook Marketplace for bulk lots, then sanitize and sort.
- Keep a running list on your phone so you do not double buy.
Here is my mini checklist so I do not forget a thing:
- Lights, warm white or soft gold, with extra fuses.
- Ribbon, one black velvet or satin, one metallic gold, both wired.
- Ornaments, matte, glossy, glitter, plus a few 5 to 7 inch statements.
- Picks, gold leaves, berries, or feathers for texture.
- Topper, starburst, big bow, or pick cluster.
- Skirt or collar, wide enough to hide cords and toy cars.
- Storage bins, one for kid safe, one for fragile, both with labels.
With a clear plan and a few kid friendly swaps, the tree sparkles, the budget holds, and the mess stays low. That is my kind of holiday win!
4 Glam Theme Recipes You Can Copy Today

Here are four easy, kid proof recipes to try on your black and gold christmas tree. I use simple ratios, repeatable steps, and sturdy materials so my boys can help without stress. Pick one, pull supplies, and decorate in under an hour. Ready to shine?
Modern Luxe: Sleek and Bright

Clean, glossy, and bright. This one feels fresh and polished, and it photographs so well.
- Color ratio: 60 percent gold, 30 percent black, 10 percent white.
- Ribbons: smooth satin gold ribbon, plus a thin black velvet ribbon.
- Ornaments: glossy gold balls, matte black spheres, a few clear ornaments with gold confetti.
- Topper: gold starburst.
- Picks: keep it minimal.
How I style it:
- Weave the satin gold ribbon in soft S curves, then layer the thin black velvet ribbon on a gentle angle. Keep spacing even.
- Hang glossy gold balls on the outer layer for shine. Place matte black deeper inside for depth.
- Add 6 to 8 clear confetti ornaments across the front and sides for sparkle that reads light, not heavy.
- Place the starburst topper, then step back and balance any gaps with a few more gold pieces.
Kid friendly tweaks:
- Use shatterproof balls at kid height. Save the confetti ornaments for the middle and top.
- Tie ribbons with floral wire inside the branches so little hands cannot slide them out.
Quick tip:
- If your tree looks busy, pull two ornaments out of each foot of space, then add one back where the light hits best. Less clutter, more glow.
Art Deco Sparkle: Fans, Lines, and Geometry

If you love glam with a bit of old school charm, this is a winner. It is clean and bold, with strong lines and a hint of theater.
- Color ratio: 50 percent gold, 30 percent black, 20 percent emerald or champagne.
- Ribbons and garland: black velvet ribbon, thin gold bead garland.
- Decor: fan shaped picks, geometric ornaments, layered bow topper with V cut tails.
- Placement: ornaments in vertical lines for that classic look.
How I style it:
- Create three to five vertical zones from top to bottom. These are your tracks.
- Run black velvet ribbon down each track in short, clean segments. Layer the gold bead garland right beside it for a sleek stripe.
- Hang geometric ornaments, like diamonds and faceted balls, spaced evenly along each track. Add emerald or champagne pieces in every other slot.
- Tuck fan picks near the top third and midline, angled out like small sunbursts.
- Finish with a layered bow topper, tails cut into neat V shapes that echo the vertical flow.
Kid friendly tweaks:
- Choose plastic bead garland. It is durable and forgiving.
- Let kids place the emerald or champagne pieces while you handle the fan picks.
Style cues to keep it sharp:
- Stick to three finishes, matte, glossy, and a touch of glitter. Repeat them in every track for harmony.
- Keep gaps consistent. About a hand width between ornaments looks tidy and luxe.
Moody Glam: Deep Tones With Soft Gold
Rich, cozy, and calm. This one is date night by the tree while the kids build forts under it. I love the depth.
- Color ratio: 40 percent black, 40 percent gold, 20 percent dark green or navy.
- Tree: flocked or black looks amazing, but classic green works too.
- Ribbons: wide black ribbon with soft gold mesh behind it.
- Ornaments: matte black bulbs, brushed gold pieces, feather or leaf picks.
- Topper: low profile cluster of gold sprays.
How I style it:
- Layer the gold mesh first, pushed deep into the branches. It creates a soft inner glow.
- Add wide black ribbon in gentle waves. Keep it low and smooth so it grounds the tree.
- Hang matte black bulbs from the inner and mid layers. Place brushed gold on the outer layer for a warm sheen.
- Tuck feather or leaf picks in groups of two or three, mostly around the middle third for fullness.
- Build a topper with short gold sprays angled low and tight, like a crown instead of a tall spire.
Kid friendly tweaks:
- Choose faux feathers or flexible leaf picks. No sharp ends, and they bounce back if bumped.
- Keep dark green or navy pieces in shatterproof finishes so the look stays neat.
Depth trick:
- Place three black ornaments in a triangle, then pop one brushed gold near the center of that triangle. It pulls the eye inward and looks rich.
Rustic Glam: Natural Textures With Shine

Warm, cozy, and family ready. This recipe mixes farmhouse touches with sparkle, and it holds up to busy little hands.
- Color ratio: 55 percent gold, 25 percent black, 20 percent natural wood or burlap.
- Ribbons: burlap style ribbon layered with a thin gold ribbon.
- Ornaments: wooden beads, matte black bulbs, glitter pinecones.
- Topper: simple layered bow.
- Extras: a few plaid gift wraps under the tree to finish the look.
How I style it:
- Drape the wooden bead garland first. Keep it soft and high so it does not get tugged.
- Layer burlap ribbon in wide loops, then run the thin gold ribbon through the dips. It looks tailored and earthy.
- Mix matte black bulbs with glitter pinecones in a 2 to 1 ratio. Add a handful of natural wood accents near the center for warmth.
- Tie a large layered bow for the topper, using burlap and gold together. Let the tails hang 12 to 18 inches.
- Place a few wrapped boxes in black, gold, or red plaid under the tree. Instant finish, and it hides cords.
Kid friendly tweaks:
- Use plastic or foam pinecones with glitter. Real ones shed and poke.
- Let kids string the wooden beads like they are setting up a necklace for the tree. Big win.
Texture tip:
- Balance rough and smooth. For every two rustic elements, add one shiny gold piece. It keeps the look glam, not heavy.
Need a quick plan? Pick your recipe, pull the ratio, and repeat the same steps around the tree. Simple, pretty, and so fun with kids helping.
Finish the Look: Skirts, Presents, and Room Decor
The tree is dressed, now let’s make the base, the gifts, and the room feel finished. This is the fun part, and my boys love to help! I keep it simple, cozy, and cohesive with my black and gold christmas tree as the star. A few smart picks make the room glow without extra clutter.
Tree Skirt or Collar: Which One and What Size
Both are great, it depends on your home and your pets. I switch between them based on what the boys and our dog are up to that year.
Here is a quick guide to help you choose.
| Option | Look and Feel | Pros | Cons | Best Size Guide |
|---|---|---|---|---|
| Tree Skirt | Soft, cozy, classic | Easy to wash, hides cords, kid friendly | Can shift if kids tug | 44 to 52 inches for mid size trees |
| Tree Collar | Clean, structured, modern | Hides the stand, blocks curious pets and toddlers | Not flexible for odd stands | Wide enough to cover the stand and cords |
- What I use and why:
- Skirt: feels plush, photographs soft, and I toss it in the wash. Great with little kids.
- Collar: looks tidy and keeps the dog from sneaking under the branches.
- Sizing tips that work:
- For a 6.5 to 7.5 foot tree, pick a skirt 44 to 52 inches wide.
- For collars, measure the stand width, add 2 to 4 inches, and make sure it hides plugs.
- Budget ideas:
- Flip a cozy throw into a skirt. Tuck the corners, done in one minute.
- Woven basket collar: remove the basket bottom, or cut a slit up the back. It looks high end for less.
- Kid and pet sanity:
- If your toddler loves to crawl under the tree, go collar.
- If you want soft and washable, go skirt. I always keep a lint roller nearby.
Gift Wrap Ideas in Black, Gold, and White
Wrapped gifts are part of the decor, so I keep them simple and coordinated. I also reuse as much as I can to save money.
Try these easy combos:
- Solid black paper + gold bows: sleek, glossy, and fast. Add a white gift tag for contrast.
- White paper + black ribbon + gold tags: bright and crisp. I love a thin black satin ribbon tied twice.
- Kraft paper + black and gold twine: warm and budget friendly. Add a single gold sticker star for shine.
- Reusable ideas:
- Fabric wraps in black or white are so pretty. Tie with saved gold ribbon from last year.
- Keep a bin of ribbons and tags. My boys know to bring them back to the box after opening.
- Labeling tip for kids:
- Use color coded tags. One child gets black tags, one gold, one white. Even early readers can spot their gifts fast.
- Small styling trick:
- Mix bow sizes. One big bow, two small bows, and a few flat ribbons. It looks layered without extra work.
Make the Whole Room Match Without Overdoing It
I repeat the colors in small hits so the tree stays the focus. Think accents, not a full makeover.
- Simple touches that pull it together:
- A gold pillow on the sofa for a soft shimmer.
- A black throw folded on a chair to ground the space.
- A bowl of ornaments on the coffee table, mixed gold and black.
- A few gold candlesticks with battery candles for safe glow.
- Keep the balance:
- Use black where you want depth, like textiles.
- Use gold for light, like metal accents and candles.
- Let the tree carry the most shine. Keep the rest low key.
- One scent idea:
- Choose pine for fresh and cozy, or vanilla for warm and sweet. I run one diffuser, or set one candle by the entry and one across the room.
- Night playlist, short and sweet:
- 8 to 10 songs keeps it calm.
- I rotate these vibes: soft jazz carols, acoustic classics, and two upbeat kid favorites. We hit play after dinner while we clean up.
- Quick visual rule:
- Add three small gold hits, two black, and one white or neutral. Stop there. The room looks styled, not busy.
Clean Up and Storage Tips for Less Mess Next Year
Future you will thank you for ten extra minutes now. I set a timer, hand each boy a job, and we race the clock. It works!
- Fast cleanup moves:
- Use a lint roller for glitter on skirts, throws, and pillows.
- Vacuum with a brush head around the tree base. Slow passes pick up pine and flock.
- Pack ornaments by color in clear bins. One for gold, one for black, one for mixed.
- Label ribbons and lights with painter’s tape and a marker. Simple and bold.
- Smart wrapping and storage:
- Wrap lights around cardboard or a paper towel tube. Tape the end so it does not slip.
- Store ribbon flat in shallow bins. Stack by color, with loose tails tucked under the roll.
- Keep a small bag for spare hooks, ties, and extra fuses. Drop it in with the lights.
- Photo reminder:
- Take a clear photo of the final tree from two angles. Next year, you can copy the layout in minutes.
- Kid jobs that help:
- One rolls lights, one sorts ornaments by color, one gathers ribbon. Small hands are great at these tasks.
A little order now means less chaos later. When next December hits, you will open those bins, smile, and get straight to the fun.
Conclusion
Glam can be family proof, and I love that balance. With a black and gold christmas tree, I get shine, depth, and zero stress when little hands help. Keep the plan simple, repeat the steps, and let the glow do the work. Pick sturdy pieces, tuck the delicate ones high, and enjoy the sparkle every night.
Here is my quick 5 step checklist I use with my boys:
- Choose a ratio.
- Set the base with lights and ribbon.
- Add ornaments by size.
- Layer picks and topper.
- Finish the base and room.
Start with one theme, then make it yours. Swap a ribbon, shift the ratio, or add a few DIY kid ornaments. Keep it kid friendly, cozy, and photo ready. Small tweaks make a big difference, and your tree will still look polished.
I would love to see what you create. Share your favorite theme in the comments, and drop a photo if you can. If this helped, share it with a friend or pin it for later. From my busy, happy house to yours, cheers to a tree that shines bright and survives playtime!
This post may contain affiliate links. Read the full disclosure here.